everyday food made simple

Growing up in Taiwan, I remember eating a lot of fish as a kid. For those of you that aren’t familiar with the whereabouts of this country: Taiwan’s an island, located approximately 110 miles off the southeastern coast of China.

I’m not going to get into the nitty gritty details about Taiwan… if you want to learn more about it, I’m sure Google and Wikipedia would be more than happy to provide you with some insight…

My whole point about mentioning Taiwan is because since we are an island country, I grew up eating fish probably 2-3 times a week. Not only did people eat lots of seafood, they made it amazing without having to throw it in the deep fryer. I know a lot of people who aren’t fans of seafood – it seems like deep frying fish is how a lot of restaurants try to get Americans to eat fish that were supposed to be good for you.

My mom’s signature dish growing up was probably salmon with bean sprouts. I remember having “salmon with bean sprouts” for lunch for days in a row when I was in middle school that my friend asked me one day, “you’re having that again?!” Looking back, she sure knew how to get healthy omega-3 fatty acids into her child :)

Now I’m living in the Midwest (read: not surrounded by the ocean), I miss being able to eat fresh seafood whenever I please. Yeah, we have the local walleye that’s famous, but when it comes to fresh fish, scallops, shrimp, lobsters, crabs, clams, I’m pretty much out of luck. Oh, I’m sure the high-end fancy grocery stores have them, but nothing really beats fresh-caught seafood…. just another reason why I’m ready to move to the coast.

Since I have to work with what I have, I’ve trying to make fish I buy packaged in individual vacuumed packs (found in the freezer section) taste good. It’s nothing like what I’m used to having, but it’ll do until I have the resources to make fresh seafood.

IMG_0940

Before we started buying salmon, cod, and other ocean fish a few months back, we bought a lot of tilapia. Nothing against tilapia – I’m just used to eating ocean fish instead. I found a big bag of unopened tilapia fillets in the freezer last night, so I figured I should use it up before it goes bad.

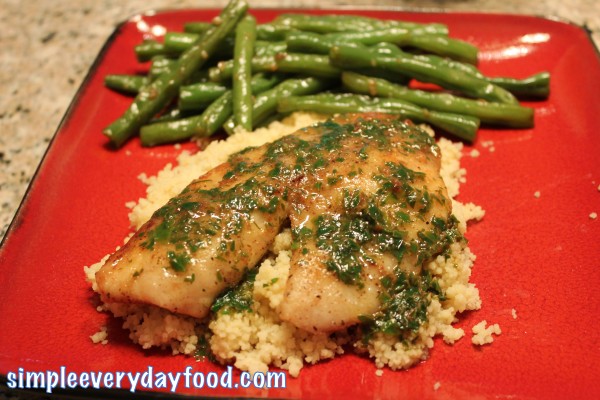
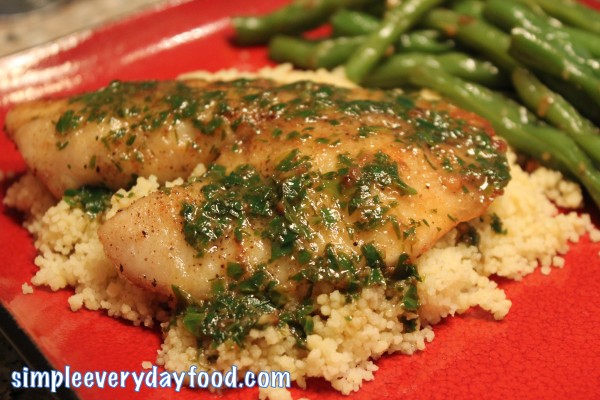
This is probably not the healthiest seafood dish I’ve ever made, but I wanted to try something different, something that I’ve never made before. The lemony buttery sauce was a perfect complement to the fish. Next time, however, I would be a little bit more careful in drizzling the sauce over the tilapia. I added a little too much and it pooled onto the couscous beneath it and gave it a very sour taste – not good. Maybe I’ll drizzle the sauce over the fish before I serve it next time.

IMG_0935

IMG_0937

tilapia with lemon herb butter
Print
Ingredients
  1. 2-3 tilapia fillets (about 12-16 oz total)
  2. Juice of 1/2 a lemon
  3. 1/4 cup fresh parsley, chopped
  4. 4 tablespoons butter, divided
  5. 2 tablespoons olive oil
  6. 1/4 cup flour
Instructions
  1. Chop the parsley and juice the lemon. Set aside.
  2. About 5 minutes before cooking, place tilapia fillets onto a plate lined with paper towels to absorb excess moisture. Season with salt and pepper if desired.
  3. Dust the fillets with a thin coat of flour, shaking off the excess.
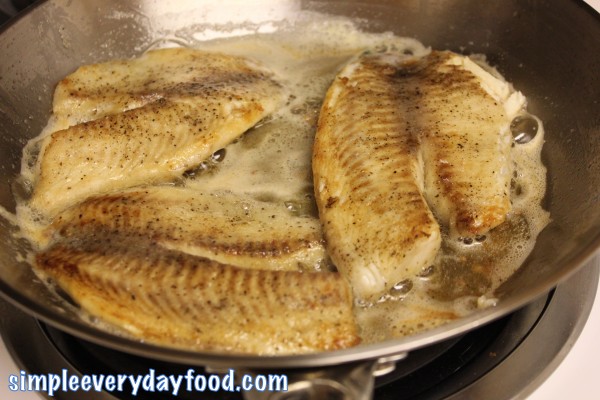
  4. Melt 2 tablespoons of butter and the olive oil in a large skillet over medium heat. Once the butter starts to bubble, add the fish and cook for 3-4 minutes. Don't be too eager and flip the fish too early - the fish will end up sticking to the pan. Just let it cook and it will be easy to flip when it's ready.
  5. Flip the fillets and cook for another 3-4 minutes on the other side or until flaky. Remove to a large plate and keep warm.
  6. Add the remaining 2 tablespoons of butter into the skillet. Once the butter has melted, stir in the lemon juice and parsley. Spoon sauce over fish.
Notes
  1. As lemon pairs well with fish, it doesn't pair well with the rest of your dinner - drizzle the sauce over the tilapia fillets before serving it onto your dinner plate. That way there won't be any excess lemony sauce that ends up overpowering everything else you have on the plate.
Adapted from Food.com
Simple Everyday Food https://www.simpleeverydayfood.com/
The dish overall was a success. It’s been a while since I made fish in a frying pan/skillet (I usually bake my fish), so the biggest accomplishment of the night was being patient enough to let the fish cook on its own for a full 3 minutes before flipping it. Yay me!

IMG_0942

Enjoy!

Sharing is caring! Email this to someonePrint this pagePin on PinterestShare on YummlyShare on FacebookShare on Google+Tweet about this on Twitter

Minnesota is known for three things: its cold snowy winters, its 10,000 lakes and its walleye. I’m sure it’s known for a lot of other things, but those are the first three things that came to mind :)

Let’s talk about that walleye – if you’ve never had a beer battered walleye sandwich before, I highly suggest you to come visit someday and try it out. If a restaurant has it on the menu, it’s very difficult for me to order something else. The batter is usually hot, crispy, and fresh from the fryer while the flaky fish just melts in your mouth…

Just thinking about it is making my mouth water….

Anyway, back to why my blurb about walleye had anything to do with this post – as much as how amazing walleye sandwiches are, I know they’re not all that great for you. So today instead of going out for a walleye sandwich, I decided to make my own healthier version of a fish sandwich, and topped with some spicy mayo to give it a kick of flavor.

I didn’t have any freshly caught walleye, so I compromised with some cod instead (which was still very tasty!). If you don’t have any fresh fish available, you can also use some of those wild-caught frozen fish filets that they sell at your local grocery store.

Ingredients:

  • 2 cod filets (or walleye, or any other kind of white flaky fish)
  • 1 egg
  • 1/2 cup panko bread crumbs
  • for the panko bread crumb seasoning:
    • 1/4 teaspoon salt
    • 1/4 teaspoon black pepper
    • 1/4 teaspoon paprika
    • 1/4 teaspoon garlic powder
    • 1/4 teaspoon onion powder
    • 1/4 teaspoon dried parsley leaves
  • for the spicy mayo:
    • 1/3 cup mayo
    • 1/4 teaspoon paprika
    • 1/4 teaspoon garlic powder
    • 1/4 teaspoon onion powder
    • 1/4-1/2 teaspoon hot sauce, depending on taste
  • 2 club rolls (or hoagie buns, or any kind of your favorite bread)
  • any other kind of toppings – lettuce, tomatoes…

Directions:

  • Preheat oven at 350 degrees.
  • Place cod filets on a plate and pat dry with paper towels. Season with salt and pepper.
  • In a large bowl, whisk the egg – this will function as your egg wash.
  • Combine all the ingredients for the panko bread crumbs (and its seasonings) in a large plate.

IMG_0545

  • Dip a filet into the egg wash. Toss and swish it around a couple times – you want to make sure it’s thoroughly coated with it before moving on!

IMG_0547

  • Transfer the filet to the plate containing the bread crumbs. Flip it around a couple times, making sure that every inch of it is covered with the bread crumbs (this is what will make the filet nice and crispy later).

IMG_0548

  • Transfer the panko-coated filet onto a baking sheet.
  • Repeat with other filet and bake for about 20 minutes, or until fish comes apart easy.

IMG_0551

  • While the fish is cooking, combine all the ingredients for the spicy mayo in a medium-sized bowl. This would also be a good time to prepare any toppings that you would like on top of your sandwich.

IMG_0546

  • Assemble your sandwich and enjoy!

IMG_0555

Note: I usually like to line my baking sheet with some aluminum foil with the edges folded up (kind of like a fence). That way not only will I catch any liquid that may be created during the cooking process, it also saves me from washing the baking sheet when I’m done – all I have to do it crumble the foil up and toss it in the trash!

This is a perfect quick meal that can be healthy and tasty at the same time – instead of the greasiness of the fried fish, the panko bread crumbs gave it a lighter texture and also made me feel better about eating something I enjoy. Plus, not a whole lot of dishes that needs to be cleaned in the end!

Sharing is caring! Email this to someonePrint this pagePin on PinterestShare on YummlyShare on FacebookShare on Google+Tweet about this on Twitter