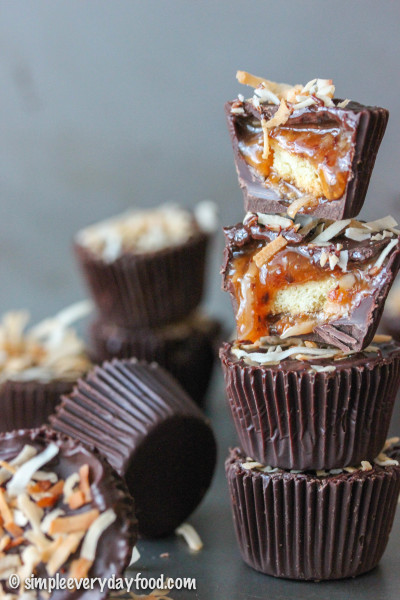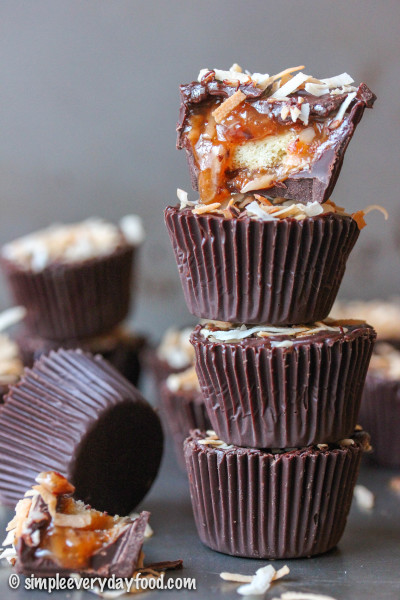
Before we go any further, don’t you just want to lick that caramel drizzle off your screen????
Those who know me know that I’m a sucker for sweets, especially when it’s anything that involves mint and chocolate. So when you see me choose anything over mint chocolate, you know it’s gotta be good. I don’t do it often, but when I do, you know Girl Scout cookie season is upon us
…(I would’ve made you a Dos Equis meme of myself, but I didn’t want to make a fool of myself).
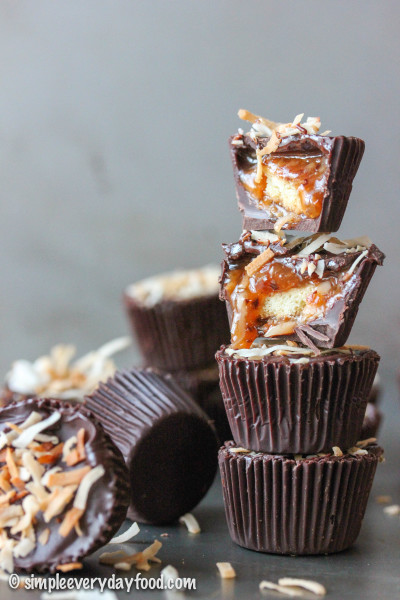
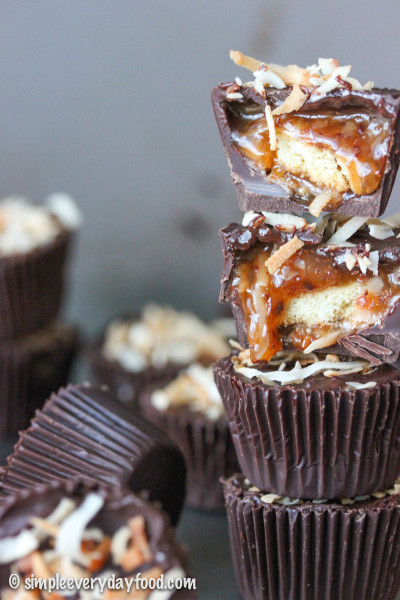
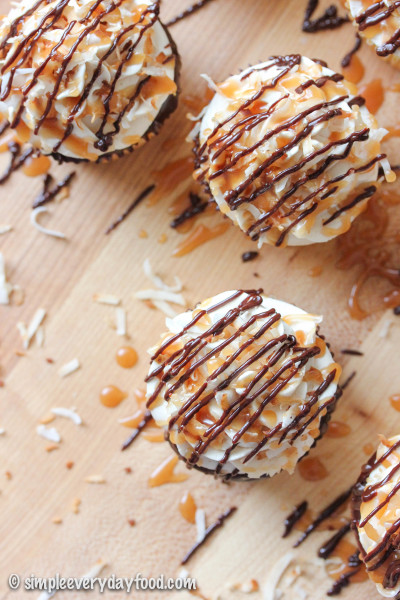
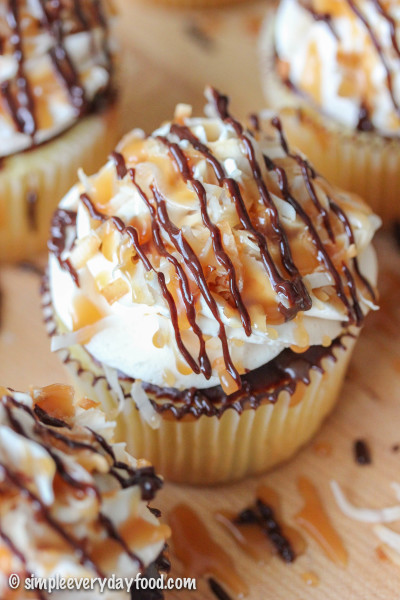
As big of a Thin Mint lover as I am, the Samoas have traditionally been my favorite – the shortbread cookie, toasted coconut, and the sweet chocolate and caramel drizzles over the top are flavor combinations made in heaven.
And believe it or not, I actually still have an entire box of Samoas stashed in the back of my cookie cupboard from last month – it’s a miracle in itself that that box has survived this long!
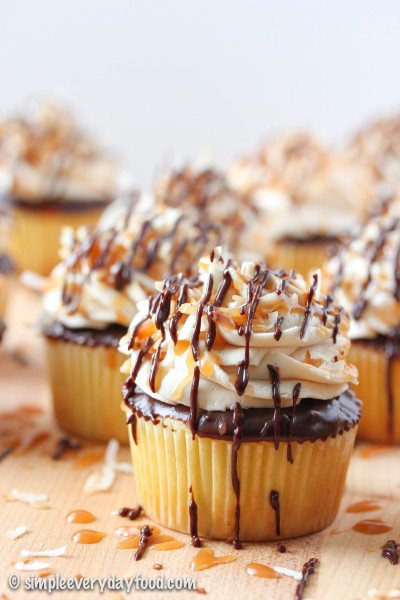
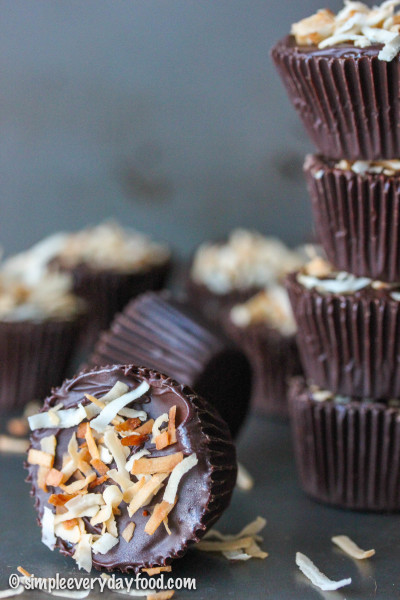
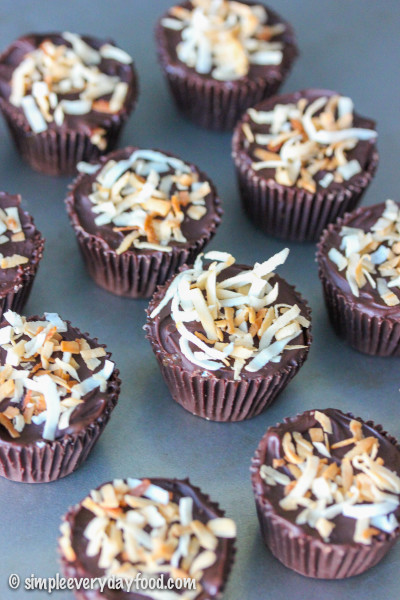
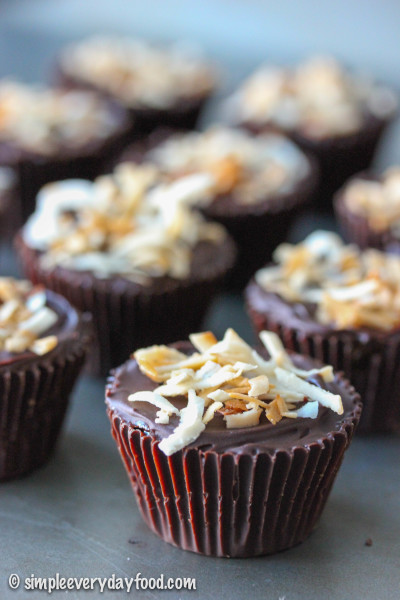
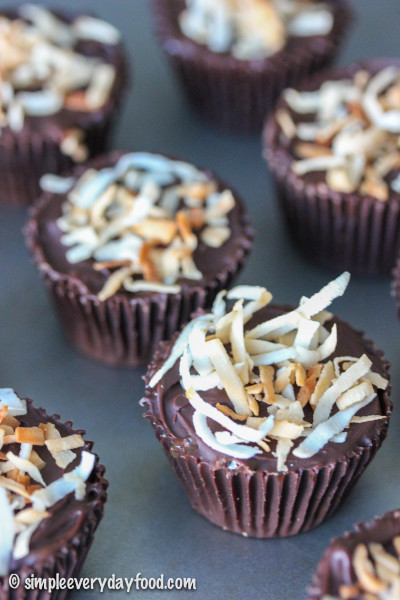
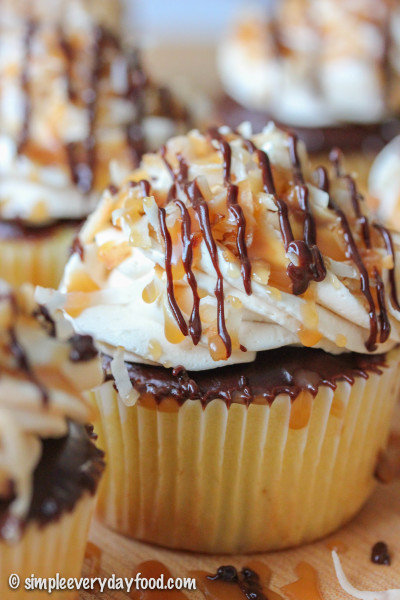
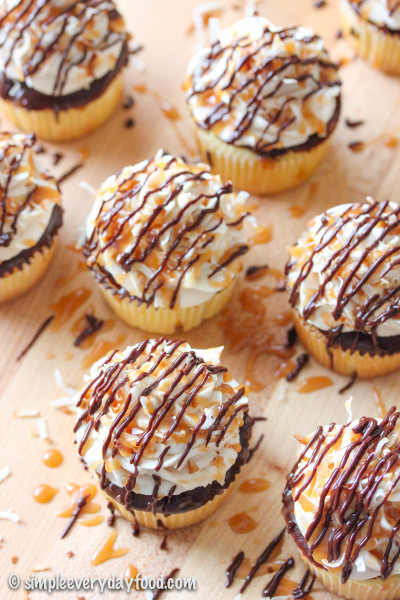
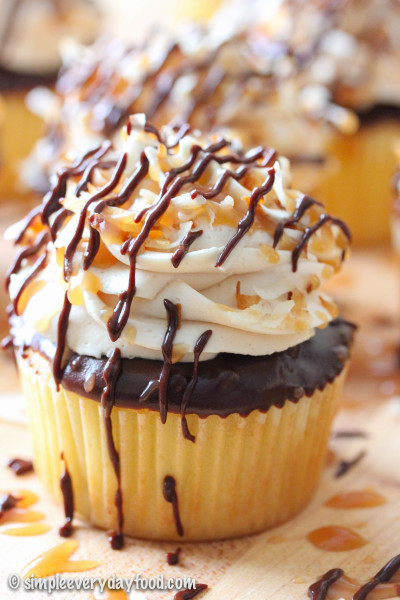
And then there are these ridiculous cupcakes. The cupcakes with layers and layers of textures and flavors that makes it a sweet, decadent, indulgent treat – yellow cake dunked in rich dark chocolate, topped with a sweet fluffy caramel buttercream (made from scratch!), garnished with crunchy toasted coconut flakes and drizzled with more melted dark chocolate and caramel sauce.
Pardon me as I wipe the drool off of my keyboard.
Pretty much everything in this recipe is made from scratch, except for the coconut flakes, because, well, I can’t seem to find coconuts anywhere around where I live, and shredding them myself seems a little time consuming…
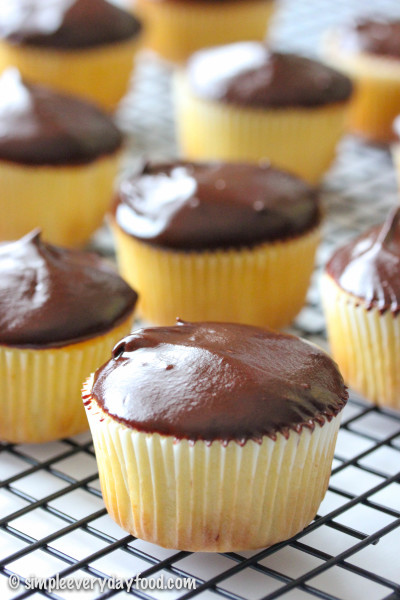
But can we first talk about this homemade cake?! It’s OMGIcanjusteatallthecakesbyitself good. It’s so soft, fluffy, moist, and super duper delicious!
Next up: the caramel sauce. It may seem easier to use store bought caramel sauce for this recipe, but please believe me when I tell you that you definitely need – NEED!!! – to make this homemade caramel sauce. It seriously only took me maaaybe 5 minutes to make and you can definitely taste the difference between the homemade version vs. the store-bought ones. The flavors are more pronounced – stronger, richer, and way more intense in flavor… I promise you totally won’t regret it!
So promise me you’ll make the caramel sauce? Pinky promise? I’ll even give you some tips!
- Make sure you read all the instructions (preferably several times) prior to making the sauce… you want to know what you’re doing before you start the process rather than reading the instructions as you go. Get all the ingredients you need before starting: you want to have everything you need in arm’s reach, because once things start happening, it goes fast.
- Although it only takes a few mere minutes out of your day to make this, it’s kind of a recipe that requires you to babysit it as you make it. That means if you’re a multi-tasker like I am, try to refrain from having five things going on all at once that all require your attention (ahem Pinterest, Instagram, changing the TV channel, trying to get the dog to stop harassing the cat…).
- At the same time, be patient! It may take a few minutes for your boiling sugar-water mixture to start turning colors, but don’t forget to swirl your pan occasionally and have your whisk handy for when the mixture turns amber brown.
- Once things start happening, whisk whisk and whisk some more! Make the whisk your best friend for these few minutes. Be one with the whisk.
- Don’t be scared of making caramel! Seriously, it may seem like a daunting task but it’s really a lot easier than it seems. Plus as cliche as it sounds, it really does taste so much better (I just typed “butter” instead of “better”… hahaha!) than store-bought ones. Not to mention that it will also make your house smell like a caramel candy-making factory.
- You’ll most likely end up with extra caramel sauce, but I’m sure you’ll be able to find things to do with it. I’m pretty sure I’ve ever heard of anyone complaining about extra caramel… have you?!
Add this homemade caramel sauce into some plain ol’ buttercream frosting, and you’ll end up with the a frosting that may just be the highlight of the entire cupcake.
- 1 and 1/3 cups all-purpose flour
- 2 and 1/2 tablespoons cornstarch
- 1 teaspoon baking powder
- 1/8 teaspoon baking soda
- 1/4 teaspoon salt
- 1/3 cup unsalted butter, at room temperature
- 3/4 cup granulated sugar
- 3 tablespoon vegetable oil
- 2 large eggs, at room temperature
- 1 teaspoon vanilla extract
- 1/4 cup skim milk
- 1/4 cup buttermilk
- 3/4 cup granulated sugar
- 3 tablespoons water
- 3 tablespoons butter (I used unsalted butter because that's what I had on hand - you can use salted butter or a combination of both unsalted + salted, if desired)
- 1/4 cup + 2 tablespoons heavy cream, combined in a small bowl
- 1/2 cup unsalted butter, at room temperature
- 2 cups powdered sugar
- 1/3 cup caramel sauce
- 1/2 teaspoon vanilla extract
- 1-2 tablespoons heavy whipping cream, if necessary
- Chocolate sauce* (see Notes)
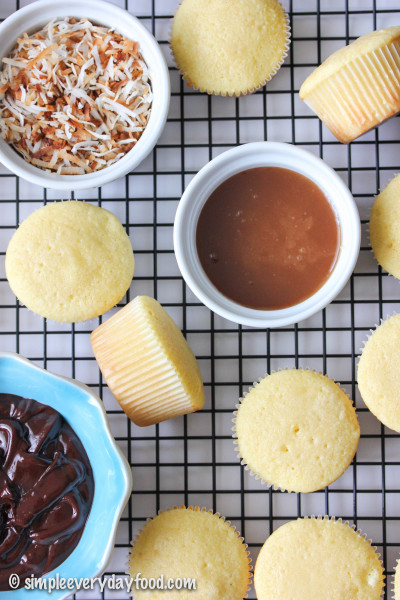
- 1/2 cup toasted coconut
- Preheat the oven to 350 degrees. Line 12 muffin tins with liners and set aside.
- In a medium mixing bowl, combine the flour, cornstarch, baking powder, baking soda, and salt. Stir to combine and set aside. In a separate small bowl, combine the milk and buttermilk, whisk together and set aside.
- In the bowl of an electric mixer, combine the butter and sugar and whip using the paddle attachment on medium-high until pale and fluffy, about 3-4 minutes, scraping the sides and bottom of the bowl if needed. Add in the vegetable oil and mix some more. Add in the eggs, one at a time, mixing on medium-low speed after each addition just until mixed. Add in the vanilla extract and mix some more.
- Add in the flour mixture and the milk mixture into the butter, alternating between the flour and the milk, starting and ending with the flour mixture, mixing until just combined after each addition (flour - milk - flour - milk - flour).
- Spoon cake batter into the lined muffin tins, filling each about 3/4 full. Bake for 16-18 minutes or until an inserted toothpick comes out clean (mine took exactly 17 minutes). Remove from oven and let cool for 5 minutes before transferring to a wired cooling rack to cool completely.
- {Before starting this, read the instructions first - I have tips on how to make the caramel sauce in the post, and gather all your ingredients so you have them nearby}
- Using a heavy-bottomed saucepan, combine the sugar and water over medium-high heat, whisking constantly to make sure the sugar completely dissolves. Once the mixture starts to boil, stop whisking. Carefully swirl the pan every once in a while the mixture continues to boil. Once the mixture reaches a dark amber color, add in the butter and whisk vigorously until butter has melted and is incorporated. Remove from heat immediately, wait 3 seconds, then very carefully pour in the heavy cream while you're constantly whisking the mixture. Be very careful, as it may splatter as you add in the heavy cream. Whisk until smooth and let cool before transferring to a bowl/container to cool completely.
- Using an electric mixer fitted with the paddle attachment, whip the butter on medium-high speed for 4-5 minutes until pale and fluffy. Add in the powdered sugar and beat on medium speed until combined. Add in the caramel sauce and the vanilla extract and continue to beat on medium-high until frosting looks light and fluffy in texture. If the frosting looks too thick, whip in 1 tablespoon of heavy cream at a time until you reach desired consistency.
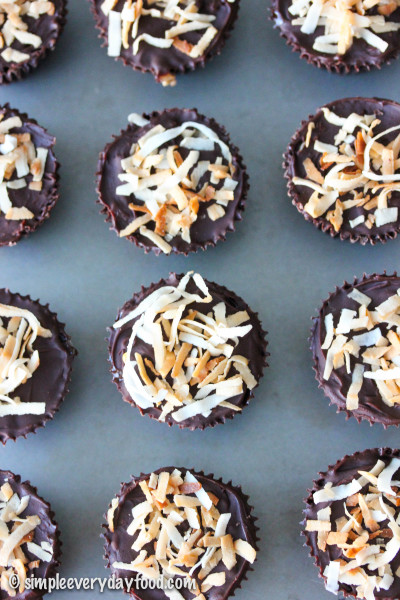
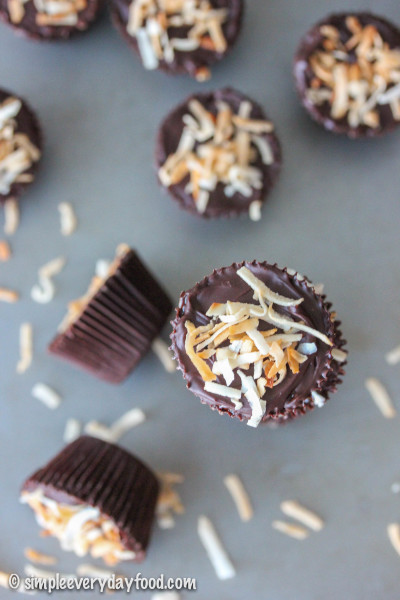
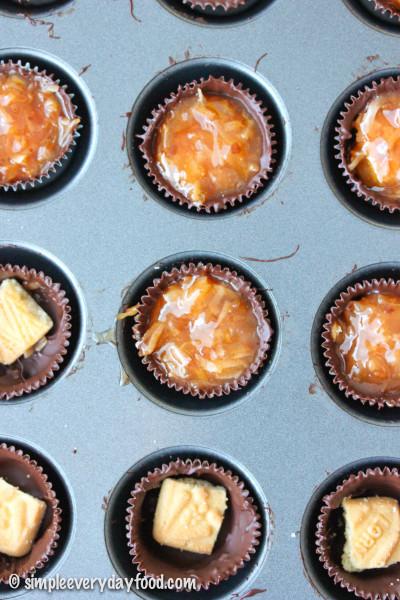
- Dip the tops of the cooled cupcakes into the chocolate sauce, letting the excess run off and return cupcakes back to their upright positions. Let the chocolate have some time to harden prior to piping the frosting, about 10-15 minutes. Pipe the caramel buttercream frosting over the tops of the cupcakes with your favorite piping tip, top with toasted coconut flakes, and drizzle with extra chocolate and caramel sauce. Cupcakes can be stored in an airtight container at room temperature for up to 5 days.
- Makes 12 cupcakes
- * To make chocolate sauce: add 1 cup chocolate chips and 1/4 cup heavy whipping cream in a microwave-safe bowl. Heat in microwave in 30 second increments, stirring after each interval until chocolate is completely melted and mixture is smooth.
© Simple Everyday Food. All images & content are copyright protected. Please do not use any of my images without prior permission. If you want to republish this recipe, please re-write the recipe in your own words, or kindly link back to this post for the recipe.