everyday food made simple

Puppy chow.

IMG_1600

I remember the first time I heard of those two words about 10 years ago, I thought it was something the dogs ate. Well, I guess it could’ve been considering there is a brand of dog food out there named Puppy Chow.

I remember when my friend gave me a bag of peanut butter chocolate puppy chow she made, I smiled and said thank you, but wondered deep down inside why she made food for a dog and gave it to me to try… reluctantly, I popped one in my mouth and fell in love.

“These things are called puppy chow?” Now I’ve learned some people call them Muddy Buddies. Either way, both names still make no sense to me whatsoever. It doesn’t look like any dog food I’ve ever seen, and I don’t even see the relation between these little yummy squares and being “muddy”.

I guess what it’s called doesn’t really doesn’t matter. What matters is that there’s a gazillion different ways you can make these and the possibilities are endless… and they’re delicious!

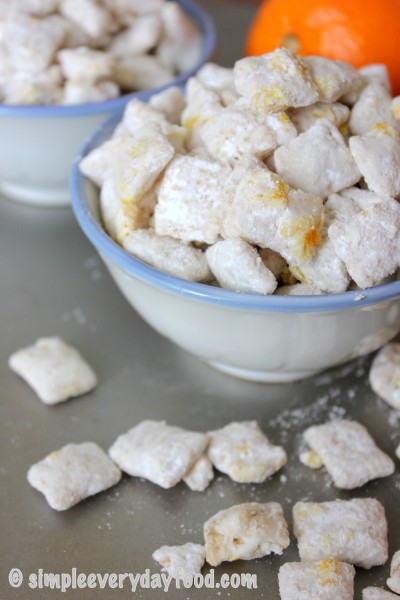
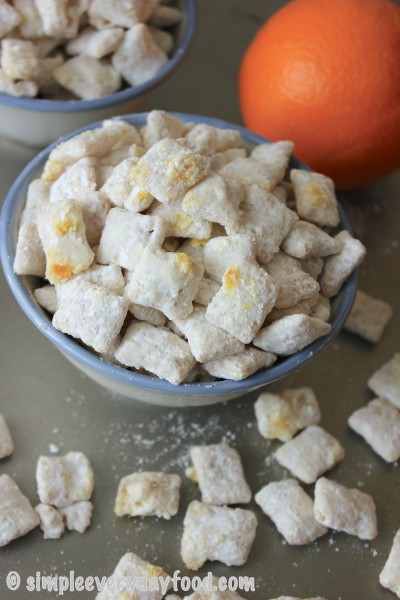
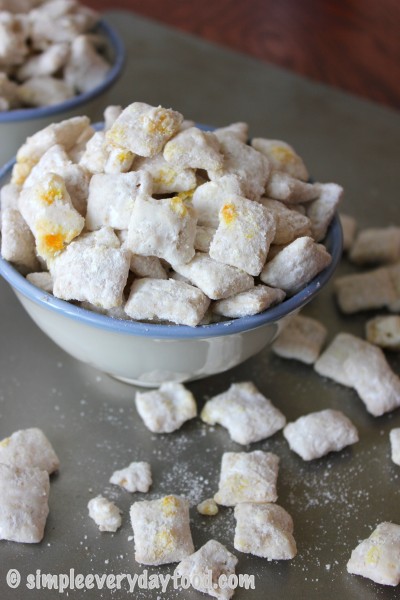
I’ve always stuck to the traditional peanut butter and chocolate combo, so today I decided to try something new. Something fruity, sweet, and doesn’t involve chocolate. These babies are bursting with orange flavors! It doesn’t require artificial food coloring or artificial flavors – they’re 100% made out of real oranges and are a refreshing change to the traditional flavor combos.

IMG_1582

IMG_1588

orange creamsicle puppy chow
Print
Ingredients
  1. 1 box Rice Chex cereal
  2. 16 oz vanilla coating
  3. 2 tablespoons orange zest
  4. 2 cups powdered sugar
Instructions
  1. Place the cereal in a large bowl.
  2. Melt the vanilla coating using a double boiler. Once it's completed melted, pour immediately over the cereal. Stir to make sure cereal is evenly coated with the vanilla mixture. Sprinkle the orange zest over the cereal. Mix some more.
  3. Add in the powdered sugar to the cereal. Stir to combine, making sure all surfaces are coated with sugar. Add more sugar if needed.
  4. Makes approximately 9 cups.
Notes
  1. Another common method is to add the cereal in a large Ziploc bag and mix everything else in that way. It is an easier way to get all the cereal coated with the powdered sugar.
Adapted from The Girl Who Ate Everything
Simple Everyday Food https://www.simpleeverydayfood.com/
IMG_1583

Is there anything that beats something sweet, yummy, and easy to make? I think not! I think from start to finish, these took me less than 30 minutes. I’m all about being efficient and nowadays. It does turn out to be quite a lot of puppy chow in the end, so either pack some in Ziploc bags and give to your friends, or store them in an airtight container and save for yourself!

Enjoy!

Recipe adapted from The Girl Who Ate Everything

© Simple Everyday Food. All images & content are copyright protected. Please do not use any of my images without prior permission. If you want to republish this recipe, please re-write the recipe in your own words, or kindly link back to this post for the recipe.

Sharing is caring! Email this to someonePrint this pagePin on PinterestShare on YummlyShare on FacebookShare on Google+Tweet about this on Twitter

Last summer during the Minnesota State Fair, I was introduced to the amazing deliciousness of cinnamon roasted almonds.

“How have I never had these before?”, I asked myself.

Almonds coated with sweet, crunchy, cinnamon-y goodness…. mmm mmm mmm.

After the State Fair was over, I was on a mission to recreate these tasty addicting snacks on my own. I did, and since this recipe makes a whole lot, I brought some to school to share, where people have been asking me to share the recipe since. Yes, this was a year ago, and I just finally gotten to it now. Talk about procrastination….

IMG_1034

I like my almonds thoroughly coated with the egg white/vanilla mixture to ensure they all get a nice thick crunchy coat of the cinnamon sugar in the end, which is why I used 2 egg whites instead of one. I made these right after I made my key lime pie bars a few weeks back – I felt guilty throwing away four perfectly fine egg whites, so I figured I’d put those egg whites to good use instead of throwing them down the drain.

I’m also a big fan of cinnamon, so I tend to be quite generous when it comes to any recipe that calls for cinnamon – if you don’t want an overpowering cinnamon flavor to your almonds, don’t add the cinnamon in heaping teaspoons (and then some) like I did….

IMG_1012

IMG_1036

I also highly recommend lining your baking sheet with some foil. Not only will it prevent the almonds from sticking to it, it will also save you a lot of time and energy when it comes to cleaning up. Trust me, no one likes to stand in front of the kitchen sink trying to scrape off brunt crusty sugar bits!

cinnamon roasted almonds
Print
Ingredients
  1. 2 eggs whites
  2. 1 1/4 teaspoon vanilla extract
  3. 4 cups raw whole almonds
  4. 1/2 cup granulated sugar
  5. 1/2 cup brown sugar
  6. 3 heaping teaspoons ground cinnamon
  7. 1/2 teaspoon salt
Instructions
  1. Preheat oven to 250 degrees. Line a large baking sheet with aluminum foil. Set aside.
  2. In a large bowl, whisk egg whites and vanilla extract until slightly foamy. In another bowl, combine the sugars, ground cinnamon, and salt.
  3. Add the almonds into the bowl with the egg mixture, toss until all the almonds are thoroughly coated. Mix in the sugar mixture to the almonds, toss some more to make sure the almonds are all coated with the cinnamon sugar.
  4. Spread the almonds onto the baking sheet in one single layer. Bake for 75 minutes, tossing 2-3 times in between.
  5. Remove from oven and cool completely. Store in an airtight container for 1-2 weeks.
  6. Makes about 4 cups
Simple Everyday Food https://www.simpleeverydayfood.com/
They’re good warm out of the oven, or after the almonds have had a chance to cool to room temperature.  I tend to like my almonds cooled to room temperature, but I did catch the hubs nibbling on them as they were cooling on the kitchen counter :)

Trust me, these almonds are yummy, and I bet you can’t just eat one (or just a handful for that matter)!

IMG_1029

Enjoy!

Sharing is caring! Email this to someonePrint this pagePin on PinterestShare on YummlyShare on FacebookShare on Google+Tweet about this on Twitter

I know it’s only Wednesday and the weekend still seems so far away, but as it gets closer and closer to Friday night, I start planning our weekend menu. This usually includes something homemade and yummy for dinners, some sort of a dessert (if I have the time to bake something delicious), and occasionally something healthy to munch on as well.

Just to be clear, I’m not always this ambitious… but every once in a while when I don’t have a whole lot to do for school, I like to go all out and spend the weekend cooking and baking.

Going along with the healthy diet we’ve been on the past month, I’ve decided to make some homemade apple chips, sprinkled with cinnamon and brown sugar. Turns out, these are super easy (and tasty) and they don’t take a whole lot of prepping time. Not only that, they’re a lot healthier than the store-bought version, and probably a whole lot cheaper too.

Healthy, tasty, simple, and cheap? Sounds like a winner to me!

And just an FYI, these take about two hours to bake in the oven. During these two hours, your house will smell amazing. Think about those apple cinnamon and brown sugar candles you see stores selling during the holidays – these smell exactly like that, but better (because frankly, real ‘apples & cinnamon’ smells better than burning scented wax).

To make the apple slices, I highly recommend using a mandolin. I guess a steady hand and a sharp knife would work too, but using a mandolin is much safer and quicker.

Ingredients:

  • 2 Granny Smith apples
  • 4 tablespoons brown sugar
  • 2 tablespoons cinnamonIMG_0586

Directions:

  • Preheat oven to 225 degrees. Line two baking sheets with parchment paper.
  • I’m not a fan of eating apple cores, so I halved my apples and removed the cores before placing them onto the mandolin.IMG_0588
  • In a shallow dish, combine the cinnamon and brown sugar. Mix well.
  • Using the mandolin, slice the apples as thin as possible. Toss them in the cinnamon mixture and make sure they’re all coated with cinnamon and sugar – no one wants that piece with no seasoning on it!IMG_0591
  • Place apple slices on baking sheets and bake for 1 hour.

IMG_0594

I realized I only had about 6″ worth of parchment paper left, so I simply put my apple slices on the baking sheets. The parchment paper will prevent your apples from sticking to your sheet, making your next step easier.  

  • After the first hour, remove sheets from oven and flip the slices over with tongs. Put the sheet that was on the top rack to the bottom rack, and the sheet that was on the bottom rack to the top (for even baking). Bake for another hour.
  • Remove from oven and let cool.

Enjoy!

Recipe adapted from The Italian Dish

Sharing is caring! Email this to someonePrint this pagePin on PinterestShare on YummlyShare on FacebookShare on Google+Tweet about this on Twitter

I went and bought a whole thing of kale for my zuppa Toscana recipe last night, and was left with about half of what I started after I made the soup.

Oh what should I do with the rest of the kale, I asked myself. I couldn’t just throw the vitamin-packed vegetable to waste – I was raised to appreciate everything we were able to afford, and not to throw anything that’s perfectly fine in the garbage.

I guess I can make some kale chips with them. I’ve never even tried kale chips before, let alone make them. I’ve heard of them before, but that’s about the extent of the relationship between kale chips and I. Potato chips, on the other hand…. Yeah, I pretty much love potato chips.

For those that aren’t familiar with kale, here’s a little quick lesson: kale is a relative of broccoli and cauliflower. It is also packed with vitamin C, vitamin K, and calcium. It’s a green leafy vegetable. So whenever you see brochures or literature that tell you to eat “green leafy vegetables”, well, eat some kale.

Kale chips are healthier than potato chips. Their nutritional value is higher while still satisfying your craving for something salty and crunchy. Of course you can go to the store and just buy pre-made kale chips. However, if you make them at home, they’re probably healthier (less preservatives), and you can season them however you want – cheese, salt, pepper, vinegar… the possibilities are endless!

After trying it, I’m totally sold. It’s delicious! I think from now on I’ll be making this instead of popcorn on movie nights in our house :)

Ingredients:

  • A few handfuls of kale – stems removed, torn up in bite-sized pieces
  • 1/4 teaspoon salt
  • 1/4 teaspoon paprika
  • 1/4 teaspoon garlic powder
  • 1/4 teaspoon onion powder
  • A pinch of cayenne pepper – or as spicy as you want
  • 1 tablespoon olive oil

IMG_0483

Directions:

  • Preheat oven to 300°F
  • In a small bowl, combine the salt, paprika, garlic powder, onion powder, and cayenne pepper.
  • Place kale pieces in a large bowl and drizzle the olive oil over it. Toss to coat, making sure that all pieces are evenly coated with the olive oil.
  • Sprinkle half of the seasoning onto the kale, toss to coat.

IMG_0484

  • On a baking sheet, spread kale out in a single even layer.
  • Sprinkle the rest of the seasoning over the kale.

IMG_0489

  • Bake for 20 minutes, stirring halfway in between.

IMG_0494

Enjoy!

Note: as you can see, what seemed like a lot of kale pieces didn’t yield a whole lot of kale chips in the end, so if you plan on sharing yours with other people, make sure you double (or even triple!) the recipe so there’s plenty to go around.

Sharing is caring! Email this to someonePrint this pagePin on PinterestShare on YummlyShare on FacebookShare on Google+Tweet about this on Twitter