everyday food made simple

Just a few weeks ago, we finally decided to re-join a gym. I figured with all the cupcakes, cookies, and bars that come out of my kitchen, it would be a matter of time until my pants start to get tighter and the number of the scale to go upwards… okay okay, I lied. All that was actually starting to happen and I was horrified one day when I put on my jeans and realized they were getting slightly snug around the hip and waist and thigh area.

So with the new year and multiple gyms offering “New Year Resolution” rates, the mister and I joined a local gym for only $1 each and made a pack that we would go at least 3 times a week, Monday-Friday, alternating between cardio and lifting. I’m happy to say that a few weeks into it, we’ve been staying strong and going almost everyday after work and I definitely feel better about myself afterwards.

Since Valentine’s Day is just around the corner (errr, I mean, tomorrow) and with us trying to live a healthier lifestyle, today I bring to you an easy, quick, cheap, relatively-healthier Valentine’s Day recipe that will satisfy your sweet n’ salty tooth but not break the bank at the same time.

IMG_5504 copy

IMG_5448 copy

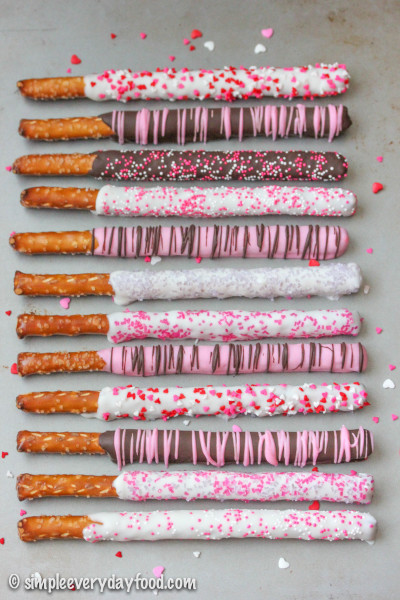
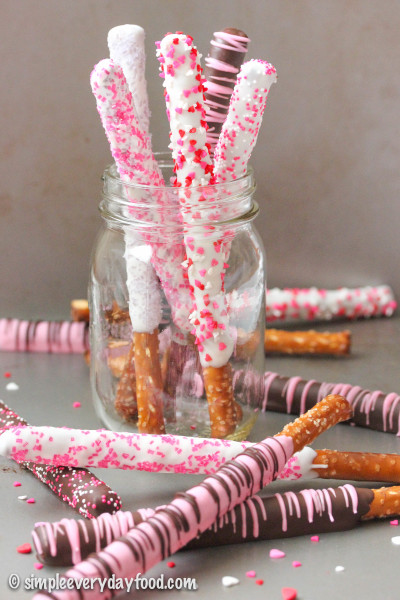
If you just realized that tomorrow is Valentine’s Day and have started to panic about what to get your significant other, you should totally make these pretzel rods because even though they’re easy and cheap to make, they look beautiful and your honey will think you spent a good fortune on them at the store.

IMG_5426 copy

IMG_5509 copy

IMG_5493 copy

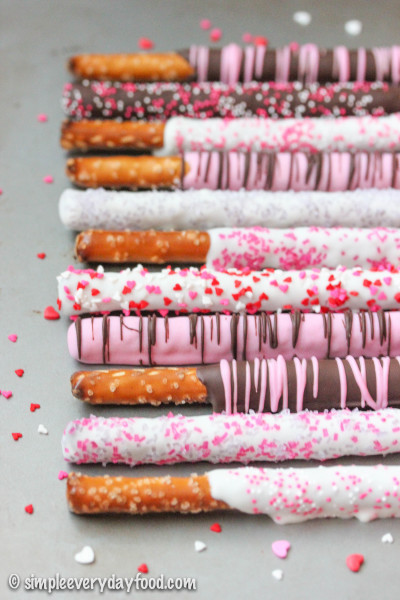
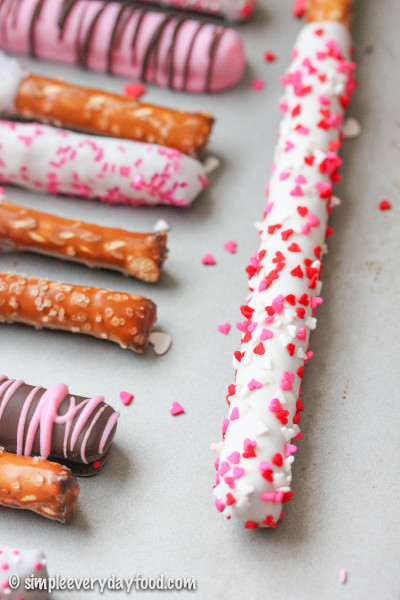
Plus, you can always customize them to however you want them – dark chocolate, milk chocolate, white chocolate… chocolate drizzle, sprinkles (always say yes to sprinkles), crushed candy/nuts, or just plain (but that’s soooo boring!). Add a few drops of gel-based food coloring into the melted white chocolate for special occasions. The combinations really are endless and it can always be a fun little project for you and the little ones (if you have little ones) on a snowy day.

IMG_5423 copy   IMG_5418 copy

IMG_5478 copy

IMG_5440 copy

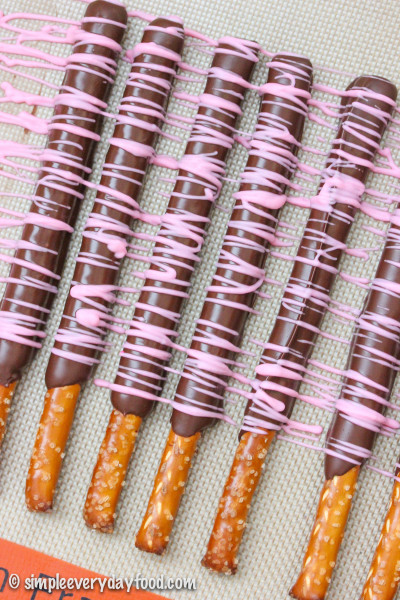
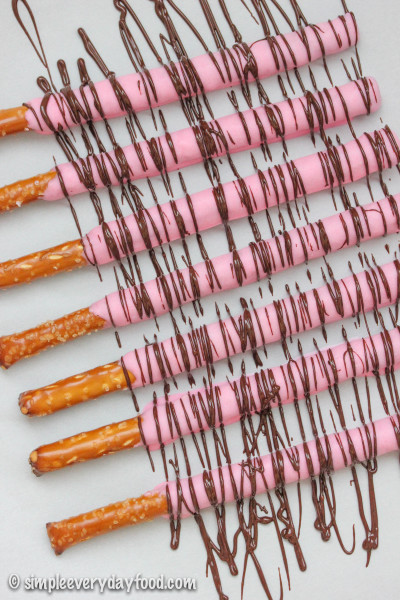
The trick to dipping these is to pour the melted candy melt/almond bark into a tall skinny glass for easy dipping. Swirl the pretzel rods in it, leaving a few inches on the end to hold on to, then let the excess drip back into the glass and place the pretzel rod on a parchment paper-lined baking sheet. If your candy melt starts to harden again, scrape it back into the saucepan and reheat until melted. See? Suuuuuuper simple. Sprinkle your garnishes on right away before the chocolate coating hardens, otherwise you’re left with plain old boring chocolate-covered pretzels. And why have plain pretzel rods when you can have ones with sprinkles?!

IMG_5495 copy

chocolate covered pretzel rods
Print
Ingredients
  1. 20 pretzel rods
  2. 16 oz vanilla-flavored candy coating
  3. Assorted sprinkles for decorating
  4. Gel food coloring, optional
Instructions
  1. Line two baking sheets with silicone baking mats or parchment paper. Set aside.
  2. In a medium saucepan, melt the candy coating over low heat, stirring occasionally until melted (you can also use a double boiler if you have one).* Transfer the melted candy coating into a tall, narrow glass or container for easy dipping. Carefully dip pretzel rods into the candy coating, leaving a few inches at the end uncoated. Gently tap off the excess and sprinkle the sprinkles over the coated pretzel rods, if desired. Place on baking sheets and let the candy coating harden completely. Pretzel rods can be stored in an airtight container at room temperature for up to one week.
Notes
  1. * Squeeze a few drops of gel food coloring into the completely melted candy coating until you reach the desired color.
Simple Everyday Food https://www.simpleeverydayfood.com/
© Simple Everyday Food. All images & content are copyright protected. Please do not use any of my images without prior permission. If you want to republish this recipe, please re-write the recipe in your own words, or kindly link back to this post for the recipe.

Sharing is caring! Email this to someonePrint this pagePin on PinterestShare on YummlyShare on FacebookShare on Google+Tweet about this on Twitter

After a few months after it came out in theaters, yesterday I finally rented Monsters University on DVD. Has anyone else seen it? The first one was perhaps my favorite Pixar movie ever, so naturally I’ve been itching to watch the prequel to it ever since it came out. I absolutely loved it and thought little Mike Wozowski was the cutest thing ever. I swear I’m just a 12 year old kid in a 27-year-old body….

After lounging around in my PJs all day yesterday, I finally mustered enough energy to go to Kowalski’s to return it last night. You know you’re in the medical field when you say “let me go upstairs and change into something ‘normal’ real quick” before going to store, means changing into a pair of scrub pants. Not yoga pants, not jeans… scrubs. Apparently it’s what I now consider “normal” attire.

I didn’t even notice it until Brian laughed and pointed that out to me at the store. In my defense, I’ve been wearing scrubs 5-6 days a week for the past 8 weeks. I go to work, I wear scrubs. I go to class, I wear scrubs. I go run errands and grocery shop after work, I’m in scrubs. I don’t really go anywhere else so I don’t get to wear a whole lot of “normal people” clothes anymore. On my day off, I don’t really go places so I stay in my PJs.

[sigh]

Since it’s December and December marks the official start of the Christmas season, it’s only right for:

1. Hanging up Christmas decorations around the house…. (Bentley – @boxerbentley on Instagram – helped hang Christmas lights)

photo

and

2. The first post of December to be something that involved mint and chocolate.

News flash: I’m obsessed with anything that involved mint and chocolate. Every year when stores stock their shelves up with anything mint chocolate, I go crazy and start hoarding all things mint chocolate, enough to last me for the next 11 months. Candy cane coffee, mint M&Ms, peppermint M&Ms, candy cane Oreos, peppermint bark, Andes peppermint candies, all kinds of mint chocolate baking chips, Dove mint chocolates… you name it, I probably have it in my cupboard.

IMG_2379 copy

#mintchocolate4life

This recipe is made in the similar manner I made my pumpkin spice puppy chow back in November – seasonal Hershey’s Kisses mint truffles melted down, poured over gluten free chocolate Chex, coated with powdered sugar. It’s sweet, minty, and really addicting! They’re so addicting that I’m bringing some to work today to share so I don’t eat 5738293 grams of sugar in two days….

IMG_2388 copy

IMG_2390 copy

mint chocolate puppy chow
Print
Ingredients
  1. 1.5 bags of 10-oz Hershey's mint truffle Kisses, unwrapped
  2. One 14.25-oz box of chocolate Chex cereal
  3. 3 cups powdered sugar
Instructions
  1. Pour the Chex cereal into a large bowl and set aside.
  2. Using a double boiler, melt the unwrapped Hershey's Kisses until smooth, stirring occasionally. Pour chocolate mixture over the Chex cereal. Stir to make sure all the cereal is coated with chocolate.
  3. Pour the powdered sugar into the large bowl of cereal mixture. Toss and stir thoroughly to make sure everything is evenly coated with the powdered sugar.
  4. Store in an airtight container for up to 7 days.
  5. Makes about 8 cups
Simple Everyday Food https://www.simpleeverydayfood.com/
Along with being delicious, this recipe is also super easy to make. It only requires 3 ingredients! Three! And there are only about 3 steps to the whole thing as well. From start to finish, it took me less than 30 minutes to make. No baking, no cooling, and not a whole lot of measuring.

IMG_2394 copy

IMG_2385 copy

Yep, you’re welcome :)

If you’ve been following my blog since the beginning of time, you’ll know that I’m a fan of puppy chow… here are a few other versions for you to try!

pumpkin spice puppy chow

IMG_2075 copy

apple pie spice puppy chow

IMG_1768 copy

orange creamsicle puppy chow

IMG_1600

© Simple Everyday Food. All images & content are copyright protected. Please do not use any of my images without prior permission. If you want to republish this recipe, please re-write the recipe in your own words, or kindly link back to this post for the recipe.

Sharing is caring! Email this to someonePrint this pagePin on PinterestShare on YummlyShare on FacebookShare on Google+Tweet about this on Twitter

About a week or two ago when I was getting ready to transition to my week of overnight shifts for my internship, I decided I needed some motivation to stay up later than 2 a.m.. I figured I could slowly train my body to get used to going to bed at a later time, so getting off of work at 8 a.m. wouldn’t seem like such a ridiculous idea. What better way to stay awake than making something that smells delicious in the oven in the middle of the night?

IMG_2192 copy

The actual baking time for this recipe really only takes about half an hour or so, but the prep time leading up to it literally took about 8 hours. If you just slightly freaked out over how long this is going to take, don’t worry – it’s nothing that requires constant attention. It’s a good recipe to work on if you’re at home all day running around doing laundry, chasing after kids, going to the grocery store, or even if you’re just having a lazy day sitting around watching TV on the couch.

The reason it takes so long is because the key to these chickpeas being perfectly crunchy is for them to be 100% dry before throwing them in the oven. The drier they are, the crunchier they get. Any moisture left in them would give you soft, mushy chickpeas, and I don’t know about you, but that sure doesn’t sound appetizing to me at all. It is also for this reason why this recipe is a good, easy one to work on if you’re craving that sweet, crunchy snack.

Before you start, make sure you rinse the chickpeas under cold water for a few minutes to get rid of the extra starch that’s on the outside. During this time, the thin, semi-translucent outer shell may come off – that’s okay. Leaving them on is totally optional because unless you’re extremely OCD like I am, otherwise spending an hour in front of the sink trying to peel away the outer shell on EVERY.SINGLE.CHICKPEA is entirely unnecessary….

photo 2

When I first started on this, I tried to convince myself that whatever shells came off during the rinsing process will be perfectly fine, and that it wouldn’t bother me one single bit if I left the other non-naked peas alone. Well, a few minutes into the rinsing, I quickly realized that my OCD tendencies were going to take over, because picking every single shell off of every single chickpea quickly became an obsession.

Once you’re satisfied, lay the chickpeas on a paper towel-lined baking sheet to dry. For me, the process took me all day, simply because it gave me something to do and I had all day to do it. Every few hours or so into the evening, I would periodically stir those peas around on the paper towel, making sure that they’re nice and dry. If you want, you can even change the paper towel underneath every once in a while so the peas have a dry surface to dry on. If I had the time, I totally would’ve just used my hair dryer and blew hot air over them to speed up the process…

photo 1

When your chickpeas have dried, throw in them in the oven to roast for the first half of the cooking time. Take them out, drizzle a little bit of EVOO, then toss them in the cinnamon sugar mixture and throw them back into the oven to cook some more. I think I went a little cinnamon-happy with mine, because let’s face it – one can never have too much cinnamon.

Once the roasting is done, leave the chickpeas in the oven with the oven door cracked open as they cool. They’ll be crunchier this way. I remember I put these in the oven at 3 a.m., and when they were done, my kitchen smelled amazing at 4 in the morning.

IMG_2199 copy

IMG_2201 copy

crunchy roasted cinnamon chickpeas
Print
Ingredients
  1. One 15-oz can of garbanzo beans (a.k.a. chickpeas)
  2. 1 tablespoon EVOO
  3. 2 tablespoons granulated sugar
  4. 1 teaspoon ground cinnamon
Instructions
  1. Line a rimmed baking sheet with
  2. Preheat oven to 400F degrees. Line a large baking sheet with a silicone baking mat. Set aside.
  3. In a large strainer, rinse and drain the chickpeas very well to remove the starch. Spread them out onto prepared baking sheet and pat very, very dry. The drier the chickpeas, the crunchier they will be. The skin of the bean may peel off as you pat them dry. That is ok. You may remove the skins or leave them on. I like to remove them, but that takes time and is not mandatory.
  4. Once 100% dry, place chickpeas into the oven and roast for 15 minutes. After 15 minutes, remove from the oven and drizzle with olive oil. Using a large spoon or spatula, mix the beans around to make sure they are all evenly coated. Mix the cinnamon and sugar together and sprinkle over beans. Mix around very well to heavily coat each bean. The beans will be flavorless, so you want to make sure each one is thoroughly coated. Add more cinnamon-sugar if you'd like. Place back into the oven and roast for another 15 minutes.
  5. Leaving the chickpeas inside, turn the oven off and crack open the door slightly. Allow the chickpeas to sit inside as the oven cools down for 30 minutes. This will help them get crunchier as opposed to sitting at room temperature. Chickpeas are crunchiest on day 1. Store at room temperature.
Adapted from Sally's Baking Addiction
Simple Everyday Food https://www.simpleeverydayfood.com/
So next time you have to stay up til morning for whatever reason and need something to keep you occupied throughout the night, you should make these! Every time I thought about going to bed, I remembered the chickpeas laying on my kitchen counter needed to be dried and roasted. Perfect for staying awake!

Who needs coffee to keep you awake when you can make cinnamon sugar roasted chickpeas instead?!

Recipe adapted from Sally’s Baking Addiction

© Simple Everyday Food. All images & content are copyright protected. Please do not use any of my images without prior permission. If you want to republish this recipe, please re-write the recipe in your own words, or kindly link back to this post for the recipe.

Sharing is caring! Email this to someonePrint this pagePin on PinterestShare on YummlyShare on FacebookShare on Google+Tweet about this on Twitter

I am no longer allowed to go shopping at Target by myself. This latest time when I shopped there myself, these came out of my kitchen:

IMG_2084 copy

IMG_2075 copy

I have proven that I have no self control when it comes to that store. It also doesn’t help that there’s a Super Target literally right across the street from our house, which also happens to be on the way home from school.

When Brian and I go, he’s always my voice of reason. “You don’t need that”, “don’t you already have something like that?”, “when would you ever use that?”. He probably saves us a good chunk of money every month by going to Target with me.

When I go by myself, it’s a totally different story. Yes, I make a list of things I need.. and I do try my hardest to stick to only things on that list. But somehow 30 minutes later, I always come out of there spending at least $30 more than what I would’ve spent if I stuck to my list. It’s just so easy to grab a basket, stroll through the aisles, look through the clearance racks, and find things that you absolutely “need” or are too good of a deal to pass up.

Please tell me I’m not the only one that has this problem. Next time I really shouldn’t even grab a basket. Once my hands are full, it’s time to head to the checkout lanes… oh but that’s easier said than done.

Anyway… the other day when I went to Target, I saw these out of the corner of my eye and just had to get them.

photo

Dang you Target, for putting Fall/Halloween candy in the 50% off clearance aisle!

I had the perfect idea – pumpkin spice puppy chow. I know what you’re thinking – it’s already November and pumpkin spice needs to make way for peppermint desserts. It’s true, but I can’t let these Kisses sit on the shelves all by themselves, can I? Someone needs to rescue them…….

I still had some leftover pumpkin pie spice from last month, so it just sounded like a no-brainer. Cinnamon Chex cereal coated with white chocolate pumpkin Hershey Kisses, dusted with powdered sugar with hints of pumpkin spice. Mmm mmm mmm.

IMG_2072 copy

Initially I dreaded unwrapping two bags of Hershey Kisses by hand. I thought I would find it tedious and time-consuming. Once I got a system down though, the process went by faster than I imagined. And somehow the melting process also seemed to go a lot smoother than my other puppy chow recipes..

pumpkin spice puppy chow
Print
Ingredients
  1. 9 cups Cinnamon Chex cereal
  2. 1.5 10oz bags of Hershey's pumpkin spice Kissees, unwrapped
  3. 2 cups powdered sugar
  4. 2 heaping teaspoons pumpkin spice
Instructions
  1. Place Chex cereal in a large bowl, set aside. Then in a medium bowl, add the powdered sugar and pumpkin spice. Stir to combine and set aside.
  2. Using a double boiler, melt the pumpkin Kisses. Pour the melted chocolate over the Chex mix, stir until all the Chex is covered with chocolate. Then gradually sprinkle the powdered sugar mixture onto the cereal. Stir until everything is covered evenly with powdered sugar.
  3. Makes ~9 cups
Simple Everyday Food https://www.simpleeverydayfood.com/
IMG_2076 copy

IMG_2080 copy

Although the pumpkin spice Kisses taste a little artificial if you eat them by themselves, these puppy chow don’t taste artificial at all! This is probably because most of my puppy chow recipes already utilize vanilla almond bark or white chocolate, so the white chocolate center of these Kisses were a perfect fit for this recipe! The cinnamon-y, pumpkin-spiced powdered sugar coating is the perfect combination with the subtle hints of pumpkin spice flavoring in these chocolates… It was a hit with all my pumpkin-loving friends!

Now that pumpkin season is unofficially over, it’s now time to move on to one of my top favorite flavor combos – chocolate + mint.

Here are a few more recipes came out of my kitchen this pumpkin season:

Pumpkin n’ spice cream cheese truffles

IMG_1827 copy

Ooey gooey pumpkin chocolate chip cookies

IMG_1785 copy

Glazed pumpkin coffee cake

IMG_1881 copy

Pumpkin peanut butter dog biscuits

IMG_1959 copy

© Simple Everyday Food. All images & content are copyright protected. Please do not use any of my images without prior permission. If you want to republish this recipe, please re-write the recipe in your own words, or kindly link back to this post for the recipe.

Sharing is caring! Email this to someonePrint this pagePin on PinterestShare on YummlyShare on FacebookShare on Google+Tweet about this on Twitter

I’ve been a little obsessed with puppy chow lately. I just made these, and I already have about a dozen different other variety of flavor combinations I want to make already!

IMG_1758 copy

IMG_1770 copy

Brian really isn’t a big fan of puppy chow, so every time I make these, my friends and coworkers are in luck – as much as I’d love to eat 8 cups worth of Chex cereal covered in sugary goodness, I find myself packing them into little snack bags to bring to work and school to share (sharing is caring, right?). My friends really aren’t as lucky when I make cookies or cupcakes, as those tend to slowly mysteriously disappear when I’m out of the house [ahem] :)

Although I’m not ready to let summer go and am in some sort of a denial state of mind that autumn is upon us, I can’t help but be excited about the different fall recipes I have planned for the next few months – apple pie spice puppy chow sounded like the perfect way to welcome the arrival of fall.

IMG_1754 copy

IMG_1760 copy

apple pie spice puppy chow
Print
Ingredients
  1. 8 cups apple & cinnamon Chex cereal
  2. 16 oz vanilla coating/almond bark
  3. 2 teaspoons apple pie spice mix (see below)
  4. 2 cups powdered sugar
For the apple pie spice mix
  1. 4 tablespoons ground cinnamon
  2. 1 and 1/2 teaspoons ground nutmeg
  3. 1/2 teaspoon ground allspice
  4. 1 and 1/2 teaspoons ground cardamom
  5. A pinch of ground ginger
Instructions
  1. Pour cereal into a large bowl.
  2. Using a double boiler, melt the vanilla coating/almond bark.
  3. Pour the melted vanilla coating onto the cereal, stir. Add in the apple pie spice mixture, stir until thoroughly combined.
  4. Add the powdered sugar into the cereal mixture, about 1 cup at a time, until the cereal is evenly coated with powdered sugar.
  5. Spread onto waxed baking sheets for coating to set. Store in airtight container for 1 week.
  6. Makes about 8 cups.
Notes
  1. Measurements for the ingredients for the apple pie spice does not have to be exact. Amount can be varied if you prefer a little bit more (or less) of one particular spice.
  2. Spice mixture recipe adapted from My Baking Addiction.
Adapted from A Pumpkin & A Princess
Simple Everyday Food https://www.simpleeverydayfood.com/
IMG_1766 copy

As if the apple pie spice mixture wasn’t delicious enough, the apple and cinnamon Chex cereal really kicks the flavor up a notch. If regular Chex cereal is all you have on hand, I’m sure it’ll taste just fine, too. Like I mentioned in the recipe card, the measurements of the spice mixture doesn’t have to be exact – everything can be made “according to taste” when it comes to these babies! I personally love cinnamon and nutmeg, so I added a bit more in mine. I wasn’t sure quite sure about the ginger flavor, so a dash of ground ginger was all I put in it. So feel free to play around with the spices – this is one of those recipes that doesn’t require exact measurements!

IMG_1768 copy

I brought a few little baggies of these to school to share, and they sure got rave reviews from everyone! I think the smell of apple pie brings back warm happy memories for everyone – family gatherings, warm cozy blankets, falling leaves…

I would be one happy camper only if there could be two seasons in a year: summer and fall.

Enjoy!

Recipe adapted from A Pumpkin & A Princess

© Simple Everyday Food. All images & content are copyright protected. Please do not use any of my images without prior permission. If you want to republish this recipe, please re-write the recipe in your own words, or kindly link back to this post for the recipe.

Sharing is caring! Email this to someonePrint this pagePin on PinterestShare on YummlyShare on FacebookShare on Google+Tweet about this on Twitter