everyday food made simple

Summer. It usually means hot (and humid) days, being outside, and eating light.

When I say “eating light“, I don’t mean “light” as in “not eating a whole lot” – I mean “light” as in “eating meals that are light in flavor“.

IMG_1504

There is a reason why winter = comfort food season. People want to sit at home wrapped up in a blanket eating a plate of hot cheesy pasta casserole or a bowl of hot creamy soup. No one wants to do all that when it’s 95 degrees out.

Well, I don’t mind it that much, but I know most people would prefer not eat a steaming hot bowl of soup when they’re hot and sweaty already.

I think tacos are the perfect summer food. It’s light, easy to make, customizable, healthy, and its flavor can be easily tweaked based on what meats you make and what toppings you add to it.

Chicken fajitas.

Carnitas.

Barbacoas.

Seafood (fish, shrimp, etc).

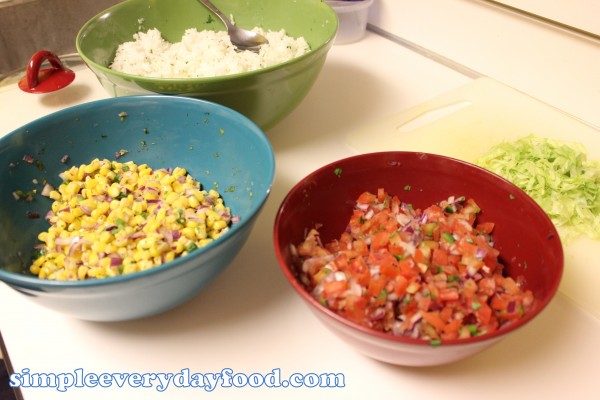
Then pile on the toppings that you like: Beans. Cheese. Lettuce. Tomatoes. Avocados. Sour cream.

No matter what your preference is, there’s usually a perfect taco for you. You can have a family of picky (and non-picky) eaters, but when it comes to tacos, everyone can easily add their favorite toppings and be a happy camper at the dinner table.

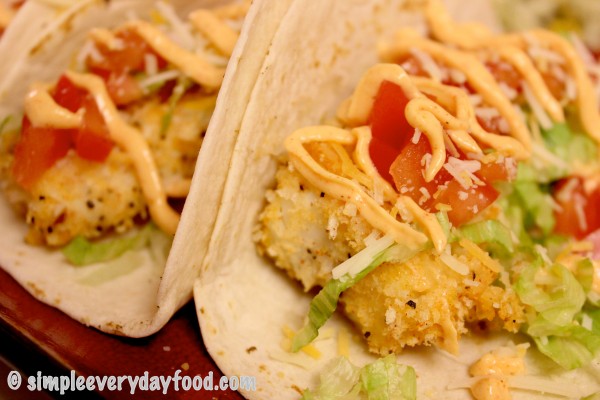
Now that I’ve done enough rambling, let me talk about these tacos. They’re simple. They’re healthy. They don’t take a whole lot of prep time in the kitchen, and they’re delicious. Deeeee-licious.

I basically took my crispy cod sandwich with spicy mayo, eliminated the bun, cut the fish fillets into fish sticks, and put them in a soft flour tortilla. Drizzle on the spicy mayo, and viola! Fish tacos.

IMG_1502

Yep, it’s that easy. Easy peasy.

easy peasy fish tacos
Print
Ingredients
  1. 1 lb cod filets
  2. 1 egg
  3. 1 cup plain panko bread crumbs
  4. 1 package of 6" flour tortillas
  5. An assortment of toppings
for the panko bread crumb seasoning
  1. 1/2 teaspoon salt
  2. 1/2 teaspoon black pepper
  3. 1/2 teaspoon paprika
  4. 1/2 teaspoon garlic powder
  5. 1/2 teaspoon onion powder
for the spicy mayo
  1. 1/3 cup mayo
  2. 1/4 teaspoon paprika
  3. 1/4 teaspoon garlic powder
  4. 1/4 teaspoon onion powder
  5. 1/4-1/2 teaspoon hot sauce, depending on taste
Instructions
  1. Preheat oven at 350 degrees. Line a baking sheet with aluminum foil and set aside.
  2. Place cod fillets on a plate and pat dry with paper towels. Slice/cut the fillets into sizes of fish sticks, about 2" pieces. Season with salt and pepper.
  3. In a large bowl, whisk the egg. In another large shallow bowl, combine all the ingredients for the panko bread crumbs (and its seasonings).
  4. Dip the fish sticks into the egg wash. Transfer them to the shallow bowl containing the bread crumbs. Flip them around a couple times, making sure that every inch of it is covered with the bread crumbs, transfer to baking sheet (you may have to do this in several rounds to prevent overcrowding of the bowls). Bake for 20 minutes until the bread crumbs look golden and crispy.
  5. In the meantime, make the spicy mayo: combine all the ingredients in a small bowl, whisk to combine. If desired, transfer the mayo into a small Ziploc bag and cut a small hole in the corner for easy drizzling.
  6. Once the fish is done cooking, assemble your tacos: place a few fish sticks in the middle of your tortilla, top with toppings, and drizzle with the spicy mayo.
  7. Serves 2-3
Notes
  1. We warmed the tortillas up in a small pan over medium-high heat, about 15 seconds on each side.
Simple Everyday Food https://www.simpleeverydayfood.com/
Making tacos really can’t get a whole lot simpler than this. Not only do these tacos deliver in flavor, it also has a variety of textures as well – the crispiness of the fish, the softness of the tortilla, the crunchiness of the shredded lettuce, and the creaminess of the mayo… it has every texture one bite of food will ever need.

IMG_1505

So what are you waiting for? Put this on your meal planner for the week!

Enjoy!

© Simple Everyday Food. All images & content are copyright protected. Please do not use any of my images without prior permission. If you want to republish this recipe, please re-write the recipe in your own words, or kindly link back to this post for the recipe.

Sharing is caring! Email this to someonePrint this pagePin on PinterestShare on YummlyShare on FacebookShare on Google+Tweet about this on Twitter

It’s midquarter already – that means there’s only about 5 more weeks of class until summer. But it also means that there’s only 5 weeks left until all 5 of my projects are due.

Well, since it’s the weekend and it’s the perfect time to catch up on homework, what better meals to prepare than something in a Crockpot? Something simple, something healthy, and something tasty. Then I won’t have to slave in the kitchen for hours prepping and cooking.

IMG_0818

IMG_0840

IMG_0843

crockpot cilantro lime chicken tacos
Print
Ingredients
  1. 1 lb. boneless skinless chicken breasts
  2. Juice from 2 limes
  3. 1/2 cup of cilantro
  4. 1 packet of taco seasoning
  5. 1/4 cup diced onions
  6. 1/2 cup of water
  7. Salt & pepper
  8. Taco tortillas
Instructions
  1. In a 3-5 quart Crockpot, combine everything except the chicken. Stir well, then add the chicken.
  2. Cook on low for about 4-6 hours or until the chicken is tender enough to shred with a fork.
  3. Take the chicken out and place on a plate. Shred, then drizzle some of the remaining sauce over the chicken to keep it moist.
  4. Spoon the chicken mixture into soft taco tortillas. Top with your favorite toppings.
Notes
  1. We cooked the chicken for about 8 hours and it turned out a tad on the dry side. It was already very tender at about the 4-6 hour mark, so next time we'll be keeping an eye on it to make sure it stays juicy.
Adapted from The Vintage Grove
Simple Everyday Food https://www.simpleeverydayfood.com/
IMG_0844

Another bonus of making Crockpot meals – not a whole lot of dishes to clean up in the end!

Oh hey, just in time for Cinco de Mayo!

Enjoy!

Recipe adapted from The Vintage Grove

Sharing is caring! Email this to someonePrint this pagePin on PinterestShare on YummlyShare on FacebookShare on Google+Tweet about this on Twitter

Last night while I took a break from studying, I decided to do a little meal planning for the weekend.

You see, when we get to have the weekend off together, I spend Thursday nights planning on what we should have for our weekend dinners, usually along with some sort of munchies or dessert.

Well, what I originally planned to be a quick 30 minute break turned out to be a 3 hour break – surfing the Internet, searching for new fun recipes to try, and this is one of them I was quite excited to try right away.

Other than burritos, enchiladas are probably one of my favorite Mexican dishes. I’ve made stacked enchiladas a few weeks back, and I also have a recipe somewhere for some yummy traditional enchiladas as well. Since it’s Friday night and I really don’t want to slave over the stove for hours making a meal, this enchilada casserole sounded like the perfect idea.

IMG_0705

Simply put, this dish is basically a deconstructed enchilada with everything mixed together, minus the tortilla.

Meat – check.

Enchilada sauce – check.

Sour cream – check.

Diced chiles – check.

Cheese – check.

Trust me, if you’re short on time but want something the whole family would like, this is definitely worth a try. The hubs loved it so much that he suggested to put this recipe into our “repeat” box.

Here’s what you’ll need:

  • 1 pound ground turkey
  • 1/2 teaspoon chili powder
  • 1/4 teaspoon cumin
  • 1/4 teaspoon cayenne pepper (optional)
  • 4 ounces cream cheese
  • 1/4 cup sour cream
  • 10-oz can red enchilada sauce
  • 1 cup shredded sharp cheddar cheese, divided
  • 1 cup shredded monterey jack cheese, divided
  • 1 cup frozen corn kernels
  • 4 oz canned diced green chiles
  • 12 ounces egg noodles
  • Salt & pepper

IMG_0696

Directions:

  • Preheat oven to 350 degrees
  • In a large pot, cook egg noodles according to package instructions.
  • In a super large skillet (or as I’ve mentioned in previous posts, I love using woks, so I used a wok instead), brown the ground turkey, breaking it up with a wooden spoon. Drain excess fat, and add in the chili powder, cumin, and cayenne pepper. Stir to combine.
  • Add in the cream cheese. Stir until cream cheese is melted and thoroughly combined.
  • In a medium sized bowl, combine the sour cream, enchilada sauce, half of the two cheeses, corn, and green chiles. Stir to combine.
  • Add the sauce mixture to the meat mixture. Stir. Let simmer for a few minutes.

IMG_0697

Being in the healthcare field, I could come up with a few things this mixture reminded me of… but don’t let that deter you! I promise it smells AND tastes delicious, and it will look a lot more appealing in the end!

  • When the pasta is done, drain the pasta, then add it to the beef mixture. Make sure you give it a good toss to make sure all the egg noodles are all evenly coated with the sauce.
  • Pour in the pasta mixture into a large casserole dish and top with the remaining cheeses.

IMG_0700

  • Bake for about 15 minutes or until the cheese has completely melted.

Enjoy!

Deconstructed Enchilada Casserole
Print
Ingredients
  1. 1 pound ground turkey
  2. 1/2 teaspoon chili powder
  3. 1/4 teaspoon cumin
  4. 1/4 teaspoon cayenne pepper (optional)
  5. 4 ounces cream cheese
  6. 1/4 cup sour cream
  7. 10-oz can red enchilada sauce
  8. 1 cup shredded sharp cheddar cheese, divided
  9. 1 cup shredded monterey jack cheese, divided
  10. 1 cup frozen corn kernels
  11. 4 oz canned diced green chiles
  12. 12 ounces egg noodles
  13. Salt & pepper
Instructions
  1. Preheat oven to 350 degrees
  2. In a large pot, cook egg noodles according to package instructions.
  3. In a super large skillet (or as I've mentioned in previous posts, I love using woks, so I used a wok instead), brown the ground turkey, breaking it up with a wooden spoon. Drain excess fat, and add in the chili powder, cumin, and cayenne pepper. Stir to combine.
  4. Add in the cream cheese. Stir until cream cheese is melted and thoroughly combined.
  5. In a medium sized bowl, combine the sour cream, enchilada sauce, half of the two cheeses, corn, and green chiles. Stir to combine.
  6. Add the sauce mixture to the meat mixture. Stir. Let simmer for a few minutes.
  7. When the pasta is done, drain the pasta, then add it to the beef mixture. Make sure you give it a good toss to make sure all the egg noodles are all evenly coated with the sauce.
  8. Pour in the pasta mixture into a large casserole dish and top with the remaining cheeses.
  9. Bake for about 15 minutes or until the cheese has completely melted.
Adapted from Table for Two
Simple Everyday Food https://www.simpleeverydayfood.com/
Have a great weekend and stay warm!

Recipe adapted from Table for Two

Sharing is caring! Email this to someonePrint this pagePin on PinterestShare on YummlyShare on FacebookShare on Google+Tweet about this on Twitter

Chipotle is perhaps my favorite fast-food restaurant. Their food is light, not greasy, fast, and it’s relatively healthy compared to other fast food restaurants.

It also has a special place in my heart. Back in my skating days, me and my skating buddies would always stop by Chipotle afterwards to grab a bite to eat before going home. In the winter, we would go to the one a few blocks away from the Metrodome; in the summer, we’d stop by the one right by Lake Calhoun, sit outside, and enjoy the warm summer sun.

I may be a small petite, 96-pound lady, but when it comes to eating Chipotle burritos, my stomach always seem to expand to twice its size. Instead of explaining further, let me just include a picture of my burrito compared to the hubs from a while back (mine is the one on the right):

IMG_0726

All I put on mine are rice, carnitas, pico de gallo, extra corn, and lettuce. No beans, no sour cream, and no cheese. It doesn’t seem like a whole lot, but somehow when you pile everything up on a flour tortilla, they always have problems wrapping it together…

Since the hubs and I are still on the “healthy, no eating out” diet, I decided to make Chipotle at home, and made some carnitas in the crockpot. This recipe is super easy (just like most crockpot recipes), and the carnitas turned out to be super tender and flavorful as well.

Ingredients:

  • 3-4 pound pork shoulder, with most of the fat trimmed off
  • 4 cloves garlic, minced
  • 1 tablespoon salt
  • 1 teaspoon cumin
  • 1 teaspoon chili powder
  • 1 teaspoon black pepper
  • 1 teaspoon oregano
  • 1/4 teaspoon cinnamon
  • 1/2 teaspoon cayenne pepper
  • Juice of 2 limes
  • 1/2 cup orange juice
  • 1/2 salsa – I used a non-chunky kind

Directions:

  • In a small bowl, combine the salt, cumin, chili powder, black pepper, oregano, cinnamon, and cayenne pepper.IMG_0660
  • In a separate bowl, combine the lime juice, orange juice, and salsa.IMG_0661

IMG_0662

  • Rub garlic onto the pork shoulder, and place into slow cooker. Then rub all the spices evenly onto the meat. Add the juice/salsa mixture. Cover and cook for 7-8 hours.IMG_0665
  • Preheat the broiler. Meanwhile, take the meat out of the crockpot and place onto a oven-safe dish (I used a casserole dish). Shred meat with two forks. Ladle in about 2-3 cups of the cooking liquid into the casserole dish and broil for 5-10 minutes until the edges are brown on the pork.IMG_0670
  • Serve on rice or tortillas with any toppings of your choice (hot sauce, sour cream, cheese, etc).

I made some cilantro lime rice (from a post a few weeks back), pico de gallo, corn salsa, and some shredded lettuce to go with our Mexican dinner. Instead of regular flour tortillas, we brought some jalapeno cheddar wraps to spice it up a bit.

IMG_0669

image

Enjoy and have a great week, folks!

Recipe adapted from Pinch of Yum

Sharing is caring! Email this to someonePrint this pagePin on PinterestShare on YummlyShare on FacebookShare on Google+Tweet about this on Twitter

Well, the weekend’s coming to an end, and tomorrow’s everyone’s favorite day of the week: Monday. In our household, every other weekend are the only days my husband and I get to spend quality time with each other – this usually means doing homework together, running errands together, and cooking together (and making enough so we’ve got plenty of leftovers for tomorrow’s lunch). We like to try new recipes, and deciding whether we should add them to our “remake”or “meh I didn’t really care for it” recipe box.

The stacked enchiladas we made tonight are a twist on regular enchiladas. Instead of serving them like they traditionally do, we stacked them, turning them into a “enchilada lasagna”.

What else goes well with enchiladas?

Rice. Cilantro lime rice. The kind they have at Chipotle – my favorite Mexican joint. Next time I’m making some carnitas and making my own burrito!

First, enchiladas…

Ingredients:

  • 1 green pepper, chopped
  • 2 teaspoon olive oil
  • 1 garlic clove, minced
  • 1.5-2 cups shredded chicken – we roasted a chicken last night so we used the leftovers
  • 1/3 cup green onions, thinly sliced
  • 1/2 cup enchilada sauce
  • 1/2 cup picante sauce
  • 4 8″ corn tortillas
  • 1 cup shredded cheese
  • other toppings of your choice – sour cream, shredded lettuce…

IMG_0533

Note: if you like black beans in your enchiladas, you can also add one cup of canned black beans as well.

Directions:

  • Preheat oven at 350 degrees
  • Grease a 9″ pie plate, set aside.
  • In a large skillet, saute the green pepper in the oil for about 2-3 minutes. Add the garlic and cook for another 2-3 minutes, or until the green pepper is crisp-tender.
  • Stir in the chicken, green onions (and black beans if desired), cook for another minute. Transfer to a bowl and set aside.

IMG_0534

  • In the same skillet, combine the enchilada sauce and picante sauce. Coat both sides of a tortilla with the sauce mixture, then place it in the pie plate. Top with 1/3 of the chicken mixture and 1/4 cup of cheese.

IMG_0535

  • Repeat the layers twice. Top with remaining tortilla, sauce, and cheese.
  • Bake at 20-22 minutes or until heated through. Cut into wedges and serve with sour cream or lettuce if desired.

Now, for the rice….

Ingredients:

  • 1 cup basmati rice
  • 2 cups water
  • 1 bay leaf
  • 1/2 teaspoon salt
  • Juice of 1/2 a lime
  • 2 tablespoons cilantro, minced
  • 1 tablespoon oil

Directions:

  • In a large pot, saute the rice in the oil for about a minute. Add the water and bay leaf, bring to a boil.
  • Once the water boils, turn heat down, cover, and simmer for 15 minutes.
  • Remove from heat while still keeping the cover on the pot. Let stand for about 30 minutes. Remove bay leaf, then transfer rice to a large mixing bowl.
  • In the meantime, combine the salt and lime juice in a small bowl. Whisk until all the salt is dissolved, then add in the cilantro.

IMG_0537

  • Pour lime juice & cilantro mixture over rice. Toss until rice is evenly coated.

IMG_0540

IMG_0542

Enjoy!

Recipes adapted from: Taste of Home Magazine & Em Maliks Kitchen

Sharing is caring! Email this to someonePrint this pagePin on PinterestShare on YummlyShare on FacebookShare on Google+Tweet about this on Twitter