everyday food made simple

IMG_5160 copy

First things first – I’ve become a publisher on Yummly! You can now find my official Publisher Page here (or simply click on the Certified Yummly button on my sidebar). And as you scroll past the recipe below, you’ll also notice that my social media sharing buttons have changed! I added a new Plug-in to SEF so now you can “Yum” my recipes and add it your Recipe Box on Yummly along with all your other “Yum’d” recipes… you know, for convenience and all. I started using Yummly a few months ago and it’s now one of my go-to places when I’m looking for dinner inspirations. They even send you weekly recommendations based on what you’ve “Yum’d” in the past! I’m super excited to be part of this new social media sharing platform, so bare with me as I get my Yummly page updated… in the meantime, keep Yum-ing!

The past few months, I’ve been hooked on the Lizzy Gardner series, written by T.R. Ragan. In case you’re not familiar, it’s a series of four books (so far) that centers around a private investigator Lizzy Gardner and the cases that she somehow always gets herself, as well as the people around her, involved in. The books aren’t particularly deep and complex, and the plots are always somewhat predictable (there are murders, Lizzy gets involved, she ends up figuring out who did it, yada yada yada). However, the author does do a good job at keeping the reader’s attention and the novels are pretty easy to read.

It started with spending 99 cents on the first book, then realizing I was able to borrow the 2nd, 3rd, and 4th book for free through my Amazon Prime membership. So for the past few months, I’ve been borrowing the next book in the series the first day of the month, finishing the book within 10 days, and impatiently waiting for the next 20 days until I can borrow the next book. It doesn’t help that the author seems to looooove ending her books on cliffhangers, because when I realized the 4th book was over (less than a week of starting it), I may have slammed my Kindle on my pillow a few times and yelled “NOOOOOO!!!!!!” (ask Brian about it – I’m pretty sure he jumped and thought I was crazy).

Initially I was going to wait it out and borrow the next book next month, but I just couldn’t wait it out any longer, so I broke down and went on Amazon with the intent of spending a few dollars and buying the next book….. only to realize that it won’t be released until February 3rd. Ahhhhhh! So much for that plan. Guess I’ll have to wait in the end anyway. Have I mentioned I hate waiting?

Okay, back to food. Because I’m sure you didn’t come on here to read about book reviews.

  IMG_5169 copy     

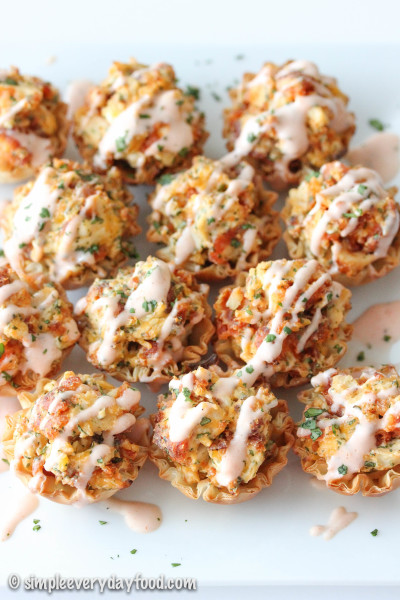
Can I just say these buffalo ranch chicken cups are so ridiculously deliciously easy to make? I even like them more than my mini taco cups, which happen to be the #1 most popular recipe on my site. That’s right, they’re that good.

IMG_5153 copy

IMG_5159 copy

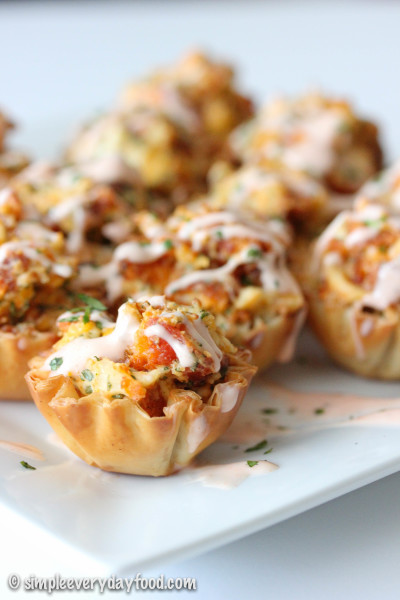
These bite-sized appetizers are so easy to assemble and they pack so much flavor in just one bite, you won’t be able to eat just one! The light, crispy, flaky phyllo (or “fillo”) shells are filled with a creamy chicken filling with large chunks of chicken and a slight hint of heat, baked to crispy perfection.

IMG_5163 copy

 IMG_5158 copy

IMG_5176 copy

IMG_5179 copy

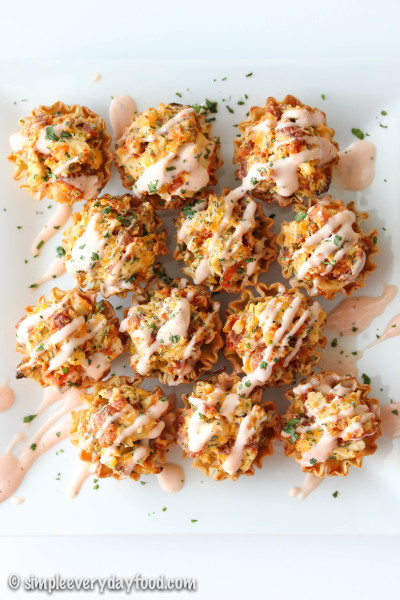
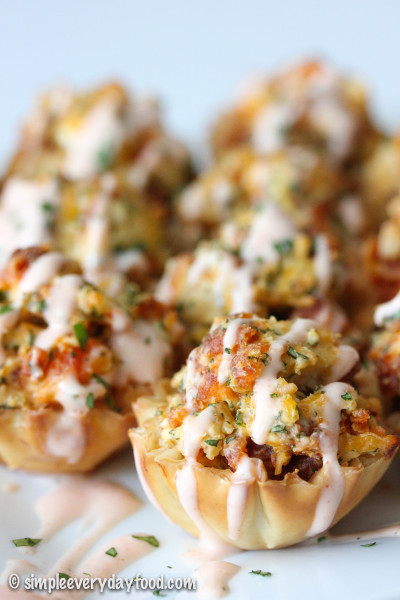
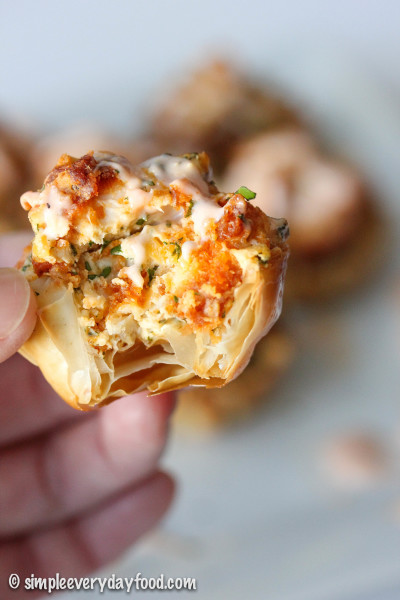
So in case you’re already looking for Super Bowl party finger foods for next month, you should most definitely add these to your list… your guests will thank you! And even if you decide to eat the whole pan yourself, that’s okay too. We don’t judge here in the food blogging world.

 IMG_5166 copy

buffalo ranch chicken cups
Print
Ingredients
  1. 1/4 cup light ranch dressing
  2. 1 tablespoon Frank's Red Hot sauce (more or less depending on taste)
  3. 3 oz low fat cream cheese, softened to room temperature
  4. One generous 1/4 cup of shredded cheddar cheese
  5. 2 tablespoons finely chopped cilantro (plus more for garnish, if desired)
  6. About 10 pieces of Tyson's Any'tizers Buffalo Chicken Wyngz, roughly chopped
  7. One package pre-baked fillo (phyllo) shells
Instructions
  1. Preheat oven to 400 degrees.
  2. In a small bowl, combine the ranch dressing and hot sauce. Set aside.
  3. In a medium bowl, combine the cream cheese, cheddar cheese, cilantro, and 2 tablespoons of the ranch mixture. With a spoon, mix ingredients together until thoroughly combined. Gently stir in the chicken bits and mix some more.
  4. Place the fillo shells into an ungreased mini muffin tin, and generously spoon the chicken mixture into the shells. Bake for 10 minutes, or until the fillo shells are golden brown.
  5. Drizzle the remaining ranch mixture over the chicken bites and sprinkle with additional cilantro, if desired. Serve immediately.
  6. Makes 15 mini cups
Adapted from Lauren's Latest
Simple Everyday Food https://www.simpleeverydayfood.com/
Recipe adapted from Lauren’s Latest

© Simple Everyday Food. All images & content are copyright protected. Please do not use any of my images without prior permission. If you want to republish this recipe, please re-write the recipe in your own words, or kindly link back to this post for the recipe.

Sharing is caring! Email this to someonePrint this pagePin on PinterestShare on YummlyShare on FacebookShare on Google+Tweet about this on Twitter

You may have noticed the lack of posts the past few weeks. I have been super stressed about my national boards exam that’s coming up in three weeks, so I have been using all my free time to cram as much information into my little head as possible. As a result, SEF has been neglected for quite some time. I have decided that I’m going to wait until my exam is over to take better care of SEF and dedicate more time to writing more posts. I have already created a bunch of recipes (10, to be exact) and have photographed my creations; however, since I spend most of my time editing them and creating blog posts, I’m going to put them on hold until April 13th. I promise SEF will be updated on a more regular basis after that – there will be some pretty delicious blog posts coming in the near future!

So, as my gift to you until April 13th, I present to you this wonderfully easy recipe that involves one of everyone’s favorite kitchen gadget – the Crockpot.

My favorite soups of all time are as follows (in no particular order):

  1. baked potato soup
  2. Olive Garden’s zuppa toscana
  3. creamy chicken and wild rice soup

Throughout the past 10 months SEF has existed, I managed to recreate and blog about #1 and #2 on that list. Naturally, it was time for me to find a family-approved recipe for creamy chicken and wild rice soup.

IMG_2536 copy

IMG_2508 copy

And this recipe is definitely going to be recreated again (and again) throughout the year. Brian and I both agreed it was so delicious that we were calling dibs on leftovers for work. Good thing this recipe yielded an entire Crockpot of soup! Even then, it still didn’t last more than 3 days in our house…

Rewind to about a year ago: I attempted to make chicken and wild rice soup on the stove… And that attempt had failed miserably. It tasted weird, had a funny consistency, and ended up getting dumped in the trash. Needless to say, my confidence in making creamy chicken wild rice soup was a little shot after that, and we both had to scramble and find something else to eat that night.

I think Brian was also a little skeptical when he heard I was going to try to give our favorite soup another try in the Crockpot. I can’t lie, I think I was too. But it was freezing cold outside, I was feeling lazy, and comfort food in the Crockpot was all that I really wanted for dinner.

IMG_2530 copy

This soup is amazing! It’s incredibly creamy and it’s filled with hearty vegetables and tons of juicy shredded chicken. Have you ever had Panera’s chicken and wild rice soup? If you haven’t – try it. It’s delicious. It’s the only soup we ever get there, and this TASTES JUST LIKE IT.

I’m still in awe at how good this soup is, and even better – how easy it is to make!

The steps are pretty simple: throw the veggies, wild rice, chicken stock, and chicken into the Crockpot. Let them sit and hang out and get to know each other for 7 hours. When the chicken is fork tender, take it out and shred it with a fork. Put it back into the Crockpot to soak up more of the yummy juices. Meanwhile, you make the creamy base on the stove…. this is where you should pay attention, simply because it took me three tries to get it right. Trust me, you’ll thank me later :)

When making your creamy base on the stove, melt the butter over low heat. Then add in the flour, 1/4 cup at a time, whisking constantly throughout each addition. The milk must also be added only 1/2 cup at a time as well. This is suuuuuper important – the first few times I tried, I added all the flour in at once, whisked, and added all the milk in at once. Somehow it just doesn’t work that way – it became super lumpy and gross, and I contemplated whether we should just make it “chicken and wild rice soup” instead of “creamy chicken and wild rice soup”. The stubbornness in me wasn’t about to let some butter and flour stand in the way of me and my dinner, so 3 sticks of butter later, I finally got the results I wanted.

The trick is to whisk constantly on LOW heat. When I say constantly, I mean it – whisk that sucker the entire time. Don’t walk away from the stove. Don’t even go on Instagram or Facebook. It’ll seem like it’s taking forever for the mixture to start bubbling, but I promise patience pays off in the end.

IMG_2540 copy

crockpot creamy chicken wild rice soup
Print
Ingredients
  1. 1 cup uncooked wild rice
  2. 1 pound boneless skinless chicken breasts
  3. 3 medium carrots, peeled and diced
  4. 1 small onion, diced
  5. 2 celery sticks, diced
  6. 6 cups low sodium chicken broth
  7. 1 heaping teaspoon poultry seasoning
  8. 1/2 cup butter
  9. 3/4 cup flour
  10. 2 cups milk + 2 additional cups
  11. Salt and pepper
Instructions
  1. Place the diced carrots, onion, and celery in the crockpot, then place the chicken breast on top. Sprinkle poultry seasoning over the chicken.
  2. Rinse the wild rice, and add to crockpot. Then add in the chicken broth. Cover and cook on low for 6-7 hours, until chicken is fork tender. Remove chicken onto a cutting board, let cool and shred with two forks. Add the shredded chicken back into the crockpot.
  3. In a saucepan, melt the butter, then add the flour, 1/4 cup at a time, and cook until it starts to bubble. Slowly whisk the milk in with the flour mixture, 1/2 cup at a time, just until it starts to thicken. Add this to the rice and chicken in the crockpot, stir to combine. If mixture is too thick, add additional milk (or water) until it reaches the desired consistency. Serve immediately.
  4. Serves 6
Adapted from Pinch of Yum
Simple Everyday Food https://www.simpleeverydayfood.com/
So there. Next time there’s a snowstorm in the forecast and all you want to do is snuggle on the couch in warm fuzzy blankets drinking hot peppermint cocoa in front of the fireplace, I’ve got dinner covered for you (trust me, I wouldn’t be surprised if we had a snowstorm in April here in Minnesota).

IMG_2533 copy

IMG_2506 copy

Recipe adapted from Pinch of Yum

© Simple Everyday Food. All images & content are copyright protected. Please do not use any of my images without prior permission. If you want to republish this recipe, please re-write the recipe in your own words, or kindly link back to this post for the recipe.

Sharing is caring! Email this to someonePrint this pagePin on PinterestShare on YummlyShare on FacebookShare on Google+Tweet about this on Twitter

Chicken pot pies and I have a love-hate relationship.

I’m absolutely in love with it, but I also know how bad it can be for you… the crust requires butter. The filling also requires butter and some sort of a heavy cream. Annnnddd… it’s super time consuming. But man, is it the ultimate comfort food or what?!

IMG_2042 copy

Chilly weather, warm oversized hoodies, fireplaces, and individualized chicken pot pies…. YES please!

Imagine the moment you stick your fork into the light, flaky, buttery crust… you’re greeted by the warm filling filled with all kinds of yummy goodness –  chunks of chicken, carrots, potatoes, celery, onions, corn, and broccoli florets. Make sure you get a little bit of everything if possible… as you savor the different textures that’s in every single bite, you can feel the the warmth of the pie filling warming your insides as it makes way to your stomach. This is exactly why I love having a hot bowl of soup in the frigid Minnesota winter.

IMG_2060 copy

The past few times I’ve made pot pies, I’ve always made my crust from scratch. However, since I’m typically trying to get six things done at once nowadays, I opted for the easy way out this time and used pre-made pie crust instead… tsk tsk. However, to “balance” out the amount of butter I used, I used skim milk instead of heavy cream… just to make myself feel a little bit better about it.

First I poached the chicken. You can by all means use pre-cooked diced chicken breast if you’re strapped on time, but I find fresh chicken to be better than the processed stuff. Place the chicken in a casserole dish, fill it with 3 cups of boiling water, cover it with foil, and cook it in the oven for 25-30 minutes. Take the chicken out to cool on a cutting board, and use the same water that’s left on the dish to poach/cook your peeled and halved potatoes, about 30 minutes. Dice up the chicken and potatoes once they’re cooled, but keep them in separate dishes.

The reason you keep them separate is because you’ll be covering the bottom of your ramekin with the potatoes. This is because if you add the already cooked potatoes while you’re making and stirring the filling, you’re probably going to mash the potatoes up even more in the process… and no one wants mushy mashed potato/pot pie filling in their chicken pot pies.

While I was cooking/cooling/dicing up the chicken and potatoes, I took out my frozen pre-made pie crust out to thaw. Once thawed, remove the pie crusts from the foil baking dish it came in, onto a floured surface. Roll the dough into a big ball, then roll it out with a rolling pin until it’s about 1/8″ thick. Next, using a bowl that’s slightly bigger in diameter than the ramekins you’ll be using, place the bowl upside down the onto the dough, and trace an outline of it with a knife. This is going to be your pie crust. Use the scraps of dough to roll it back into a ball, and repeat the process until you have about 6-7 pie crusts (we have 8-oz ramekins and two pre-made pie crusts yielded seven 5″ crusts). Stack the crusts together, with either a piece of parchment paper or plastic wrap in between each one. Return to fridge to chill while you’re making the filling.

chicken pot pie
Print
Ingredients
  1. 1 pound boneless, skinless chicken breasts
  2. 2 medium sized russet potatoes, peeled and halved the long way
  3. 7 tablespoons butter, divided
  4. 3 medium sized carrots, peeled and diced
  5. 3-4 stalks of celery, diced
  6. 1 small yellow onion, diced
  7. 1/2 cup all-purpose flour
  8. Salt and black pepper
  9. 3 cups low-sodium chicken broth
  10. 1.5 cups skim milk
  11. 1 cup broccoli florets, roughly chopped
  12. 1/2 cup frozen corn
  13. 1 tablespoon dried parsley
  14. 2 teaspoons chopped fresh thyme
  15. 2 frozen pre-made pie crusts (usually a package you find at the store has 2 crusts)
  16. 6 to 7 (8-oz) ramekins
Instructions
  1. Take frozen pie crust out to thaw. Preheat oven to 400 degrees.
To cook the chicken
  1. Place the chicken breasts in a glass baking/casserole dish. Add 3 cups of boiling water to the chicken and cover with aluminum foil. Cook in oven at 400 degrees for 25-35 minutes. Remove chicken onto cutting board to cool, then dice into bite-sized pieces. Transfer to a bowl and set aside.
To make the potatoes
  1. Using the same dish with the same water you used to cook the chicken, add the potatoes, cover with foil, and cook at 400 degrees for 30 minutes or until fork tender. Transfer to cutting board and let cool. Cut into bite-sized pieces and transfer to another bowl.
Make the pie crust
  1. On a floured surface, remove pie crusts from aluminum baking dishes. Combine the two pie crusts and roll into a dough ball. Using a rolling pin, roll until dough is about 1/8" thick. Find a bowl that's slightly larger in diameter than the ramekins you'll be using. Place the bowl upside down onto the dough, and trace an outline of the bowl with a knife. Combine the scraps of dough and roll it back into a ball. Repeat steps to get as many discs of crusts as you can. Stack the crusts onto a plate, separating each crust with a piece of parchment paper or plastic wrap. Return to fridge to chill.
Make the filling
  1. Melt 3 tablespoons of butter in a large pot over medium heat. Add in the carrots, celery, and onion and cook until onions are translucent. Add 1 teaspoon of salt and 1/2 teaspoon of black pepper. Stir.
  2. Add in the rest of the 4 tablespoons of butter into the vegetable mixture. Once the butter has completely melted, stir in the flour. Stir continuously to make sure the bottom of your pot doesn't burn. Cook flour for 1-2 minutes.
  3. Add in the chicken broth and milk to the vegetables. Cook until mixture starts to thicken, about 5-10 minutes, stirring occasionally. Then add in the diced chicken, broccoli florets, corn, dried parsley, thyme, another 1/4 teaspoon of salt and pepper. Continue to simmer until all the vegetables are cooked. Once filling is thickened and vegetables are cooked, remove pot from heat and let cool for 20-30 minutes.
To assemble
  1. Preheat oven to 375 degrees and grease six 8-oz ramekins. Place ramekins on a rimmed baking sheet.
  2. Add chunks of potatoes onto the bottom of each ramekin, enough to cover the bottom. Spoon the cooled filling mixture over the potatoes, filling each ramekin to the brim. Placed the pie dough you made earlier over the top, crimping the edges. Make several slits with a knife for ventilation.
  3. Bake for 20-25 minutes, or until crust turns golden brown.
  4. Remove ramekins from oven, let cool for 5-10 minutes and serve.
Adapted from Simply Scratch
Simple Everyday Food https://www.simpleeverydayfood.com/
See?! Told you pot pies are time consuming. But I promise it’s totally worth it in the end!! :)

It will be important that you cool the filling down a bit before ladling them into the ramekins and topping them with the dough. This is because if the filling is steaming hot, it could melt your dough and your crust won’t be able to hold its shape while baking.

IMG_2048 copy

IMG_2055 copy

IMG_2063 copy

IMG_2065 copy

This chicken pot pie is TO. DIE. FOR. The filling is creamy and the crust is buttery and flaky. Although the entire process took about 3 hours to complete, the final product sure didn’t disappoint! I’d happily do that all over again tomorrow if I had the time.

Also, just as a warning – the filling will be super hot when it comes out of the oven, so as difficult as it is to sit and wait and be tortured by the smells, letting it cool for a bit before eating is highly recommended! Burnt tongues ruin the enjoyment of eating pot pies, that’s for sure.

Recipe adapted from Simply Scratch

© Simple Everyday Food. All images & content are copyright protected. Please do not use any of my images without prior permission. If you want to republish this recipe, please re-write the recipe in your own words, or kindly link back to this post for the recipe.

Sharing is caring! Email this to someonePrint this pagePin on PinterestShare on YummlyShare on FacebookShare on Google+Tweet about this on Twitter

Now that fall is in the air, all I crave for are comfort foods. Usually this means some sort of soup or casserole dish when it comes to dinner. Don’t even get me started on the numerous desserts that are on my comfort food list – you’d be here for a while, and I’m sure your time is valuable.

Mac & cheese in casserole form is perhaps one of the best comfort foods ever. What’s better than a ooey gooey spiced up mac & cheese with onions, peppers, and seasoned chicken?!

IMG_1920 copy

IMG_1917 copy

Okay, I know a warm brownie with a molten chocolate center served with a side of vanilla bean ice cream probably comes to mind, but stay with me here – right now we’re talking about dinner.

You’re going to laugh at me, but this is the first time I’ve ever bought a block of cheese and shredded it myself with a grater. Yep, first time. I’ve always been lazy and used pre-shredded cheese, but I was told those are usually coated with some sort of a flour-y substance that can change the texture of your dish. So this time I put my grater to use and shredded two blocks of cheese myself, and let me tell you what, I don’t think I’m ever going back to the bagged kind anymore. There’s something about fresh shredded cheese that tastes so much better!

IMG_1910 copy

The two cheeses we use for this dish are Wisconsin sharp cheddar and pepperjack cheese. Pepperjack is perhaps one of my favorite cheeses ever, and it gives the dish a nice little kick that pairs well with the paprika, cumin, and green chiles.

chicken fajita mac and cheese
Print
Ingredients
  1. 12 oz of your favorite pasta
  2. 2 tablespoons EVOO
  3. 1 rotisserie chicken, shredded
  4. 1 teaspoon cumin
  5. ½ teaspoon paprika
  6. A pinch of cayenne pepper, more if desired
  7. 1/4 teaspoon salt
  8. 1/4 teaspoon black pepper
  9. 1 green bell pepper, diced
  10. 1 small yellow onion, diced
  11. 3 cloves garlic, minced
  12. 1 (4 oz) can diced green chiles, drained
  13. ½ cup sour cream
  14. 6 oz shredded sharp cheddar cheese
  15. 6 oz shredded pepper jack cheese
  16. Toppings such as diced tomatoes and cilantro, if desired
Instructions
  1. Preheat oven to 400 degrees.
  2. Cook pasta according to package directions. Drain and set aside.
  3. In a large skillet, heat 1 tablespoon EVOO over medium high heat. Add the chicken, cumin, paprika, cayenne pepper, salt, and black pepper, stir until chicken is coated with the spice mixture. Transfer to a large bowl and set aside.
  4. In the same skillet, heat the remaining tablespoon of EVOO. Saute the garlic, green peppers, and onion over medium high heat until onions turn translucent. Season with salt and pepper to taste. Add in the green chiles and cook for another minute or two.
  5. Pour the vegetable mixture into the large bowl containing the chicken. Stir until combined. Add in the sour cream and the two cheese. Stir some more until everything is thoroughly mixed and there are no clumps of cheese.
  6. Transfer the chicken/vegetable mixture into a 3 quart baking dish. Bake for 15 minutes or until pasta is slightly brown and bubbly.
  7. Serve immediately. If desired, top with diced tomatoes, cilantro, or other garnishes.
  8. Serves 6
Adapted from Annie's Eats
Simple Everyday Food https://www.simpleeverydayfood.com/
If you’re a fan of bell peppers, you can also add in a red and yellow bell pepper to the mix. I’m not a big fan of the red and yellow peppers, so I chose to leave them out of the recipe. However, I do like fresh tomatoes with my fajitas, so I diced up some tomatoes and added them to my bowl. A little bit of chopped up cilantro is also highly recommended – it really brings out the Mexican flavors and it gives the dish a nice bright flavor.

IMG_1923 copy

IMG_1926 copy

I also chose to use rotisserie chicken to save some time – it’s a good way to get rid of leftover rotisserie chicken! If you prefer to cook your chicken yourself, just substitute the rotisserie chicken with two diced up chicken breasts instead.

On a totally different subject, I really shouldn’t have mentioned that warm brownie. Now I need to go make myself a brownie in a mug…

What’s your favorite comfort food?

Recipe adapted from Annie’s Eats

© Simple Everyday Food. All images & content are copyright protected. Please do not use any of my images without prior permission. If you want to republish this recipe, please re-write the recipe in your own words, or kindly link back to this post for the recipe.

Sharing is caring! Email this to someonePrint this pagePin on PinterestShare on YummlyShare on FacebookShare on Google+Tweet about this on Twitter

It’s midquarter already – that means there’s only about 5 more weeks of class until summer. But it also means that there’s only 5 weeks left until all 5 of my projects are due.

Well, since it’s the weekend and it’s the perfect time to catch up on homework, what better meals to prepare than something in a Crockpot? Something simple, something healthy, and something tasty. Then I won’t have to slave in the kitchen for hours prepping and cooking.

IMG_0818

IMG_0840

IMG_0843

crockpot cilantro lime chicken tacos
Print
Ingredients
  1. 1 lb. boneless skinless chicken breasts
  2. Juice from 2 limes
  3. 1/2 cup of cilantro
  4. 1 packet of taco seasoning
  5. 1/4 cup diced onions
  6. 1/2 cup of water
  7. Salt & pepper
  8. Taco tortillas
Instructions
  1. In a 3-5 quart Crockpot, combine everything except the chicken. Stir well, then add the chicken.
  2. Cook on low for about 4-6 hours or until the chicken is tender enough to shred with a fork.
  3. Take the chicken out and place on a plate. Shred, then drizzle some of the remaining sauce over the chicken to keep it moist.
  4. Spoon the chicken mixture into soft taco tortillas. Top with your favorite toppings.
Notes
  1. We cooked the chicken for about 8 hours and it turned out a tad on the dry side. It was already very tender at about the 4-6 hour mark, so next time we'll be keeping an eye on it to make sure it stays juicy.
Adapted from The Vintage Grove
Simple Everyday Food https://www.simpleeverydayfood.com/
IMG_0844

Another bonus of making Crockpot meals – not a whole lot of dishes to clean up in the end!

Oh hey, just in time for Cinco de Mayo!

Enjoy!

Recipe adapted from The Vintage Grove

Sharing is caring! Email this to someonePrint this pagePin on PinterestShare on YummlyShare on FacebookShare on Google+Tweet about this on Twitter