everyday food made simple

I hope everyone had a wonderful 4th that was celebrated by spending time with family, nice weather, and plenty of good food! It’s funny that in our family, we (and by “we”, I mean “I”) usually plan an excessively long list of things I want to make for the holidays despite the fact that it’s usually the two of us. It’s not one of those “oh these are the things I want to make, but I probably won’t make everything”.  Noooooo siree! I’m the one who plans and executes. If I want to make it, I will make it.

You should’ve seen the list I made for Thanksgiving last year – it was ridiculous. I think I had 8-9 things on the menu just to feed the two of us, from appetizers to side dishes to dessert – we were covered in the event of a zombie apocalypse and we couldn’t leave the house for 3 weeks. There was so much food that we barely had enough counter space to put everything!

The big holiday itself usually gets a lot of attention and planning ahead, but not everyone plans for breakfast the morning after when everyone wakes up from the food coma. In case you’re still looking for a easy breakfast option for tomorrow, I’ve got you covered!

IMG_3098 copy

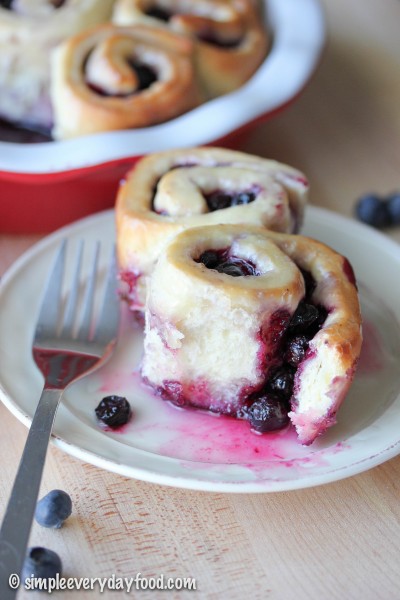
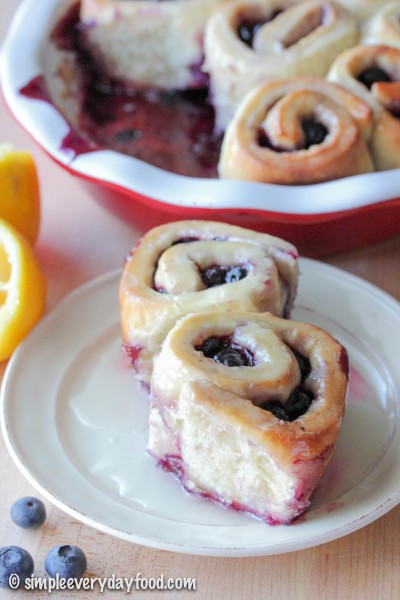
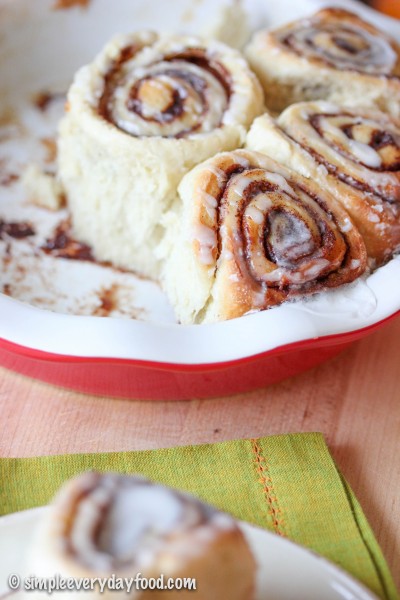
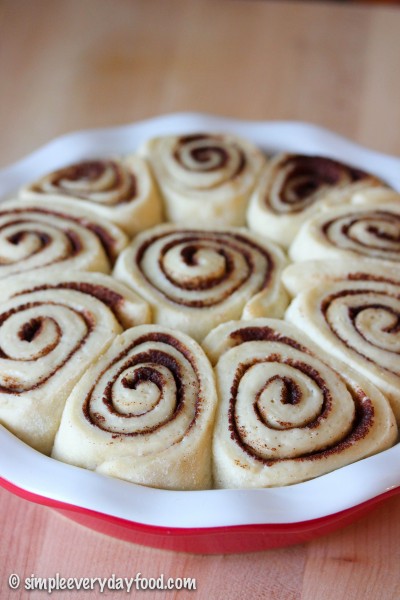
These cinnamon rolls can be easily made the night before, so when you wake up and want breakfast, you only have to wait less than 30 minutes for a piping hot, fresh out-of-the-oven, mouth-watering, gooey, sweet cinnamon roll! And let me tell you, it’s totally worth the wait, because these are deeeelish!

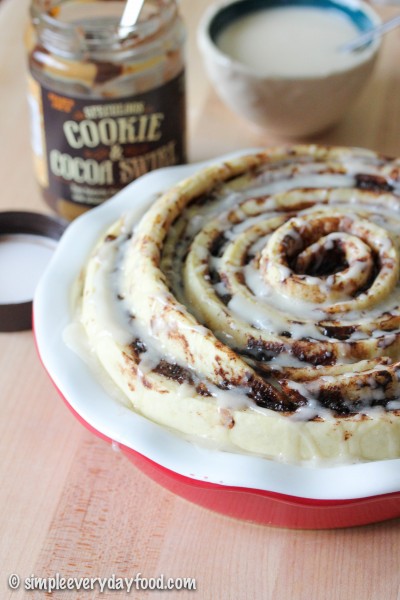
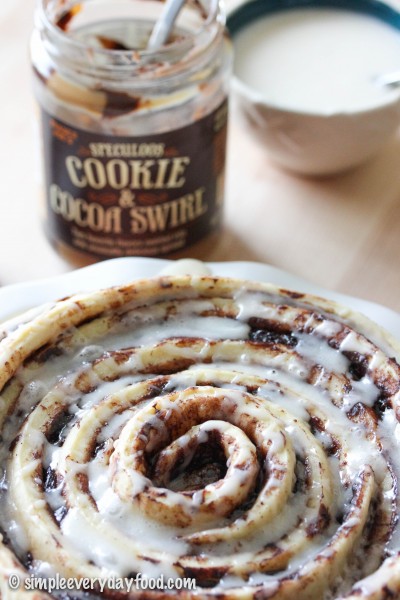
Chocolate + cookie butter + maple glaze + fluffy rolls = it’s practically heaven! I could eat this every weekend.

IMG_3103 copy

I’m personally a big fan of overnight cinnamon roll recipes, simply because I my stomach doesn’t have the patience to wait long for food in the morning. All the hard work is put in the night before, so all you have to do is throw it in the oven, make the glaze, wait, and enjoy the next morning – pretty easy, eh?

IMG_3095 copy

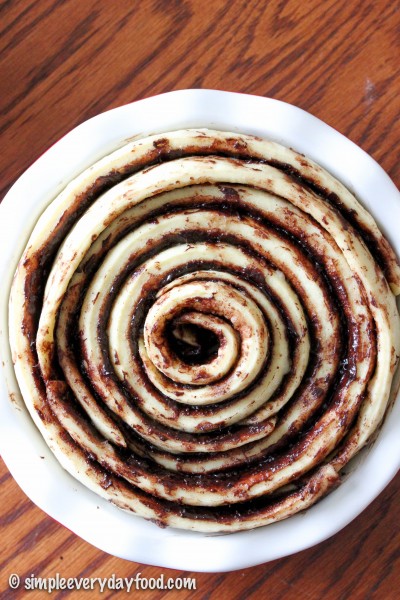
[loosely coil the strips to allow room for the dough to rise overnight]

IMG_3092 copy

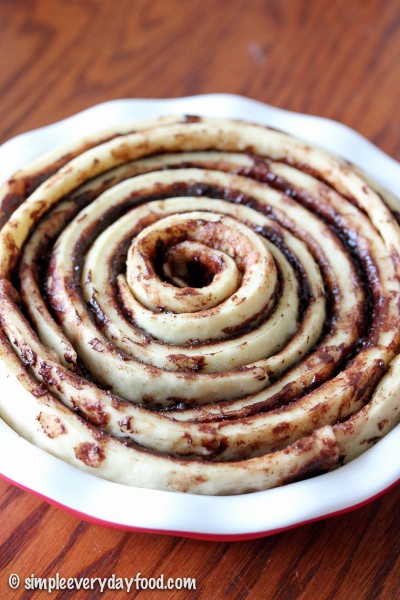
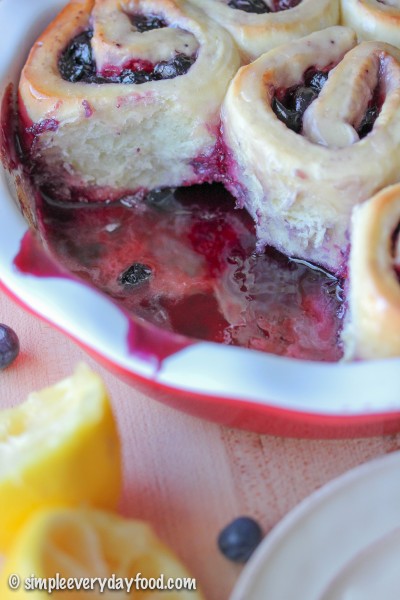
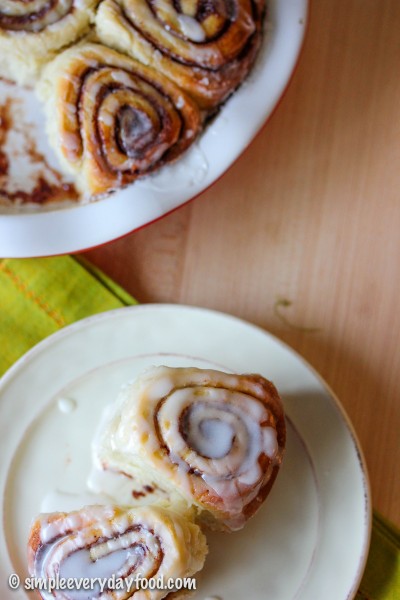
This giant spiral cinnamon roll is so pretty to look at, and even more fun to eat. You can either cut it into wedges and serve it like you would cake, or you can do what we did, and peel off the strips as you go. I highly recommend the latter, simply because it’s always fun when you get to eat with you hands, and eating it this way kind of reminds me of tearing off little pieces of bubble tape gum from when I was little (remember those? The gum whose flavor only lasts 5 seconds?).

IMG_3105 copy

giant spiral cinnamon roll with vanilla maple glaze
Print
For the roll
  1. 2 and 3/4 cup all-purpose flour
  2. 3 tablespoons granulated sugar
  3. 1 teaspoon salt
  4. 1 package instant yeast
  5. 1/2 cup water
  6. 1/4 cup skim milk
  7. 3 tablespoons unsalted butter
  8. 1 egg, at room temperature
For the filling
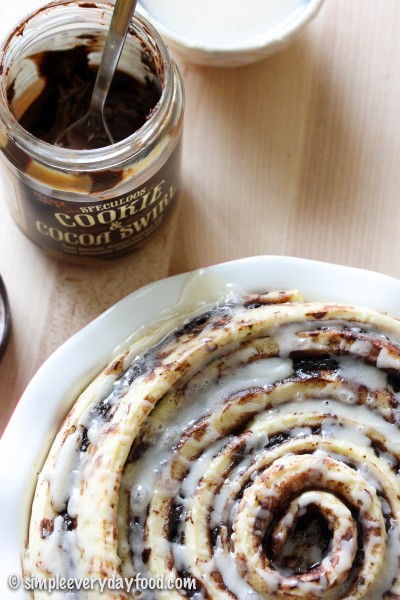
  1. 2/3 cup chocolate cookie butter (I used Speculoos chocolate cookie butter from Trader Joe's), softened slightly by microwaving it for 10-15 seconds
  2. 2 tablespoons ground cinnamon
For the glaze
  1. 1 cup powdered sugar
  2. 1 tablespoon heavy cream
  3. 1 tablespoon pure maple syrup
  4. 1 teaspoon pure vanilla extract
Instructions
  1. To make the dough, set aside 1/2 cup flour. In a large electric mixer bowl, combine the remainder of the flour, sugar, salt, and yeast together. Set aside.
  2. In a microwavable bowl, heat the water, milk, and butter together until the butter is melted and the mixture is hot to touch. Stir the butter mixture into the flour mixture over medium-low speed. Increase the speed to medium, add in the egg and just enough of the reserved flour until the dough is soft, pulls away from the sides of the bowl, and is no longer sticky (I used the entire 1/2 cup, but you may not have to use it all).
  3. Knead the dough for 3-4 minutes on a lightly floured surface. Form the dough into a ball and place in a lightly greased bowl. Cover and let sit for 30 minutes. In the meantime, spray a 9" pie pan with nonstick cooking spray and set aside.
  4. After 30 minutes, roll the dough out on a lightly floured surface into a 15x12" rectangle. Spread the slightly softened cookie butter over the top, then sprinkle the ground cinnamon.
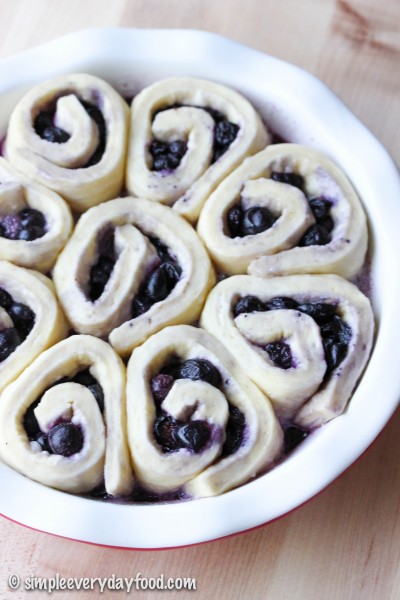
  5. Using a pizza cutter, cut the dough into six 2" wide strips (cut the the long way). Loosely roll up one strip (kind of like a fruit roll-up) and place in the center of the pan. Wrap the remaining 5 strips loosely around the center one, starting each strip at the end of the previous one so the end product looks like a giant spiraled cake.
  6. Loosely cover the roll with aluminum foil and let rise in a warm, draft-free area overnight.
  7. The next morning, bake cinnamon roll at 350 degrees for 30-35 minutes or until lightly browned. I covered the top with aluminum foil 15 minutes into baking to prevent excessive browning on top.
  8. Remove the cake and let cool for 10 minutes. In the meantime, make the glaze by whisking all the glaze ingredients together until smooth. Drizzle over the rolls prior to serving.
  9. Serve immediately, or cover it tightly with foil and store up at room temperature for up to 3 days.
Adapted from Sally's Baking Addiction
Simple Everyday Food https://www.simpleeverydayfood.com/
Recipe adapted from Sally’s Baking Addiction

© Simple Everyday Food. All images & content are copyright protected. Please do not use any of my images without prior permission. If you want to republish this recipe, please re-write the recipe in your own words, or kindly link back to this post for the recipe.

Sharing is caring! Email this to someonePrint this pagePin on PinterestShare on YummlyShare on FacebookShare on Google+Tweet about this on Twitter

IMG_3514 copy

Has anyone else been sucked into the World Cup frenzy? Just like any other major international sporting event, the World Cup is one that I always look forward to, and this year was no exception.

My sister and I got into soccer way back in 2002. Unlike the U.S., every time the World Cup rolls around, it’s a big deal in Taiwan – all sorts of World Cup-related merchandise can be seen around every street corner. My sister and I’s favorite team (even til today) is Germany. I remember we’d set our alarms and wake up at 3 a.m. to watch them play. Because we lived in a small apartment, we’d tip toe around the house in the middle of the night, trying to rub the sleepiness away from our eyes, and muting the TV because we were afraid to risk waking up our parents and getting sent back to bed. We’d watch in silence, whispering to each other during the game, and silently cheer on our team. After the game was over, we’d put the remote right where we found it and sneak back into bed, waking up the next morning tired and exhausted (yeah, we had it down to a science).

Sounds crazy, but at that time, it was all so worth it.

For the past two World Cup games, I had to watch them by myself here in the U.S. while my sister caught the games back in Taiwan. We still watch the games, text each other about the results, and cheer on our team together. Some things just never change.

Now, onto this recipe..

IMG_3493 copy

Can I just say how good this loaf cake is? The cake itself is soft and moist, the lemons give it a sweet yet tangy flavor, and the poppy seeds inside almost pops in your mouth. None of the flavors are heavy and overpowering – every component does its part to make this a light, summery recipe. The glaze on top is really optional, although I do highly recommend it as it adds an extra punch of lemon flavor to it, and the fact that no on ever turns down a layer on yummy sugary glaze on top of any kind of dessert.

IMG_3506 copy

The best part? You can eat it for breakfast, as a afternoon (or mid-morning) snack, or even as a light dessert after dinner. I placed it under the “breakfast” category simply because I ate it more for breakfast as opposed to dessert, even though no one ever said you can’t eat cake for breakfast…..

IMG_3497 copy

lemon poppy seed loaf cake
Print
For the cake
  1. 2 cups all-purpose flour
  2. 2 tablespoons poppy seeds
  3. 1 and 1/2 tablespoons lemon zest
  4. 3/4 teaspoon baking powder
  5. 3/4 teaspoon baking soda
  6. 1/4 teaspoon salt
  7. 1 tablespoon vegetable oil
  8. 1 egg, at room temperature
  9. 1 tablespoon vanilla extract
  10. 2/3 cup granulated sugar
  11. 1/3 cup plain Greek yogurt
  12. 2 tablespoons fresh lemon juice
  13. 6 tablespoons milk
For the glaze
  1. 4 tablespoons powdered sugar
  2. 1/4 teaspoon almond extract
  3. 1 teaspoon milk
  4. 1/2 teaspoon lemon zest
Instructions
  1. Preheat oven to 350 degrees. Coat a 9x5" loaf pan with nonstick cooking spray and set aside.
  2. In a medium bowl, whisk together the flour, poppy seeds, lemon zest, baking powder, baking soda, and salt.
  3. In a large bowl, combine the oil, egg, and vanilla extract. Mix to combine. Then whisk in the sugar, yogurt, and lemon juice until thoroughly incorporated. Alternate between adding the flour mixture and the milk (I added 1/3 of the flour, 1/2 of the milk, 1/3 of the flour, 1/2 of the milk, then the remaining 1/3 of the flour).
  4. Pour the batter in the loaf pan and bake for 45-50 minutes, or until an inserted toothpick comes out clean. If you notice the top is browning too fast, cover the pan with a tented tin foil after the first 30-40 minutes.
  5. Cool the pan for at least 15 minutes, then turn onto a wired cooling rack to cool completely.
  6. While the cake is cooling, prepare the glaze by whisking all the glaze ingredients in a small bowl. Drizzle over the top of the cooled caked. Cake may be sliced and stored in an airtight container for up to 5 days.
Adapted from Amy's Healthy Baking
Simple Everyday Food https://www.simpleeverydayfood.com/
Recipe adapted from Amy’s Healthy Baking

© Simple Everyday Food. All images & content are copyright protected. Please do not use any of my images without prior permission. If you want to republish this recipe, please re-write the recipe in your own words, or kindly link back to this post for the recipe.

Sharing is caring! Email this to someonePrint this pagePin on PinterestShare on YummlyShare on FacebookShare on Google+Tweet about this on Twitter

After close to a two-month hiatus from SEF, I’m glad to announce that I’ll start posting more on a regular basis! In the past few months, I’ve successfully passed my boards, settled into a nice routine on the new job, read a few books, and finally had some time to relax and not stress about anything. It was nice, but I’m excited to be back – SEF has been a little neglected and could really use a little TLC…

Last year, I conquered my fear of baking with yeast, and successfully made my first ever homemade cinnamon rolls! Ever since, I’ve made several different renditions of some sort of breakfast “rolls” on weekends both Brian and I have off together. These blueberry sweet rolls are perhaps one of my favorite ones I’ve made so far!

Yep, you’ve heard me correctly – juicy blueberries bursting with flavor, combined with a sweet tangy lemon glaze.. it’s practically heaven!

IMG_2819 copy

IMG_2838 copy

IMG_2844 copy

Just like the cinnamon rolls I’ve previously made, these are also overnight sweet rolls, meaning you won’t have to get up extra early for any type of prep work.

Now, onto a few technical things before you dive on in to make these this weekend:

  • When you toss the blueberries into the sugar/cornstarch mixture, it’ll seem like you’ll have a lot of sugar left on the bottom. Don’t panic! The blueberries will slowly absorb the sugar and cornstarch while you’re making the dough.
  • After you spread out the blueberries onto your dough, you’ll feel like there’s really not a lot of blueberry filling. The blueberry mixture will not completely cover the entire surface of the dough, and that’s totally okay. It’ll be plenty as you try to roll up the dough tightly – this really was the hardest part for me! They were harder to roll because the blueberries will seem like they have a mind of their own and would be rolling all over the place.
  • If you’re the impatient kind and can’t help but peek at how much your rolls have risen every two hours (ahem), don’t be alarmed if they don’t seem like they’re doing much after 4-6 hours. Because we’re using frozen blueberries in the filling, it’ll make the dough colder in temperature, therefore it’ll take a little bit longer for it to rise.

As the dough rises overnight, something magical happens: the frozen blueberries release their juices, and you get a delicious pool of blueberry juice on the bottom of the pan as a result. When you check on the rolls in the morning, you may notice the juices are practically half-overflowing to the top of the pan – this is okay! Because the juices will thicken as they bake, which is perfect if you like a little extra blueberry goo to go with your sweet rolls :)

IMG_2814 copy

IMG_2837 copy

IMG_2824 copy

overnight blueberry sweet rolls with lemon glaze
Print
For the rolls
  1. 2 and 3/4 cups all-purpose flour
  2. 3 tablespoons granulated sugar
  3. 1 teaspoon salt
  4. 1 package dry active yeast
  5. 1/2 cup water
  6. 1/4 cup milk
  7. 2.5 tablespoons unsalted butter
  8. 1 large egg, at room temperature
For the filling
  1. 1 and 1/3 cups frozen blueberries
  2. 1/4 cup granulated sugar
  3. 1 teaspoon cornstarch
For the glaze
  1. Juice from half a lemon
  2. 1 cup powdered sugar
  3. 1-2 tablespoons milk
Make the filling
  1. Combine the frozen blueberries, sugar, and cornstarch in a medium-sized bowl. Toss to coat and set aside. There might seem to be a lot of sugar on the bottom - don't worry!
Make the dough
  1. Set aside 1/2 cup flour. In the bowl for an electric mixer, combine the remaining flour, sugar, salt, and yeast together. Stir until combined. Attach the dough hook attachment onto your mixer.
  2. In a medium microwave-safe bowl, heat the water, milk, and butter together in the microwave until the mixture is hot to touch and the butter is melted. Pour the butter mixture into the flour mixture and stir on medium speed. Then add the egg and only enough of the reserved flour to make the dough. I used the entire 1/2 cup, but you may not use it all. You'll know you've added enough when the dough is soft, pulls away from the sides of the bowl, and is no longer sticky.
  3. On a lightly floured surface, knead the dough for 5 minutes. Place the dough ball in a lightly greased bowl, making sure all surfaces of the dough ball is lightly greased. Let sit for 10 minutes.
  4. While your dough rises, make the filling by tossing the ground cinnamon and sugar together in a small bowl.
  5. After the 10 minutes, roll out your dough into roughly a 14"x8" rectangle. Give the blueberry mixture a final toss, and spread them evenly across the dough. Roll up the dough tightly and cut into 9-10 even pieces, about 1.5" each. Place into a lightly greased 9" pie pan, making sure you leave enough room between each roll for it to rise.
  6. Loosely cover the pan with aluminum foil and let it sit overnight, up to 12 hours, at room temperature. The rolls should have doubled in size when you check on them the next morning.
  7. When you're ready to bake them the next morning, preheat the oven to 375 degrees. Bake for 25-27 minutes, covering the top with aluminum foil 15 minutes into baking to prevent excessive browning on top.
  8. While the rolls are baking, make the glaze by mixing the powdered sugar, 1 tablespoon of milk, and lemon juice in a small bowl. Add more milk if the glaze is too thick.
  9. When the rolls are done baking, remove from oven and drizzle them generously with the glaze. Rolls are best served warm and on the same day, even though they can be stored in an airtight container for up to 3 days.
  10. Makes 9-10 rolls
Adapted from Sally's Baking Addiction
Simple Everyday Food https://www.simpleeverydayfood.com/
My oh my were these good! Sweet, fluffy rolls with blueberries that are just bursting in flavor, combined with a tangy, sweet, tart lemony glaze – I can’t think of a more perfect way to start a morning!

IMG_2817 copy

If you happen to have a few extra leftovers, place it in the microwave and heat it up for 10-20 seconds* until warm. The congealed blueberry juice on the bottom will liquefy again and the rolls will taste just as good as they were when they came out of the oven!

*the amount of time the rolls need to be microwaved may depend on the model and type of the microwave you have

Recipe adapted from Sally’s Baking Addiction

© Simple Everyday Food. All images & content are copyright protected. Please do not use any of my images without prior permission. If you want to republish this recipe, please re-write the recipe in your own words, or kindly link back to this post for the recipe.

Sharing is caring! Email this to someonePrint this pagePin on PinterestShare on YummlyShare on FacebookShare on Google+Tweet about this on Twitter

IMG_3185 copy 

It’s funny how fast our body adjusts to a new routine. Just two months ago, I was used to going to bed at 2:30 a.m. and sleeping in until at least 10:30. By the time I finally get myself out of bed, it’s usually around 11. Back then, I didn’t have to work until 5 p.m. so on the days I actually eat breakfast (I had a bad habit of drinking coffee for breakfast), I took my time making something delicious and nutritious… usually some sort of an egg sandwich or scrambled eggs with a side of greens and some rice.

Just one month into my new job, the only time I get to spend my sweet time deciding on what to have (or not have) for breakfast now are the weekends. My new job requires me to be up at 4:00 a.m… keep in mind that before February 3rd, 2014, I have never gotten up at 4 a.m. for anything. This whole “getting up early in the morning” thing has been brand new for me. I have also realized that at 4 a.m., neither my mind nor my body are awake enough to even lift a frying pan to cook anything on the stove. This is why this past weekend, I decided to make a batch of easy breakfast muffins as a quick and easy breakfast option. These are especially helpful on the days where I end up hitting the snooze button 9 times, as it can easily be packed in my lunchbox for me to eat once I get to work.

IMG_3178 copy

Today I present to you: earl grey breakfast muffins with a streusel topping. That’s right, you’ve heard read correctly – on top of these spongy soft muffins lays a generous layer of crunchy, buttery, sweet streusel topping, because let’s face it – muffins are good, but muffins with streusel topping? Even better.

IMG_3193 copy

IMG_3176 copy

You know what’s even better? The fact that these muffins can easily be made without a mixer. Just a few bowls, a spatula/whisk, and some arm strength is all that’s required. Now I’m going to share a little secret: the key to making the batter is to make sure that all your ingredients are at room temperature... this includes your eggs and sour cream and everything else. I melted my butter and brewed my earl grey tea around the same time, and let both of them sit to cool for at least 20 minutes until it’s no longer warm to the touch. During this time, I occupied myself with catching up with my Instagram feed, picking up a dozen dog toys off the living room floor, vacuuming, and reading a few pages of my new book (The Goldfinch).

Once all the components are ready, the mixing and assembly literally only takes about 10-15 minutes, then bake these in the oven until an inserted toothpick comes out clean. This took 24 minutes in our oven, but every oven is different so start keeping an eye on it around the 20 minute mark.

IMG_3186 copy

Because these muffins freeze well, I divided these them into two batches – one for now and one for later. I kept about half on the counter and literally snacked on them all day, while the other half was stored in an airtight container in the freezer… you know, for mornings where you’d rather trade “time to eat breakfast on the couch” with “10 more minutes of sleep under some warm covers” (which for me, is almost everyday). If you’re anticipating a busy morning, take a few of these out to thaw overnight. Otherwise pop them in the microwave for half a minute or so, or until they’re warm and ready to eat.

The fact that there’s a slight hint of earl grey tea in it also makes me think it’ll keep me going in the morning since it technically contains a small amount of caffeine. It’s all mental, I tell ya.

IMG_3188 copy

earl grey breakfast muffins
Print
For the streusel
  1. 2/3 quick cooking oats
  2. 2/3 cup brown sugar
  3. 2/3 cup all-purpose flour
  4. 1/4 teaspoon salt
  5. 5 tablespoons cold butter, cut into cubes
For the muffin batter
  1. 2 cups all purpose flour
  2. 1 teaspoon baking powder
  3. 1/2 teaspoon cinnamon
  4. 1/2 teaspoon salt
  5. 1/4 teaspoon baking soda
  6. 3 large eggs, at room temperature
  7. 3/4 cup granulated sugar
  8. 1/2 cup (1 stick) butter, melted
  9. 3/4 cup sour cream
  10. 1/3 cup strongly brewed Earl grey tea
  11. 1 teaspoon vanilla extract
To make the streusel
  1. Combine the oats, brown sugar, flour, and salt in a medium sized bowl. Using a pastry cutter or two forks, work in the cold butter until the mixture resembles coarse crumbs (I found it easier to use my hands to mix everything together after initially incorporating the ingredients with a pastry cutter). Set aside.
To make the batter
  1. Preheat the oven to 350 degrees. Line approximately 16 muffin tins with liners.
  2. In a medium-sized bowl, combine the flour, baking powder, cinnamon, salt, and baking soda. Stir until combined.
  3. In another larger bowl, whisk the sugar and butter until mixed. Then add the eggs, one at a time, until combined. Then add in the sour cream, Earl grey tea, and vanilla extract. Stir some more. Then slowly add in the flour mixture and mix until everything is thoroughly incorporated.
  4. Scoop batter into muffin tins about 1/2-3/4 full. Top with a generous amount of the streusel topping. Bake for 22-24 minutes, or until an inserted toothpick comes out clean. Store an an airtight container for up to 5 days (or put them in a freezer and simply thaw out in room temperature for a later date).
  5. Makes 16 muffins
Adapted from Food Network Magazine
Simple Everyday Food https://www.simpleeverydayfood.com/
Recipe adapted from Food Network Magazine

© Simple Everyday Food. All images & content are copyright protected. Please do not use any of my images without prior permission. If you want to republish this recipe, please re-write the recipe in your own words, or kindly link back to this post for the recipe.

Sharing is caring! Email this to someonePrint this pagePin on PinterestShare on YummlyShare on FacebookShare on Google+Tweet about this on Twitter

A few weeks ago, the temperature here in the Twin Cities Metro area dropped all the way down to -20 degrees (-35 with the windchill factor). If you follow me on Instagram, you were probably sick of seeing me post pictures of how cold it was.

photo 2

(note the -61 degree F wind chill factor)

Needless to say, I was not at all thrilled.

All I craved were something sweet and decadent for breakfast, hot steaming coffees throughout the day, and hearty soups and warm comforting casseroles for dinner. That’s when I decided cinnamon rolls sounded like the perfect breakfast idea for a cold snowy morning.

These cinnamon rolls can easily be make the night before. You let it sit on the counter to rise overnight, place it in the oven for 30 minutes the next morning, and voila! Warm steamy gooey cinnamon rolls drenched in a sweet sticky glaze, ready to be devoured. You can also make these the morning of, but let’s face it – why get up early to make breakfast when you can get it ready the night before and spend an extra hour or two curled up in warm blankets the next morning?!

IMG_2578 copy

IMG_2573 copy

I know a lot of people are afraid of working with yeast – I’ll admit it, I was too… until now. I’ve always felt like yeast is a tricky little thing to bake with. It just seemed like a very sensitive ingredient… if you don’t pay enough attention to it, your whole plan might fail. However, these cinnamon rolls are suuuuuper easy! Even I, a making-anything-with-yeast-rookie was able to successfully execute this recipe – which means that there’s not excuse you won’t be able to!

I think my favorite part of my first-ever-cinnamon-roll-making-experience was the smell of these rolls before and during the baking process. I absolutely loved waking up to the sweet smell of rising yeasty dough, and the fact that it made my house smell like a Cinnabon factory while they cooked in the oven.

IMG_2555 copy

Hot, gooey, pillowy, soft, melt-in-your-mouth goodness, complete with a sweet vanilla glaze that will have you licking every single one of your fingers afterwards!

IMG_2591 copy

homemade overnight cinnamon rolls
Print
For the rolls
  1. 2 and 3/4 cups all-purpose flour
  2. 3 tablespoons granulated sugar
  3. 1 teaspoon salt
  4. 1 package of active dry yeast
  5. 1/2 cup water
  6. 1/4 cup milk
  7. 2 and 1/2 tablespoons unsalted butter
  8. 1 egg, at room temperature
For the filling
  1. 3 tablespoons unsalted butter, softened to room temperature
  2. 1 and 1/2 heaping tablespoons ground cinnamon
  3. 1/4 cup granulated sugar
For the glaze
  1. 1 cup powdered sugar
  2. 1-2 tablespoons milk
  3. 1 teaspoon vanilla extract
Instructions
  1. Set aside 1/2 cup flour. In the bowl for an electric mixer, combine the remaining flour, sugar, salt, and yeast together. Stir until combined. Attach the dough hook attachment onto your mixer.
  2. In a medium microwave-safe bowl, heat the water, milk, and butter together in the microwave until the mixture is hot to touch and the butter is melted. Pour the butter mixture into the flour mixture and stir on medium speed. Then add the egg and only enough of the reserved flour to make the dough. I used the entire 1/2 cup, but you may not use it all. You'll know you've added enough when the dough is soft, pulls away from the sides of the bowl, and is no longer sticky.
  3. On a lightly floured surface, knead the dough for 5 minutes. Place the dough ball in a lightly greased bowl, making sure all surfaces of the dough ball is lightly greased. Let sit for 10 minutes.
  4. While your dough rises, make the filling by tossing the ground cinnamon and sugar together in a small bowl.
  5. After the 10 minutes, roll out your dough into roughly a 14"x8" rectangle. Spread the softened butter all over. Sprinkle the cinnamon sugar mixture on top - be generous! Add more if needed.
  6. Roll up the dough tightly and cut into 10 even pieces, about 1.5" each. Place into a lightly greased 9" pie pan, making sure you leave enough room between each roll for it to rise.
  7. Loosely cover the pan with aluminum foil and let it sit overnight, up to 12 hours, at room temperature. The rolls should have doubled in size when you check on them the next morning.
  8. When you're ready to bake them the next morning, preheat the oven to 375 degrees. Bake for 25-27 minutes, covering the top with aluminum foil 15 minutes into baking to prevent excessive browning on top.
  9. While the rolls are baking, make the glaze by mixing the powdered sugar, 1 tablespoon of milk, and vanilla extract in a small bowl. Add more milk if the glaze is too thick.
  10. When the rolls are done baking, remove from oven and drizzle them generously with the glaze. Rolls are best served warm and on the same day, even though they can be stored in an airtight container for up to 3 days.
  11. Makes 10 rolls
Adapted from Sally's Baking Addiction
Simple Everyday Food https://www.simpleeverydayfood.com/
IMG_2563 copy

Now that I have conquered my fear of baking with yeast, don’t be surprised if you see more bread, pizza dough, and sweet rolls recipes on here in the future :)

Recipe adapted from Sally’s Baking Addiction

© Simple Everyday Food. All images & content are copyright protected. Please do not use any of my images without prior permission. If you want to republish this recipe, please re-write the recipe in your own words, or kindly link back to this post for the recipe.

Sharing is caring! Email this to someonePrint this pagePin on PinterestShare on YummlyShare on FacebookShare on Google+Tweet about this on Twitter