After close to a two-month hiatus from SEF, I’m glad to announce that I’ll start posting more on a regular basis! In the past few months, I’ve successfully passed my boards, settled into a nice routine on the new job, read a few books, and finally had some time to relax and not stress about anything. It was nice, but I’m excited to be back – SEF has been a little neglected and could really use a little TLC…
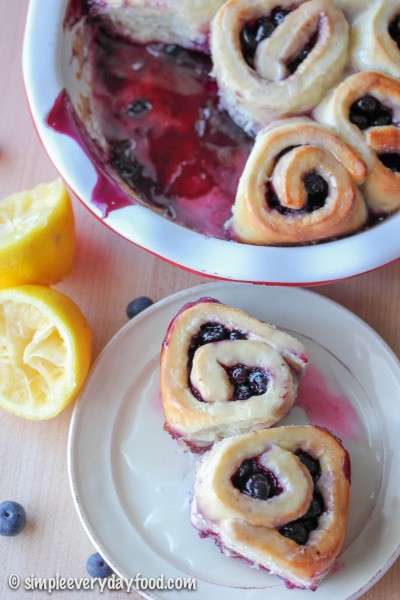
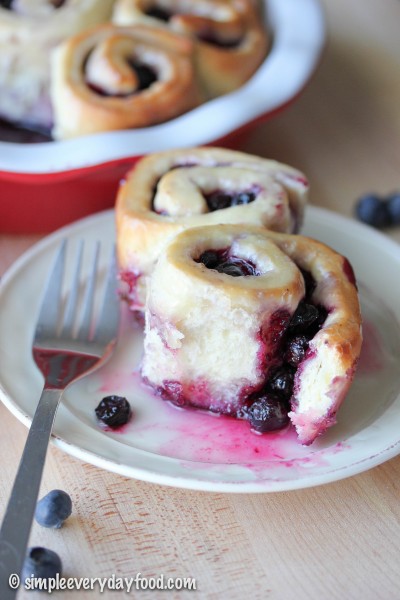
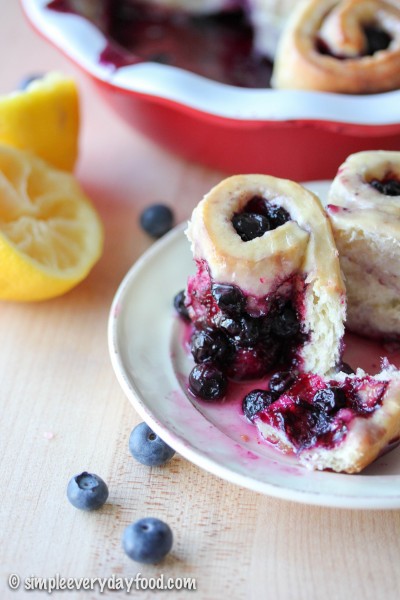
Last year, I conquered my fear of baking with yeast, and successfully made my first ever homemade cinnamon rolls! Ever since, I’ve made several different renditions of some sort of breakfast “rolls” on weekends both Brian and I have off together. These blueberry sweet rolls are perhaps one of my favorite ones I’ve made so far!
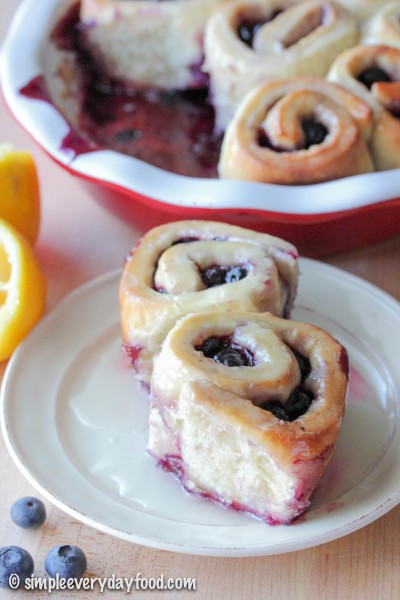
Yep, you’ve heard me correctly – juicy blueberries bursting with flavor, combined with a sweet tangy lemon glaze.. it’s practically heaven!
Just like the cinnamon rolls I’ve previously made, these are also overnight sweet rolls, meaning you won’t have to get up extra early for any type of prep work.
Now, onto a few technical things before you dive on in to make these this weekend:
- When you toss the blueberries into the sugar/cornstarch mixture, it’ll seem like you’ll have a lot of sugar left on the bottom. Don’t panic! The blueberries will slowly absorb the sugar and cornstarch while you’re making the dough.
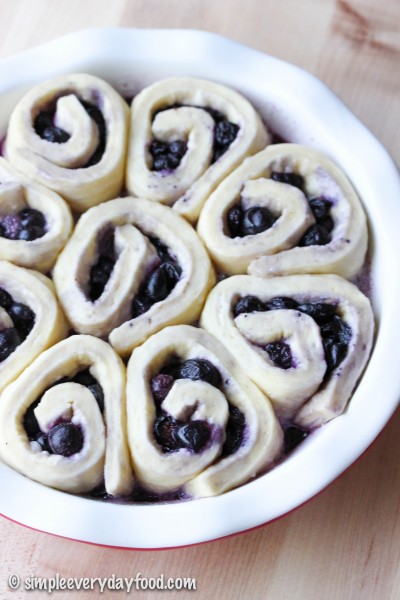
- After you spread out the blueberries onto your dough, you’ll feel like there’s really not a lot of blueberry filling. The blueberry mixture will not completely cover the entire surface of the dough, and that’s totally okay. It’ll be plenty as you try to roll up the dough tightly – this really was the hardest part for me! They were harder to roll because the blueberries will seem like they have a mind of their own and would be rolling all over the place.
- If you’re the impatient kind and can’t help but peek at how much your rolls have risen every two hours (ahem), don’t be alarmed if they don’t seem like they’re doing much after 4-6 hours. Because we’re using frozen blueberries in the filling, it’ll make the dough colder in temperature, therefore it’ll take a little bit longer for it to rise.
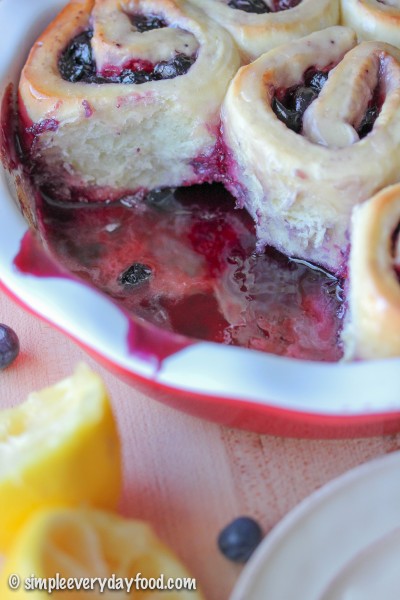
As the dough rises overnight, something magical happens: the frozen blueberries release their juices, and you get a delicious pool of blueberry juice on the bottom of the pan as a result. When you check on the rolls in the morning, you may notice the juices are practically half-overflowing to the top of the pan – this is okay! Because the juices will thicken as they bake, which is perfect if you like a little extra blueberry goo to go with your sweet rolls :)

- 2 and 3/4 cups all-purpose flour
- 3 tablespoons granulated sugar
- 1 teaspoon salt
- 1 package dry active yeast
- 1/2 cup water
- 1/4 cup milk
- 2.5 tablespoons unsalted butter
- 1 large egg, at room temperature
- 1 and 1/3 cups frozen blueberries
- 1/4 cup granulated sugar
- 1 teaspoon cornstarch
- Juice from half a lemon
- 1 cup powdered sugar
- 1-2 tablespoons milk
- Combine the frozen blueberries, sugar, and cornstarch in a medium-sized bowl. Toss to coat and set aside. There might seem to be a lot of sugar on the bottom - don't worry!
- Set aside 1/2 cup flour. In the bowl for an electric mixer, combine the remaining flour, sugar, salt, and yeast together. Stir until combined. Attach the dough hook attachment onto your mixer.
- In a medium microwave-safe bowl, heat the water, milk, and butter together in the microwave until the mixture is hot to touch and the butter is melted. Pour the butter mixture into the flour mixture and stir on medium speed. Then add the egg and only enough of the reserved flour to make the dough. I used the entire 1/2 cup, but you may not use it all. You'll know you've added enough when the dough is soft, pulls away from the sides of the bowl, and is no longer sticky.
- On a lightly floured surface, knead the dough for 5 minutes. Place the dough ball in a lightly greased bowl, making sure all surfaces of the dough ball is lightly greased. Let sit for 10 minutes.
- While your dough rises, make the filling by tossing the ground cinnamon and sugar together in a small bowl.
- After the 10 minutes, roll out your dough into roughly a 14"x8" rectangle. Give the blueberry mixture a final toss, and spread them evenly across the dough. Roll up the dough tightly and cut into 9-10 even pieces, about 1.5" each. Place into a lightly greased 9" pie pan, making sure you leave enough room between each roll for it to rise.
- Loosely cover the pan with aluminum foil and let it sit overnight, up to 12 hours, at room temperature. The rolls should have doubled in size when you check on them the next morning.
- When you're ready to bake them the next morning, preheat the oven to 375 degrees. Bake for 25-27 minutes, covering the top with aluminum foil 15 minutes into baking to prevent excessive browning on top.
- While the rolls are baking, make the glaze by mixing the powdered sugar, 1 tablespoon of milk, and lemon juice in a small bowl. Add more milk if the glaze is too thick.
- When the rolls are done baking, remove from oven and drizzle them generously with the glaze. Rolls are best served warm and on the same day, even though they can be stored in an airtight container for up to 3 days.
- Makes 9-10 rolls
If you happen to have a few extra leftovers, place it in the microwave and heat it up for 10-20 seconds* until warm. The congealed blueberry juice on the bottom will liquefy again and the rolls will taste just as good as they were when they came out of the oven!
*the amount of time the rolls need to be microwaved may depend on the model and type of the microwave you have
Recipe adapted from Sally’s Baking Addiction
© Simple Everyday Food. All images & content are copyright protected. Please do not use any of my images without prior permission. If you want to republish this recipe, please re-write the recipe in your own words, or kindly link back to this post for the recipe.