everyday food made simple

Food. It’s what brings people together in this world. It’s part of each country’s culture, and it also has a tendency to define and shape one’s eating habits and preferences later in life. And often times, it is attached to some sort of a memory.

photo(2)

The smell of certain foods as you’re walking down the street, the sight of certain foods you see on TV, magazines, or billboards, can all elicit some sort of a response deep down from the limbic system in your brain. When you eat certain foods, it may remind you of a special occasion or bring back certain memories.

Maybe it was the first time you tried something and liked it. Maybe it brought you back to your childhood. Maybe it reminded you of mom’s home cooking. Maybe you got really sick after eating it and never wanted to eat it again. Maybe you ate that same thing for three weeks in a row and would be totally fine if you’d never see that food for the rest of your life.

…you get the idea. What I’m basically saying is that food has the power to transport us back to a place and time, which is exactly what happened when I took the first bite of today’s recipe.

IMG_2989 copy

The Taiwanese beef noodle soup is something the Taiwanese is proud of. Along with bubble tea, it was originally created in Taiwan, and is often named in the top 5 things people need to try when visiting the country. It’s so popular that it has its own festival! Other famous items from the island include stinky tofu, oyster omelet, braised pork rice, shaved ice, pineapple cake…… I can go on and on, but I know that’s not why you’re here (but if you’re interested, you can get a list of must-eats here, here, and here).

Many older generations of Taiwanese people do not eat beef. The reason behind it is because Taiwan used to be a big farming country, and oxen and water buffalo were the main farm animals that helped the farmers with their crops every year. Naturally, many farming families found it wrong to eat the meat from those who had a hand in helping them grow crops, subsequently helping them put food on their tables.

Growing up, all my grandparents didn’t eat beef. My mom (until this day), also strongly insists that we don’t eat beef at all. My sister, my dad, and I have never been able to eat beef whenever we are out with my mom. It’s just how it is – no ifs, ands, or buts.

Even though my dad grew up with parents who didn’t eat beef, as he grew older, he would occasionally eat beef every once in a blue moon when the craving came. My dad, who knows me best in our family, always knew that I would also have cravings for beef that were often left unfulfilled because of our “house rules”.

I remember back in middle school, I would always stop by his work to head home together for the day. We would walk down the bustling busy city streets in the hot humid summer evenings together, his briefcase strap over his shoulder, and he would put his arm around my shoulder and say, “why don’t we go get some beef noodle soup for dinner?”

It was like a secret between the two of us – we would secretly go out for beef noodle soup, and we would never tell mom. This usually happened when my mom wasn’t able to make it home in time for dinner – whenever she asked what we had for dinner, we would always tell her, “oh, we just had some noodles, that’s all.” We were sneaky like that, and he was my partner in crime… we were little rebels who broke mom’s rules together.

I’m pretty sure my mom never found out about our rule-breaking behaviors… I guess she does now – sorry mom!

Anyway, the whole point of walking dragging you down memory lane is to tell you that this noodle soup is divine. The moment I took that first sip of the broth, I was transported back to 10 years ago, secretly eating beef noodle soup at some mom-and-pop shop with my dad. This recipe is spot-on on flavor… I was in heaven.

IMG_2999 copy

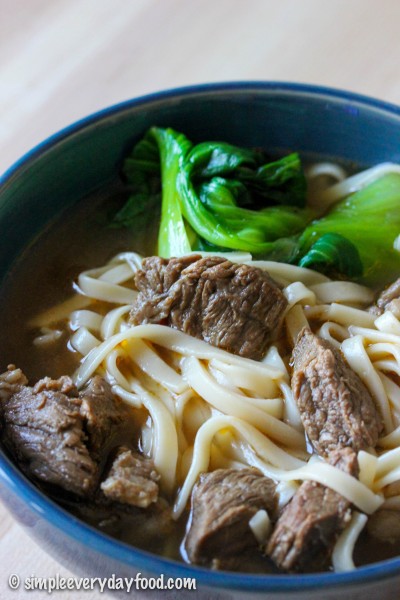
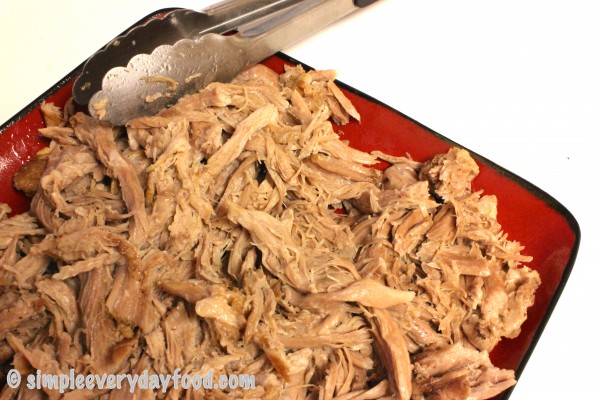
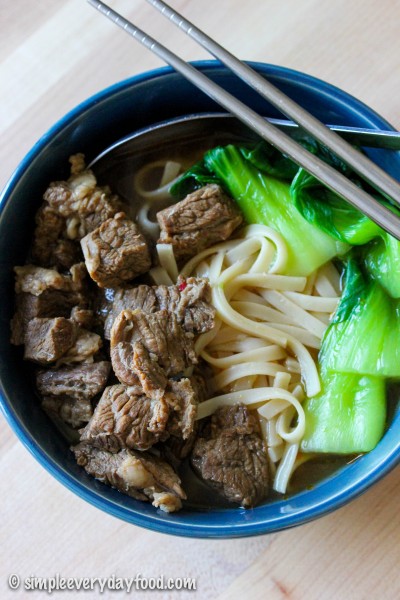
The broth is nice and salty, the beef is tender with just the right amount of fat on it, and the noodles are nice and chewy. It really is the perfect combination! The ginger, garlic, peppercorns, star anise, soy sauce and the doubanjiang are the base for the broth that you slowly cook your beef in for the next 2.5 hours – the smell will make your mouth water, but it’s 110% worth the wait!

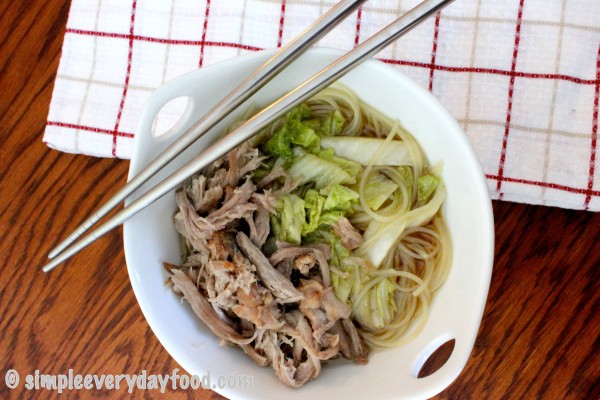
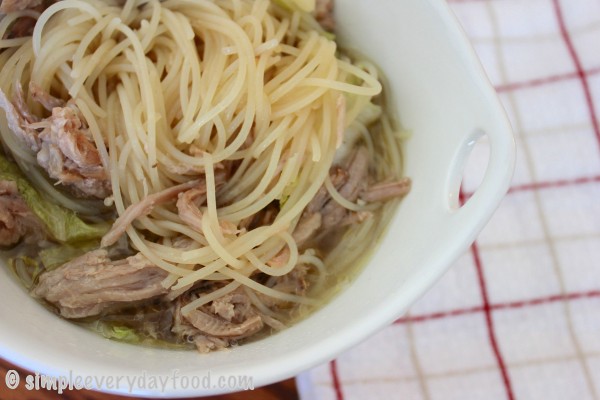
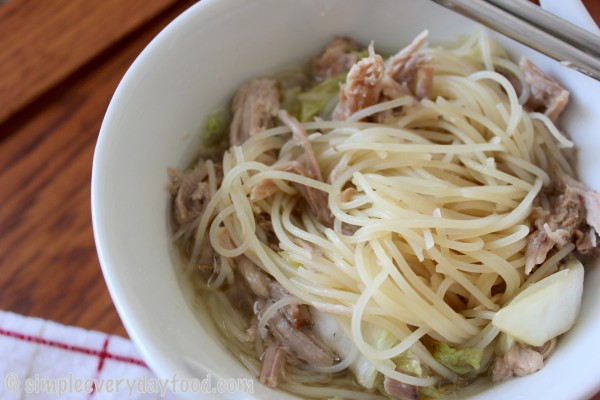
I chose to cook the noodle in a separate pot. I also cooked some baby bok choy to go with it as well. If you can’t get your hands on baby bok choy, some spinach or napa cabbage would work too. Once everything is ready to be served, then place the noodles in a large bowl, and ladle the beef and broth into the bowl. Top with your veggies, and you’ve got yourself a bowl of authentic Taiwanese beef noodle soup!

IMG_2998 copy

Next time my parents come visit, I’m going to make this to share with my dad… behind my mom’s back, of course :)

taiwanese beef noodle soup
Print
Ingredients
  1. 3 tablespoons EVOO, divided
  2. 2-2.5 lbs boneless beef chuck, cut into 1" cubes
  3. 6 large slices of ginger
  4. 6 cloves of garlic, smashed
  5. 2 medium plum tomatoes, finely diced
  6. 2 tablespoons granulated sugar
  7. 1 tablespoon Sichuan chili bean paste (doubanjiang - I found mine at the local Asian grocery store)
  8. 1 cup Chinese rice wine
  9. 1 tablespoon black peppercorns
  10. 2 whole star anise cloves
  11. 3/4 cup soy sauce
  12. 2 and 1/2 quarts water
  13. 2 lbs Asian wheat noodles, cooked
  14. A handful of baby bok choy, spinach, or napa cabbage, if desired
Instructions
  1. Heat 1 tablespoon of EVOO in a large, heavy-bottomed pot (I used a Dutch oven) over medium-high heat. Add the beef to the pot in a single layer and cook undisturbed for 3-4 minutes until browned. Then stir and cook until all the sides are nicely browned. Transfer to a plate and repeat the process again with 1 tablespoon of EVOO and the remaining beef. Transfer beef to the plate and set aside.
  2. Add the remaining tablespoon of EVOO to the same pot and heat over medium-high heat. Add in the sliced ginger and garlic cloves, stirring frequently until fragrant, about 2-3 minutes. Add in the diced tomatoes and stir for another minute. Then add in the sugar and stir until the sugar is dissolved. Finally, add in the chili bean paste (doubanjiang) and stir until the mixture starts to bubble.
  3. Add the beef back to the pot, then add the rice wine and cook for 1 minute. This would be a good time to scrape up all the yummy brown bits crusted on the bottom of the pot. Add in the star anise, peppercorns, soy sauce, and water. Bring the mixture to a boil, then reduce the heat to a simmer, cover, and cook for about 2.5 hours, or until the beef is tender.
  4. Using tongs, remove the all the beef cubes from the broth and set aside. Carefully strain the soup over a mesh strainer into another similarly sized pot to catch the ginger, garlic, star anise, etc. Pick up any small beef cubes from the strained mixture, then return the beef cubes back into the broth.
  5. If desired, heat the soup back up over medium heat and wilt some greens with the soup.
  6. When ready to serve, place noodles on the bottom of individual serving bowls. Ladle the soup and beef chunks into bowls. Serve immediately.
  7. Serves 4-6 people
Adapted from Serious Eats
Simple Everyday Food https://www.simpleeverydayfood.com/
Recipe adapted from Serious Eats

© Simple Everyday Food. All images & content are copyright protected. Please do not use any of my images without prior permission. If you want to republish this recipe, please re-write the recipe in your own words, or kindly link back to this post for the recipe.

Sharing is caring! Email this to someonePrint this pagePin on PinterestShare on YummlyShare on FacebookShare on Google+Tweet about this on Twitter

If you follow me on Instagram, you’ll know that this past weekend, we made another trip out to Seattle to celebrate our anniversary. There’s just something about that wonderful city that calls my name – the weather, the city, the people, and don’t even get me started on the food. Oooooh… the food. The food is amazing in Seattle. It feels like home here. For all you people who already live there – I’m jealous.

We had plenty of seafood, plenty of Taiwanese food, experienced some drizzly weather, shopped and spent money, went to watch the Vikings play the Seahawks, got at least 9-10 hours of sleep every night, and experienced our first ever room service (because who doesn’t like to eat dinner in bed in front of the TV?). Unlike last time where I had our everyday planned out with places to go and things to eat, this time was more of a relaxing vacation. We lounged around in our hotel until we figured out what to do, then we would wander around the city finding new places to try, and we even went on a little adventure to Bellevue using public transportation.

As wonderful as vacation is, there’s always something about going home, being in the comfort of your own home, being able to cook food in your kitchen, and sleeping in your own bed (ooooh, king-sized Tempurpedic bed… how I missed you!). After eating out for 4 days straight, I just wanted to make something simple for dinner.

IMG_2265 copy

IMG_2269 copy

This quesadilla is a twist on the classic bacon cheeseburger. It has all the essential ingredients, toppings, and condiments on it. Minus the bun, it tastes just like a cheeseburger! Not the mention it’s totally customizable to what you normally put on your burger. Instead of adding ketchup while you’re assembling it, you add it into the beef as it’s browning in the skillet. This will prevent the tortilla from being overly soggy – you’ll want to trust me on this – you can thank me later. Brian, the carnivore in our house, requested only bacon, ground beef, and cheese on his. I, on the other hand, added additional lettuce and tomatoes on mine. If you like sliced pickles, onions, and mushrooms on your burger, feel free to add those in too! I also used a mix of shredded sharp cheddar and pepperjack cheese for a spicy kick on top of the classic cheese.

IMG_2249 copy

The hardest part of making this is flipping the quesadillas in the skillet. It actually took me a few tries to get it done right, so I’ll share my little trick with you: After the bottom tortilla is nicely browned, place a paper plate; face down, onto the quesadilla. In one swift motion, flip your skillet upside down so the quesadilla is now on the paper plate (with the browned side facing up). Then gently slide the whole quesadilla back into the skillet so the other tortilla can brown for a few minutes. Repeat above steps when transferring your quesadilla onto a plate when done.

bacon cheeseburger quesadillas
Print
Ingredients
  1. 1/2 lb bacon, diced and cooked
  2. 1 tablespoon EVOO
  3. 1 lb ground beef
  4. 3 tablespoons ketchup
  5. 6 8-inch flour tortillas
  6. 1.5 cups shredded sharp cheddar cheese
  7. 1.5 cups shredded pepperjack cheese
  8. Additional topping as desired: diced tomatoes, shredded lettuce, sour cream, etc.
Instructions
  1. In a medium skillet, heat up the EVOO over medium high heat. Brown the beef until cooked. Add in the ketchup (and mustard, if that's your kind of thing). Stir and drain off excess fat. Set aside.
  2. Place another large skillet over medium high-high heat. Plate a tortilla onto the surface and lay down a nice even layer of cheese. Then pile on your toppings - ground beef, bacon bits, lettuce, and tomatoes. Top it off with another even layer of cheese and top with another flour tortilla. Periodically check to see if the bottom tortilla has started to brown. Once slightly browned, it's time to flip your quesadillas.
  3. Place a paper plate; face down, onto the quesadilla. In one swift motion, flip your skillet upside down so the quesadilla is now on the paper plate (with the browned side facing up). Then gently slide the whole quesadilla back into the skillet so the other tortilla can brown for a few minutes. Repeat above steps when transferring your quesadilla onto a plate when done.
  4. Cut into quarters and serve immediately.
  5. Makes 3 quesadillas
Adapted from Taste and Tell
Simple Everyday Food https://www.simpleeverydayfood.com/
And just as a side note – the more toppings you add in, the heavier the quesadilla will be, and the more coordination the flipping might require…. It’s just a price we pay for a delicious flavorful burger.

IMG_2262 copy

Recipe adapted from Taste and Tell

© Simple Everyday Food. All images & content are copyright protected. Please do not use any of my images without prior permission. If you want to republish this recipe, please re-write the recipe in your own words, or kindly link back to this post for the recipe.

Sharing is caring! Email this to someonePrint this pagePin on PinterestShare on YummlyShare on FacebookShare on Google+Tweet about this on Twitter

Now that fall is in the air, all I crave for are comfort foods. Usually this means some sort of soup or casserole dish when it comes to dinner. Don’t even get me started on the numerous desserts that are on my comfort food list – you’d be here for a while, and I’m sure your time is valuable.

Mac & cheese in casserole form is perhaps one of the best comfort foods ever. What’s better than a ooey gooey spiced up mac & cheese with onions, peppers, and seasoned chicken?!

IMG_1920 copy

IMG_1917 copy

Okay, I know a warm brownie with a molten chocolate center served with a side of vanilla bean ice cream probably comes to mind, but stay with me here – right now we’re talking about dinner.

You’re going to laugh at me, but this is the first time I’ve ever bought a block of cheese and shredded it myself with a grater. Yep, first time. I’ve always been lazy and used pre-shredded cheese, but I was told those are usually coated with some sort of a flour-y substance that can change the texture of your dish. So this time I put my grater to use and shredded two blocks of cheese myself, and let me tell you what, I don’t think I’m ever going back to the bagged kind anymore. There’s something about fresh shredded cheese that tastes so much better!

IMG_1910 copy

The two cheeses we use for this dish are Wisconsin sharp cheddar and pepperjack cheese. Pepperjack is perhaps one of my favorite cheeses ever, and it gives the dish a nice little kick that pairs well with the paprika, cumin, and green chiles.

chicken fajita mac and cheese
Print
Ingredients
  1. 12 oz of your favorite pasta
  2. 2 tablespoons EVOO
  3. 1 rotisserie chicken, shredded
  4. 1 teaspoon cumin
  5. ½ teaspoon paprika
  6. A pinch of cayenne pepper, more if desired
  7. 1/4 teaspoon salt
  8. 1/4 teaspoon black pepper
  9. 1 green bell pepper, diced
  10. 1 small yellow onion, diced
  11. 3 cloves garlic, minced
  12. 1 (4 oz) can diced green chiles, drained
  13. ½ cup sour cream
  14. 6 oz shredded sharp cheddar cheese
  15. 6 oz shredded pepper jack cheese
  16. Toppings such as diced tomatoes and cilantro, if desired
Instructions
  1. Preheat oven to 400 degrees.
  2. Cook pasta according to package directions. Drain and set aside.
  3. In a large skillet, heat 1 tablespoon EVOO over medium high heat. Add the chicken, cumin, paprika, cayenne pepper, salt, and black pepper, stir until chicken is coated with the spice mixture. Transfer to a large bowl and set aside.
  4. In the same skillet, heat the remaining tablespoon of EVOO. Saute the garlic, green peppers, and onion over medium high heat until onions turn translucent. Season with salt and pepper to taste. Add in the green chiles and cook for another minute or two.
  5. Pour the vegetable mixture into the large bowl containing the chicken. Stir until combined. Add in the sour cream and the two cheese. Stir some more until everything is thoroughly mixed and there are no clumps of cheese.
  6. Transfer the chicken/vegetable mixture into a 3 quart baking dish. Bake for 15 minutes or until pasta is slightly brown and bubbly.
  7. Serve immediately. If desired, top with diced tomatoes, cilantro, or other garnishes.
  8. Serves 6
Adapted from Annie's Eats
Simple Everyday Food https://www.simpleeverydayfood.com/
If you’re a fan of bell peppers, you can also add in a red and yellow bell pepper to the mix. I’m not a big fan of the red and yellow peppers, so I chose to leave them out of the recipe. However, I do like fresh tomatoes with my fajitas, so I diced up some tomatoes and added them to my bowl. A little bit of chopped up cilantro is also highly recommended – it really brings out the Mexican flavors and it gives the dish a nice bright flavor.

IMG_1923 copy

IMG_1926 copy

I also chose to use rotisserie chicken to save some time – it’s a good way to get rid of leftover rotisserie chicken! If you prefer to cook your chicken yourself, just substitute the rotisserie chicken with two diced up chicken breasts instead.

On a totally different subject, I really shouldn’t have mentioned that warm brownie. Now I need to go make myself a brownie in a mug…

What’s your favorite comfort food?

Recipe adapted from Annie’s Eats

© Simple Everyday Food. All images & content are copyright protected. Please do not use any of my images without prior permission. If you want to republish this recipe, please re-write the recipe in your own words, or kindly link back to this post for the recipe.

Sharing is caring! Email this to someonePrint this pagePin on PinterestShare on YummlyShare on FacebookShare on Google+Tweet about this on Twitter

This is perhaps the best thing I have ever made in the Crockpot. Ever. Now granted I haven’t made a whole lot of different things in the Crockpot, but this one is amazing (if I may say so myself) and it will definitely be a repeat for my next busy homework-filled day.

IMG_1530

I’ve been finding the perfect recipe for a traditional Chinese/Taiwanese noodle soup broth, and I think this might be it. It literally brought me back home and I think I almost shed a tear when I tasted it for the first time today. I almost felt like I was transported back in time: finding some tiny little hole-in-the-wall noodle shop on the streets of Taiwan, sitting with my family at a small table on metal stools, waiting for our food to be cooked. Most of these restaurants only have big industrial fans during the hot summer months, so we usually sit somewhere near a fan. As if we weren’t hot enough, we usually all order noodle soup (I think I order noodle soup half the time not because of the noodles, but simply because I love the “soup” part of it).

Noodle soup has a special place in my heart. It’s usually something that can made within 15, 20 minutes with a variety of ingredients, so we ate a lot of it growing up, especially when my parents didn’t have much time to cook after coming home from work. Now when I say “noodle soup”, I don’t mean the American “chicken noodle soup”. The Asian version is very different and in my (biased) opinion, tastes way better :)

Anyway, back to soup… I used a pork butt roast for this rather than a pork shoulder – you can definitely use a pork shoulder if you’d like. The pork butt is slightly fattier, but it also gives the broth an amazing flavor as well.

IMG_1528

The combination of soy sauce, ginger, garlic, and star anise play an important part in making this a true authentic Taiwanese/Chinese dish. I added about 1.5 cups of water after taking the roast out to dilute the broth a little bit more; however, if you prefer your broth on the more concentrated and salty side, feel free to omit the additional water. I used Napa cabbage as my vegetable simply because that was all my grocery store had at the time, but if you prefer bok choy, that’ll work as well.

IMG_1538

slow cooker asian pork and noodle soup
Print
Ingredients
  1. 3 cups low-sodium chicken broth
  2. 1/4 cup soy sauce
  3. 3 tablespoons light brown sugar
  4. 3 cloves garlic, smashed
  5. 1-2" piece ginger, peeled and sliced
  6. 2 pieces star anise
  7. 1/4 teaspoon salt
  8. 3 pounds pork butt roast
  9. 1.5 cups water
  10. 2 cups Napa cabbage, chopped
  11. 3-4 oz dried Mai-Fun noodles
Instructions
  1. In a 5-6 quart slow cooker, combine the chicken broth, soy sauce, brown sugar, garlic, ginger, star anise and salt. Add the pork, then cover and cook on low 8 hours, or until pork is fork tender.
  2. Remove pork and place on a large plate. Shred with a fork and set aside.
  3. Add the water, Napa cabbage, and noodles to the slow cooker, making sure they are submerged. Cover and cook for 30 more minutes, or until noodles are done.
  4. Divide the noodles, Napa cabbage, and pork among bowls, then ladle in the broth.
  5. Serves 3
Adapted from Food Network
Simple Everyday Food https://www.simpleeverydayfood.com/
Not only is the flavor of this soup very nostalgic to me, it also makes the house smell like a little hole-in-the-wall Taiwanese noodle place. I placed the roast in the slow cooker this morning before leaving for class, and when I came back 8 hours later, I could smell the deliciousness before I even opened the front door. Not to mention finding a recipe this delicious that only requires a Crockpot is always a win in my book!

IMG_1540

Enjoy!

Recipe slightly adapted from Food Network

© Simple Everyday Food. All images & content are copyright protected. Please do not use any of my images without prior permission. If you want to republish this recipe, please re-write the recipe in your own words, or kindly link back to this post for the recipe.

Sharing is caring! Email this to someonePrint this pagePin on PinterestShare on YummlyShare on FacebookShare on Google+Tweet about this on Twitter

Summer. It usually means hot (and humid) days, being outside, and eating light.

When I say “eating light“, I don’t mean “light” as in “not eating a whole lot” – I mean “light” as in “eating meals that are light in flavor“.

IMG_1504

There is a reason why winter = comfort food season. People want to sit at home wrapped up in a blanket eating a plate of hot cheesy pasta casserole or a bowl of hot creamy soup. No one wants to do all that when it’s 95 degrees out.

Well, I don’t mind it that much, but I know most people would prefer not eat a steaming hot bowl of soup when they’re hot and sweaty already.

I think tacos are the perfect summer food. It’s light, easy to make, customizable, healthy, and its flavor can be easily tweaked based on what meats you make and what toppings you add to it.

Chicken fajitas.

Carnitas.

Barbacoas.

Seafood (fish, shrimp, etc).

Then pile on the toppings that you like: Beans. Cheese. Lettuce. Tomatoes. Avocados. Sour cream.

No matter what your preference is, there’s usually a perfect taco for you. You can have a family of picky (and non-picky) eaters, but when it comes to tacos, everyone can easily add their favorite toppings and be a happy camper at the dinner table.

Now that I’ve done enough rambling, let me talk about these tacos. They’re simple. They’re healthy. They don’t take a whole lot of prep time in the kitchen, and they’re delicious. Deeeee-licious.

I basically took my crispy cod sandwich with spicy mayo, eliminated the bun, cut the fish fillets into fish sticks, and put them in a soft flour tortilla. Drizzle on the spicy mayo, and viola! Fish tacos.

IMG_1502

Yep, it’s that easy. Easy peasy.

easy peasy fish tacos
Print
Ingredients
  1. 1 lb cod filets
  2. 1 egg
  3. 1 cup plain panko bread crumbs
  4. 1 package of 6" flour tortillas
  5. An assortment of toppings
for the panko bread crumb seasoning
  1. 1/2 teaspoon salt
  2. 1/2 teaspoon black pepper
  3. 1/2 teaspoon paprika
  4. 1/2 teaspoon garlic powder
  5. 1/2 teaspoon onion powder
for the spicy mayo
  1. 1/3 cup mayo
  2. 1/4 teaspoon paprika
  3. 1/4 teaspoon garlic powder
  4. 1/4 teaspoon onion powder
  5. 1/4-1/2 teaspoon hot sauce, depending on taste
Instructions
  1. Preheat oven at 350 degrees. Line a baking sheet with aluminum foil and set aside.
  2. Place cod fillets on a plate and pat dry with paper towels. Slice/cut the fillets into sizes of fish sticks, about 2" pieces. Season with salt and pepper.
  3. In a large bowl, whisk the egg. In another large shallow bowl, combine all the ingredients for the panko bread crumbs (and its seasonings).
  4. Dip the fish sticks into the egg wash. Transfer them to the shallow bowl containing the bread crumbs. Flip them around a couple times, making sure that every inch of it is covered with the bread crumbs, transfer to baking sheet (you may have to do this in several rounds to prevent overcrowding of the bowls). Bake for 20 minutes until the bread crumbs look golden and crispy.
  5. In the meantime, make the spicy mayo: combine all the ingredients in a small bowl, whisk to combine. If desired, transfer the mayo into a small Ziploc bag and cut a small hole in the corner for easy drizzling.
  6. Once the fish is done cooking, assemble your tacos: place a few fish sticks in the middle of your tortilla, top with toppings, and drizzle with the spicy mayo.
  7. Serves 2-3
Notes
  1. We warmed the tortillas up in a small pan over medium-high heat, about 15 seconds on each side.
Simple Everyday Food https://www.simpleeverydayfood.com/
Making tacos really can’t get a whole lot simpler than this. Not only do these tacos deliver in flavor, it also has a variety of textures as well – the crispiness of the fish, the softness of the tortilla, the crunchiness of the shredded lettuce, and the creaminess of the mayo… it has every texture one bite of food will ever need.

IMG_1505

So what are you waiting for? Put this on your meal planner for the week!

Enjoy!

© Simple Everyday Food. All images & content are copyright protected. Please do not use any of my images without prior permission. If you want to republish this recipe, please re-write the recipe in your own words, or kindly link back to this post for the recipe.

Sharing is caring! Email this to someonePrint this pagePin on PinterestShare on YummlyShare on FacebookShare on Google+Tweet about this on Twitter