everyday food made simple

If you don’t hear from me for a few days, don’t fret! Our refrigerator decided to die on us a few days ago, and our new one isn’t going to be delivered until sometime Friday. Yep, I open my freezer one morning and my ice cream has leaked through the carton and melted into a little puddle. Our milk is warm, and we have water in our ice cube trays..

You know what that means: no fridge = no food = no cooking = no posts! Sad, I know. I was just as sad when I realized we had to toss ALL of our food that was in the freezer and fridge (Brian didn’t want to take any chances). This included a few essential everyday supplies – milk, coffee creamer, eggs, yogurt, ICE CREAM… Oh man, it was a sad, sad day. All our groceries filled two and a half large kitchen garbage bags, and they’re currently residing in a little grocery cemetery at the end of our driveway. Not only do we not have any milk to drink, I also can’t make coffee because I don’t have any creamer! You have no idea how good a large cold glass of milk sounds right now.

You really don’t realize how much you rely on your refrigerator until you don’t have one anymore! How did people survive back in the day before fridges were even invented?!

On the brighter side of things, since we were already planning on doing some major kitchen renovation/upgrades next spring and getting new appliances were one thing on our list, we decided to buy a new stove/range while we were at it too. I think I might be more excited about this new oven I’m getting than the refrigerator – it’s a convection oven! Apparently it creates restaurant-quality desserts… well I guess I’ll just have to make something in it to try it out :)

 I’ll be back when I finally get some fresh groceries in my new fridge! Until then, stay warm and enjoy the crisp fall weather before the snow falls!

Sharing is caring! Email this to someonePrint this pagePin on PinterestShare on YummlyShare on FacebookShare on Google+Tweet about this on Twitter

Every year when the Packers come in town to play the Vikings, Brian and his little buddies have a little boys weekend they call the “Norsemen weekend”. Every year someone plans and makes t-shirts for everyone, then when the weekend finally comes around, they hang out, catch up on Saturday night.. then on Sunday, they tailgate all day and go watch the game at the Metrodome.

When my friends and I tend to either go shopping or go eat when we get together, Brian and his friends, well.. they watch football. I guess it’s what brings guys closer. Whatever works I guess.

About two months prior to this weekend, Brian said to me one day, “You know what you should do this year for our Norsemen trip? You can make us purple and gold cupcakes for tailgating!” So not only do I have to stay at home by myself all weekend, I have to make him cupcakes.

IMG_2118 copy

IMG_2132 copy

Doesn’t sound like such a good deal for me, if you ask me.

Well, as the weekend came closer, I decided what the heck – I’ve had a baking itch for a few weeks now, so not only would baking Vikings cupcakes satisfy my itch, it’d also be something nice to do for him and his buddies. Even though today would’ve been the only day I could sleep in all week, and despite the fact that I have a gazillion things to do for school, I decided to get up early and make cupcakes.

IMG_2097 copy

IMG_2128 copy

Just me, the kitchen, and Pandora. It truly was the best therapy.

And let me tell you, these cupcakes turned out to be exactly how I envisioned them to be!

IMG_2113 copy

IMG_2137 copy

I really should win a Wife Of The Year award for this.

Looking for football game day fingerfoods? Here are a few you might like…

Mini taco cups (my most popular pin on Pinterest!)

IMG_1703

Wonton wrapper wrapped mozzarella sticks

IMG_2017 copy

Hot cheesy corn dip

IMG_1714

Sharing is caring! Email this to someonePrint this pagePin on PinterestShare on YummlyShare on FacebookShare on Google+Tweet about this on Twitter

Ooooh man. Life has been so busy lately. I need more hours in my day. Along with my new internship, classes, blogging, making food so I can blog about it, and trying to spend time with my family as much as I can, I don’t seem to have a life outside of all that anymore (not saying that I did have a life before anyway…). The Amazing Race and Survivor just started a few weeks ago, and I’m already behind on all my TV shows. I have about 30 episodes of Chopped, 13 episodes of The Incredible Dr. Pol, about 20+ episodes of Criminal Minds (that dates way back to last December), 15 some episodes of Cupcake Wars, along with a bunch of miscellaneous shows that are taking up space on our DVR…. good thing we’ve got two DVRs that can be used at the same time, otherwise we’ll for sure run out of space quickly!

…talk about First World Problems.

On a positive note – I’m truly enjoying this quarter. It’s exhausting and busy, but I feel like I’m learning a ton during my internship, and I absolutely love that everyday is different. Everyday is a surprise and I’m constantly challenging myself to do better.

Okay. Back to food. When I first set out to make this appetizer, I had every intention to bake it in the oven so it’s healthier than the deep-fried mozzarella sticks we usually get at restaurants. Well, that plan failed miserably… somehow the wonton wrappers didn’t brown nor did it crisp up in the oven, and cheese oozed out from all kinds of directions from the holes I managed to create during the wrapping process.

[sigh] It was a sad, sad sight. And needless to say, I was quite disappointed. I would’ve taken a picture of the horrible sad mess that laid there on my baking sheet, but it was just so bad that taking pictures of it seemed like a waste of energy..

Good thing I had a Plan B in mind. If baking didn’t work out, I could at least quickly fry it in a pan. That can’t be as bad as deep frying it, right?

IMG_2013 copy

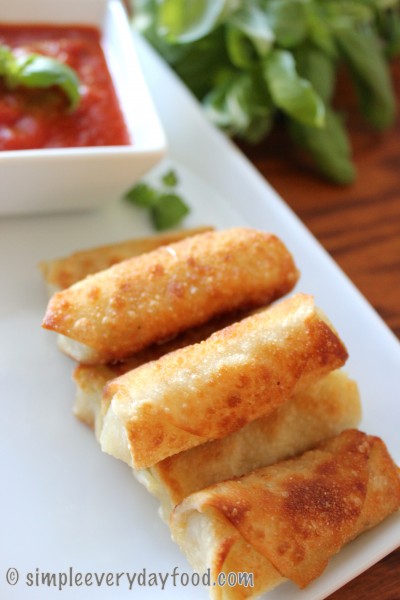
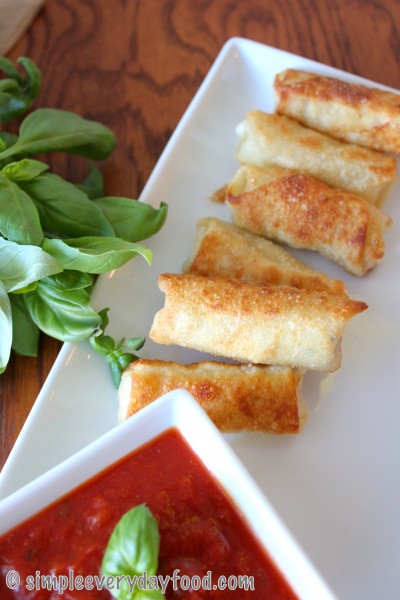
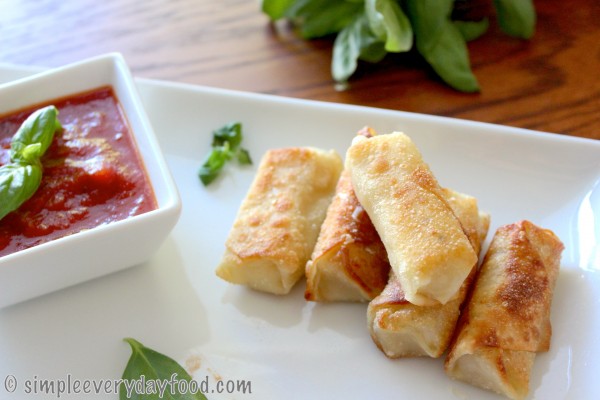
This appetizer can be made within 15-20 minutes, so it’s perfect if you’re craving a quick little snack in the afternoon, or if you need something to munch on during a football game! You can make as many or as little as you need, and they turn out to be cute mini-sized mozzarella sticks, which makes them that much more fun to eat!

IMG_2017 copy

You know, just a mozzarella stick chillin’ in the marinara hot tub… no big deal.

IMG_2022 copy

Wait, you know what’s even better? Nowadays they make string cheese in different flavors, so you can customize your mozzarella sticks based on what kind of string cheese you buy! No more boring plain ol’ string cheese! In our house, we’re a big fan of anything that has a hint of jalapeno or black pepper, so we used string cheese with cracked black pepper to give it a subtle kick of flavor. They turned out to be amazing!

wonton wrapper wrapped mozzarella sticks
Print
Ingredients
  1. 3 sticks of string cheese of your flavor, cut in half
  2. 6 wonton wrappers
  3. 1 large egg, beaten
  4. 1/2 teaspoon water
  5. 1/3 cup vegetable oil
  6. Marinara sauce for dipping, if desired
Instructions
  1. In a small bowl, combine the egg and the water. Brush a wonton wrapper with the egg wash, then wrap the string cheese with the wrapper, making sure the the wrapper covers the string cheese entirely and there are no holes for the cheese to leak out of during the cooking process. Also make sure the edges of the wrapper are sealed nice and tight with the egg wash. Repeat process for all the string cheese sticks.
  2. In a medium pan, heat the oil over medium high heat. Place your uncooked mozzarella sticks in the pan, making sure they're not crowded. Using a pair of tongs, cook cheese sticks on each side for about a minute, or until the wrapper has turned golden brown and crispy.
  3. Transfer mozzarella sticks on a paper-towel lined plate to soak up all the excess oil. Serve immediately with marinara sauce while hot.
  4. Makes 6 mini mozzarella sticks.
Simple Everyday Food https://www.simpleeverydayfood.com/
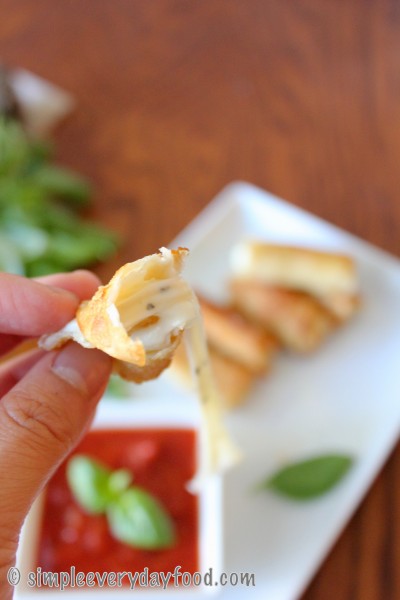
Creamy, cheesy mozzarella cheese wrapped in a light, crispy wonton wrapper… who knew a healthier version of mozzarella sticks can be so delicious (and addicting)?!

IMG_2011 copy

IMG_2026 copy

Here’s a couple things to keep in mind while you make these golden crispy appetizers:

  • The egg wash serves as a glue to hold your wonton wrapper together. Don’t be shy when brushing it onto the wrappers – if you don’t put enough on, nothing’s going to stick and your mozzarella stick is going to fall apart.
  • Try to make sure that your cheese stick is wrapped nice and tight with the wrapper with no gaping holes. Gaping holes is how the cheese can leak out of the wrapper during the cooking process, leaving you with just an empty wonton wrapper shell…. not good.
  • These babies cook fast when you have a nice hot pan. I think mine took about 45-60 seconds for the first side to brown up. I then turned them three other times to make sure all four “sides” are nice and crispy. The whole cooking process took maybe less than 3 minutes.

© Simple Everyday Food. All images & content are copyright protected. Please do not use any of my images without prior permission. If you want to republish this recipe, please re-write the recipe in your own words, or kindly link back to this post for the recipe.

Sharing is caring! Email this to someonePrint this pagePin on PinterestShare on YummlyShare on FacebookShare on Google+Tweet about this on Twitter

Have you ever looked at a recipe and just knew it was going to turn out to be delicious?

Well, a few weeks ago I got that feeling and it took me by surprise – I never like to get too overconfident when I’m in the kitchen just to avoid the disappointing letdown if something doesn’t turn out the way I had it pictured in my head. However…. when I saw this recipe, something in my head told me it was going to turn out great – so great that I needed to make two of them so I can bring one to work to share with my coworkers.

I’m glad to tell you that that little voice in my head was right, and I’m sooooo incredibly glad that I made two coffee cakes. I know those coworkers that got to try it were glad I made two also!

Enter Part 4 of my latest obsession with pumpkin desserts – a rich, moist pumpkin coffee cake complete with a thick, crumbly layer of streusel topping and a vanilla glaze.

IMG_1855 copy

When I had my mind set on making two of these cakes, I pre-measured the streusel ingredients (minus the butter) and dry ingredients into separate tupperware bowls the night before, just to make my life easier when I’m ready to make them the next day. I have to say, it really did save me quite a bit of time on baking day, because all I had left to do was to measure out the wet ingredients and add the two together. I’m totally going to be prepping this way from now on!

These cakes were also made with a little love from Brian… here’s the story: when I decided on making two cakes, I realized that we would be short of pumpkin puree and ground cloves. The syrup we had on hand also expired August of 2011… so I sent him to Target to pick things up for me while I got things ready. You know baking season is in full swing when Target has absolutely no ground cloves whatsoever. None. So being the loving husband that he is, he drove to Wal-Mart just to get me the ground cloves that I needed. That deserves a pat on the back in my book :)

IMG_1863 copy

IMG_1881 copy

glazed pumpkin coffee cake
Print
For the streusel
  1. 1/2 cup all-purpose flour
  2. 1/4 cup cold unsalted butter
  3. 1/2 cup light brown sugar
  4. 1/4 teaspoon salt
  5. 2 teaspoons ground cinnamon
For the cake
  1. 2 cups flour
  2. 1 teaspoon baking soda
  3. 1/2 teaspoon baking powder
  4. 1/2 teaspoon salt
  5. 2 teaspoons ground cinnamon
  6. 1/2 teaspoon ground nutmeg
  7. 1/4 teaspoon ground cloves
  8. 1 cup pumpkin puree
  9. 1/2 cup light brown sugar
  10. 1/2 cup vegetable oil
  11. 1/4 cup maple syrup
  12. 1/4 cup milk
For the glaze
  1. 1 cup powdered sugar
  2. 1-2 tablespoons pumpkin spice coffee creamer or milk
Instructions
  1. Preheat the oven to 350 degrees. Spray a 9x9 baking pan with nonstick spray and set aside.
Make the streusel
  1. Combine the flour, brown sugar, salt, and cinnamon together in a small bowl. Using a pastry cutter or a fork, add in the cold butter and mix until you get pea-sized clumps of butter. Set aside.
Make the cake
  1. In a large bowl, add in the flour, baking soda, baking powder, salt, cinnamon, nutmeg, and cloves. Mix until combined. Using a medium bowl, add in the pumpkin, brown sugar, oil, maple syrup, and milk. Mix. Add the wet ingredients to the dry ingredients and mix until combined. Do not overmix.
  2. Pour the batter into the baking pan, spreading out the batter with a spatula to create an even surface. Generously sprinkle the streusel topping onto the cake, pressing them slightly down into the batter.
  3. Bake the cake for 30 minutes, or until an inserted toothpick comes out clean. Remove the cake from the oven and let cool.
Make the glaze
  1. While the cake is cooling, make the glaze by whisking the powdered sugar and 1 tablespoon of creamer/milk together until smooth. If it's too thick, add another tablespoon of creamer/milk. Add more creamer/milk until desired consistency is reached. Drizzle over cake and enjoy!
  2. Store cake in an airtight container for up to 5 days.
Adapted from Sally's Baking Addiction
Simple Everyday Food https://www.simpleeverydayfood.com/
IMG_1872 copy

When you mix everything up, the batter will be thick – don’t panic! That’s totally normal and it’ll turn out great in the end, trust me. What makes the dessert over-the-top amazing is the thick layer of streusel topping. I think I could probably bake a whole cake pan of the streusel and be okay with it. If you have pumpkin spice creamer on hand (which I did), use that instead of milk to make the glaze  for a more intense pumpkin flavor! If you don’t have pumpkin creamer, you don’t have to go out and buy a whole bottle of it – using milk would work just fine too. Depending on how thick/thin you like your icing, add less/more milk to the powdered sugar accordingly. I went a little pumpkin-creamer-happy on one and the glaze turned out to be a little thinner than I would’ve liked. Either way, it’s not going to affect the taste or texture of your cake – it’s just a matter of personal preference.

Vanilla glaze dripping down the sides… don’t you want to just reach through the screen and catch some of that glaze with your finger?!

IMG_1856 copy

IMG_1878 copy

This cake can either be served warm or at room temperature, so there’s no need to wait for it to cool! It’s a good thing no cooling is required, otherwise I would probably have to leave the house for an hour so I wouldn’t be tormented by constant wafts of delicious smells!

Happy baking!

Recipe adapted from Sally’s Baking Addiction

© Simple Everyday Food. All images & content are copyright protected. Please do not use any of my images without prior permission. If you want to republish this recipe, please re-write the recipe in your own words, or kindly link back to this post for the recipe.

Sharing is caring! Email this to someonePrint this pagePin on PinterestShare on YummlyShare on FacebookShare on Google+Tweet about this on Twitter

Now that fall is in the air, all I crave for are comfort foods. Usually this means some sort of soup or casserole dish when it comes to dinner. Don’t even get me started on the numerous desserts that are on my comfort food list – you’d be here for a while, and I’m sure your time is valuable.

Mac & cheese in casserole form is perhaps one of the best comfort foods ever. What’s better than a ooey gooey spiced up mac & cheese with onions, peppers, and seasoned chicken?!

IMG_1920 copy

IMG_1917 copy

Okay, I know a warm brownie with a molten chocolate center served with a side of vanilla bean ice cream probably comes to mind, but stay with me here – right now we’re talking about dinner.

You’re going to laugh at me, but this is the first time I’ve ever bought a block of cheese and shredded it myself with a grater. Yep, first time. I’ve always been lazy and used pre-shredded cheese, but I was told those are usually coated with some sort of a flour-y substance that can change the texture of your dish. So this time I put my grater to use and shredded two blocks of cheese myself, and let me tell you what, I don’t think I’m ever going back to the bagged kind anymore. There’s something about fresh shredded cheese that tastes so much better!

IMG_1910 copy

The two cheeses we use for this dish are Wisconsin sharp cheddar and pepperjack cheese. Pepperjack is perhaps one of my favorite cheeses ever, and it gives the dish a nice little kick that pairs well with the paprika, cumin, and green chiles.

chicken fajita mac and cheese
Print
Ingredients
  1. 12 oz of your favorite pasta
  2. 2 tablespoons EVOO
  3. 1 rotisserie chicken, shredded
  4. 1 teaspoon cumin
  5. ½ teaspoon paprika
  6. A pinch of cayenne pepper, more if desired
  7. 1/4 teaspoon salt
  8. 1/4 teaspoon black pepper
  9. 1 green bell pepper, diced
  10. 1 small yellow onion, diced
  11. 3 cloves garlic, minced
  12. 1 (4 oz) can diced green chiles, drained
  13. ½ cup sour cream
  14. 6 oz shredded sharp cheddar cheese
  15. 6 oz shredded pepper jack cheese
  16. Toppings such as diced tomatoes and cilantro, if desired
Instructions
  1. Preheat oven to 400 degrees.
  2. Cook pasta according to package directions. Drain and set aside.
  3. In a large skillet, heat 1 tablespoon EVOO over medium high heat. Add the chicken, cumin, paprika, cayenne pepper, salt, and black pepper, stir until chicken is coated with the spice mixture. Transfer to a large bowl and set aside.
  4. In the same skillet, heat the remaining tablespoon of EVOO. Saute the garlic, green peppers, and onion over medium high heat until onions turn translucent. Season with salt and pepper to taste. Add in the green chiles and cook for another minute or two.
  5. Pour the vegetable mixture into the large bowl containing the chicken. Stir until combined. Add in the sour cream and the two cheese. Stir some more until everything is thoroughly mixed and there are no clumps of cheese.
  6. Transfer the chicken/vegetable mixture into a 3 quart baking dish. Bake for 15 minutes or until pasta is slightly brown and bubbly.
  7. Serve immediately. If desired, top with diced tomatoes, cilantro, or other garnishes.
  8. Serves 6
Adapted from Annie's Eats
Simple Everyday Food https://www.simpleeverydayfood.com/
If you’re a fan of bell peppers, you can also add in a red and yellow bell pepper to the mix. I’m not a big fan of the red and yellow peppers, so I chose to leave them out of the recipe. However, I do like fresh tomatoes with my fajitas, so I diced up some tomatoes and added them to my bowl. A little bit of chopped up cilantro is also highly recommended – it really brings out the Mexican flavors and it gives the dish a nice bright flavor.

IMG_1923 copy

IMG_1926 copy

I also chose to use rotisserie chicken to save some time – it’s a good way to get rid of leftover rotisserie chicken! If you prefer to cook your chicken yourself, just substitute the rotisserie chicken with two diced up chicken breasts instead.

On a totally different subject, I really shouldn’t have mentioned that warm brownie. Now I need to go make myself a brownie in a mug…

What’s your favorite comfort food?

Recipe adapted from Annie’s Eats

© Simple Everyday Food. All images & content are copyright protected. Please do not use any of my images without prior permission. If you want to republish this recipe, please re-write the recipe in your own words, or kindly link back to this post for the recipe.

Sharing is caring! Email this to someonePrint this pagePin on PinterestShare on YummlyShare on FacebookShare on Google+Tweet about this on Twitter