everyday food made simple

As the weekend approaches, I start planning meals to bring to work. I usually like to go with something quick and simple to make – usually some sort of pasta, soup/stew, or some lean protein with brown rice.

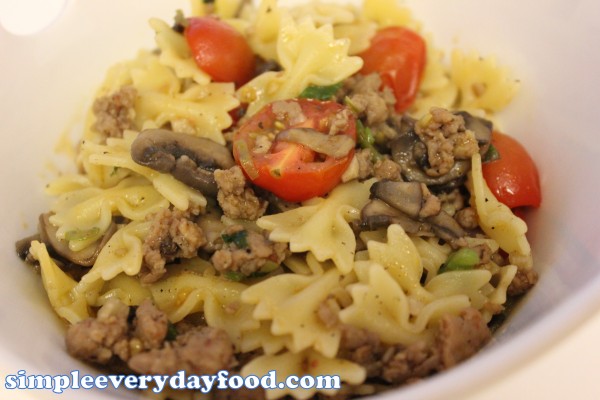
Since I’m already going to make a zuppa toscana soup, I figured I’d stick with the Italian theme and make some pasta to go with it. If you like mushrooms, sausage, tomatoes, and pasta, I’m sure you’ll love this recipe!

The recipe says to make everything in a large skillet, but I made mine in a wok instead. When it comes to cooking, sometimes it’s hard to hide my Asian-ness.

You can take a girl out of Asia, but you can’t take the Asian out of her!

I think woks are a very versatile piece of kitchen equipment, and I think every kitchen needs to have one. You can use it for sauteing vegetables, , steaming dumplings, boiling pasta, making omelets… the possibilities are endless.

Back in Taiwan, our family does not own a skillet, a grill pan, any sort of saucepans, a food processor,  or an oven (we do, however, have a toaster oven)… everything either gets cooked in a wok or in a pot (and that’s only used when we make soup). In case you’re wondering, most household kitchens in Taiwan don’t have an oven, since many of our traditional cuisines are made on the stove top, not in the oven.

Okay, I’m going off a little off the subject here… this recipe is super easy – prep time and all, it probably only took me about half an hour to make.

Ingredients:

  • 12 ounces mini farfalle pasta (they’re the cute little bowtie ones)
  • 2 tablespoons of EVOO
  • 8 ounces hot turkey sausage, casings removed
  • 2 stalks green onions, thinly sliced
  • 2 cloves garlic, minced
  • 8 ounces cremini mushrooms, sliced
  • Salt and pepper
  • 2 cups cherry/grape tomatoes, halved

IMG_0673

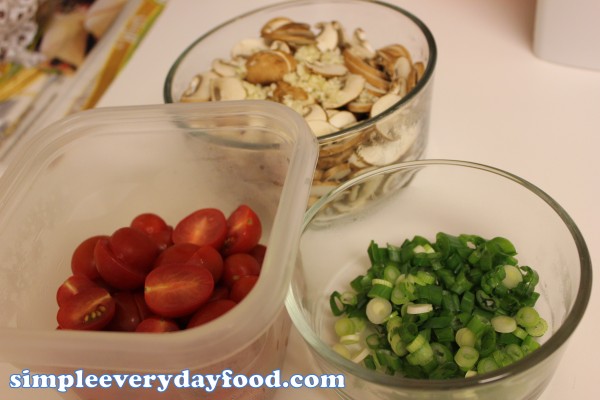
I actually prepped all the ingredients the night before to save on some cooking time

Directions:

  • Boil pasta as directed on package. Drain and reserve 1 cup of pasta water.
  • Heat olive oil in a large skillet (or in my case, a wok) over medium heat. Brown sausage, breaking it up with a spatula/wooden spoon until thoroughly cooked. Take out and place on a paper towel-lined plate to absorb all the grease. Set aside.
  • Using the remaining oil in skillet, add the mushrooms, garlic, green onions, 1/2 teaspoon each of salt and pepper. Saute until mushrooms begin to brown.. Add the grape tomatoes and cook until they are slightly softened. Add the sausage and pasta back into the skillet and toss to mix. If the pasta seems dry, add little bits of the reserved pasta water at a time. Season with salt and pepper to taste.
  • Divide among bowls and top with grated Parmesan cheese if desired. (I omitted this step to make it healthier)

IMG_0675

Enjoy!

Recipe adapted from Food Network Magazine

Sharing is caring! Email this to someonePrint this pagePin on PinterestShare on YummlyShare on FacebookShare on Google+Tweet about this on Twitter

Chipotle is perhaps my favorite fast-food restaurant. Their food is light, not greasy, fast, and it’s relatively healthy compared to other fast food restaurants.

It also has a special place in my heart. Back in my skating days, me and my skating buddies would always stop by Chipotle afterwards to grab a bite to eat before going home. In the winter, we would go to the one a few blocks away from the Metrodome; in the summer, we’d stop by the one right by Lake Calhoun, sit outside, and enjoy the warm summer sun.

I may be a small petite, 96-pound lady, but when it comes to eating Chipotle burritos, my stomach always seem to expand to twice its size. Instead of explaining further, let me just include a picture of my burrito compared to the hubs from a while back (mine is the one on the right):

IMG_0726

All I put on mine are rice, carnitas, pico de gallo, extra corn, and lettuce. No beans, no sour cream, and no cheese. It doesn’t seem like a whole lot, but somehow when you pile everything up on a flour tortilla, they always have problems wrapping it together…

Since the hubs and I are still on the “healthy, no eating out” diet, I decided to make Chipotle at home, and made some carnitas in the crockpot. This recipe is super easy (just like most crockpot recipes), and the carnitas turned out to be super tender and flavorful as well.

Ingredients:

  • 3-4 pound pork shoulder, with most of the fat trimmed off
  • 4 cloves garlic, minced
  • 1 tablespoon salt
  • 1 teaspoon cumin
  • 1 teaspoon chili powder
  • 1 teaspoon black pepper
  • 1 teaspoon oregano
  • 1/4 teaspoon cinnamon
  • 1/2 teaspoon cayenne pepper
  • Juice of 2 limes
  • 1/2 cup orange juice
  • 1/2 salsa – I used a non-chunky kind

Directions:

  • In a small bowl, combine the salt, cumin, chili powder, black pepper, oregano, cinnamon, and cayenne pepper.IMG_0660
  • In a separate bowl, combine the lime juice, orange juice, and salsa.IMG_0661

IMG_0662

  • Rub garlic onto the pork shoulder, and place into slow cooker. Then rub all the spices evenly onto the meat. Add the juice/salsa mixture. Cover and cook for 7-8 hours.IMG_0665
  • Preheat the broiler. Meanwhile, take the meat out of the crockpot and place onto a oven-safe dish (I used a casserole dish). Shred meat with two forks. Ladle in about 2-3 cups of the cooking liquid into the casserole dish and broil for 5-10 minutes until the edges are brown on the pork.IMG_0670
  • Serve on rice or tortillas with any toppings of your choice (hot sauce, sour cream, cheese, etc).

I made some cilantro lime rice (from a post a few weeks back), pico de gallo, corn salsa, and some shredded lettuce to go with our Mexican dinner. Instead of regular flour tortillas, we brought some jalapeno cheddar wraps to spice it up a bit.

IMG_0669

image

Enjoy and have a great week, folks!

Recipe adapted from Pinch of Yum

Sharing is caring! Email this to someonePrint this pagePin on PinterestShare on YummlyShare on FacebookShare on Google+Tweet about this on Twitter

I know everybody has their own preference on how they like their cookies… some like them crispy, some like them soft, and well, some just eat them raw.

I’m not a fan of eating raw cookie dough – I can’t get over the fact that I’m eating raw eggs, and the texture weirds me out a little. I don’t like my cookies crispy either. When I think “cookies”, I think of soft and chewy cookies… not hard and crispy that may break a tooth when you bite into it.

That being said, I’m definitely a fan of soft and chewy cookies. When I say “soft and chewy”, I don’t mean gooey and half-raw in the middle to where it starts to break apart when you hold it with two fingers… I mean medium-well done and with a soft center.

Now that we’ve got my definition of “what a good cookie should taste like” out of the way, here’s a little story behind why I was so excited to make these cookies today:

At the place I work at, the only place to get something within the building that’s open late is Subway. For those that need a little reminder, Subway doesn’t just make subs. They also makes cookies… pretty good ones in fact. Even though they do have classic chocolate chip cookies, M&M cookies, and white chocolate macadamia nut ones, my favorite is their white chocolate chip and cranberry cookies.

Huh? Really?

Don’t get me wrong, every once in a while I love to indulge in some good ole fashioned chocolate chip cookies, but for some reason, their white chocolate cranberry ones are the only ones I eat there. The sweetness of the chocolate with the slight tartness of the cranberries are a match made in heaven… not the mention they’re always soft and chewy, just the way I like it.

IMG_0652

In my opinion, these cookies come pretty dang close to the ones from Subway. They hold up pretty well in the freezer too, so save some dough and you can have yummy cookies within 8 minutes at a later time!

Ingredients:

  • 1.5 sticks of unsalted butter at room temperature
  • 3/4 cup brown sugar
  • 1/4 cup granulated sugar
  • 1 egg at room temperature
  • 2 teaspoons vanilla extract
  • 2 cups flour
  • 2 teaspoons cornstarch
  • 1 teaspoon baking soda
  • 1/2 teaspoon salt
  • 3/4 cup white chocolate chips
  • 3/4 cup dried cranberries

Directions:

  • Preheat oven to 350 degrees. Line a cookie sheet with parchment paper.
  • In a bowl, combine the flour, cornstarch, baking soda, and salt.
  • Using an electric mixer, cream the butter and the sugars at medium speed until fluffy. Mix in the egg and vanilla extract. Turn the speed down to low, and slowly add the flour mixture to the butter mixture. Mix until thoroughly combined.
  • Stir in the white chocolate chips and cranberries.
  • Cover and let it sit in the refrigerator for about an hour.
  • Drop balls of cookie dough onto the lined baking sheet and bake for 8 minutes. It is important not to bake for more than 9 minutes. Remove from oven and cool on a wired cooling rack.

IMG_0658

Note: like I mentioned before, these unbaked cookie dough balls freeze pretty well. I saved some and put them in a freezer Ziploc bag for next time :)

Enjoy!

Recipe from Sally’s Baking Addiction

Sharing is caring! Email this to someonePrint this pagePin on PinterestShare on YummlyShare on FacebookShare on Google+Tweet about this on Twitter

Being Asian and growing up eating authentic Asian food, I’m always searching for good restaurants and recipes that bring back childhood memories.

Just a little background info: about 99% of Asian moms like my mother cook without using a recipe book. They don’t use measuring cups, they don’t use measuring spoons, and they don’t have recipe books. The next generation learns to cook from watching their mothers in the kitchen. Everything is cooked using the “guess-timate” technique. If something didn’t have enough salt, just add a little bit more in there and taste it again. Still not enough? Add some more until it tastes good.

How much salt total did that dish just take?

Yep, since everything is based on the “taste test”, I’ve never gotten any written recipes from my mom. Everything that I try to recreate is based on memories.

That being said, I love fried rice. And me being a fan of seafood, I’m a really big fan of shrimp fried rice. The flavors of fried rice in Taiwan is something that the Chinese-American restaurants just couldn’t recreate (at least I haven’t found a place here in the Twin Cities that can). I’m not saying this recipe is 100% authentic, but it’s pretty tasty, and I guess that’s all it matters.

Ingredients:

  • 2 eggs, beaten
  • A bunch of scallions, thinly sliced, white and green parts separated
  • Salt and pepper
  • 4 tablespoons olive oil
  • 1/2 pound medium shrimp, peeled and deveind
  • 1 cup shredded carrots
  • 3 cups cooked rice – I used brown rice to make it a little healthier
  • 1.5 tablespoons low-sodium soy sauce
  • 1 teaspoon sesame oil
  • 1 tablespoon water

Directions:

  • In a large skillet, scramble the eggs with the scallion whites with 1 tablespoon of olive oil. Transfer to a plate and set aside.
  • In the same skillet over medium heat, cook the shrimp with 1 tablespoon of olive oil. Sprinkle with salt and pepper, then transfer to the plate with the eggs and set aside.IMG_0625
  • In the same skillet (again), slightly cook the carrots with the scallion greens until it’s no longer crunchy – I like my carrots cooked well, not raw and crunchy.

IMG_0626

  • In a small bowl, combine the soy sauce, sesame oil, and water.
  • In the skillet (if you have a wok, a wok would be better), heat the remaining 2 tablespoons of oil over medium-high heat. Add the rice and soy sauce mixture and stir until warmed through. Then add the eggs, shrimp, and carrots. Toss until everything is evenly mixed.

IMG_0630

Enjoy!

Sharing is caring! Email this to someonePrint this pagePin on PinterestShare on YummlyShare on FacebookShare on Google+Tweet about this on Twitter

I love cupcakes.

It’s perhaps one of my favorite kinds of desserts ever. They’re little portion-regulated desserts complete with cake, frosting, and decorations. Pretty to look at, yummy to eat. Rest assured folks, this will not be the last cupcake post you see on here. If I could bake cupcakes for a living, I totally would.

Now, this recipe is pretty simple. The directions are straight-forward, and there’s really not a whole lot of weird ingredients to it either. It also only yields about a dozen cupcakes, which, if you are only cooking for two people like I am, it’s nice because then there’s not a whole lot of cupcakes sitting on the counter for days tempting you :)

If you love chai tea, this is the recipe for you!

IMG_0618

Ingredients:

  • Chai spice mix:
    • 1 1/2 teaspoons ground cardamom
    • 1 1/2 teaspoons ground cinnamon
    • 1/2 teaspoon ground ginger
    • 1/4 teaspoon ground cloves
    • 1/4 teaspoon ground nutmeg
  • Cupcakes:
    • 1/2 cup butter, at room temperature
    • 1 cup sugar
    • 2 teaspoons vanilla extract
    • 2 eggs
    • 2 teaspoons chai spice mix
    • 1 1/4 cups flour, sifted
    • 1/2 cup buttermilk
    • 1/2 teaspoon baking soda
    • 1/2 teaspoon apple cider vinegar
  • Buttercream frosting:
    • 1 cup butter, at room temperature
    • 1 teaspoon vanilla extract
    • 2 cups powdered sugar
    • the remainder of the chai spice mix
    • 1 tablespoon cold milk, or more if needed to thin out the buttercream

Cupcake directions:

  • Preheat oven to 325 degrees. Line cupcake pan with liners.
  • In a small bowl, combine the chai spice mix.
  • In an electric mixer, cream the sugar and butter. Add the vanilla extract, then beat in the eggs, one at the time, until combined.
  • Add 2 teaspoons of the chai spice mix, then fold in the flour and buttermilk alternately until combined.
  • In a small bowl, combine the baking soda and vinegar, then add that to the batter mixture. Mix until combined.
  • Spoon batter into cupcake pan, about 3/4 full, and bake for about 18-20 minutes (or until toothpick comes out clean).
  • Remove from cupcake pan and cool on wired cooling rack.

Buttercream directions:

  • In an electric mixer, beat the butter until creamy. Add the vanilla extract and remaining chai spice mix. Mix well.
  • Beat in the powdered sugar, about 1/2 cup at a time, until it’s all thoroughly combined.
  • If the frosting is too thick, add 1-2 tablespoons of milk at a time, until desired consistency is reached.
  • Pipe buttercream frosting onto cooled cupcakes.

IMG_0612

Enjoy!

Recipe adapted from The Culinary Enthusiast

Sharing is caring! Email this to someonePrint this pagePin on PinterestShare on YummlyShare on FacebookShare on Google+Tweet about this on Twitter